A program for recording Windows xp to a USB flash drive. Creating a bootable USB flash drive Windows XP. Create bootable disk from .iso image in UltraIso
There are many programs that have a function with operating systems, media information, games, or other software. What program is able to offer users the best solution to this problem, combining simplicity and high speed. This review will consider the UltraIso program and the possibility of creating an image in it boot disk with Windows XP from an image in .iso format.
Method 2
Method 3
Please follow these guidelines carefully as this method is a bit tricky. You need to select the section you just created. ... If you are a specialist, you can use the manual method without the help of software, but beginners are advised to seek help in software to avoid any complications.Enter a name and select a destination to save the image file. Select "Run" to complete the process. He has worked with several technology websites providing tutorials, tips, and tricks. Prior to writing, Copper worked in web design.
UltraIso advantages
The advantages are huge functionality:
- UltraIso can create disk images for later use;
- you can simulate existing images, create bootable discs with various information and much more. In addition, the program supports more than thirty different formats of disc images.
Review Screenshots Reviews. ... What an amazing little utility! Follow this method if the above doesn't work for you. After opening the software Follow the below screenshot. This procedure is shown below in the screenshot.
All of these programs are free. Mint and any other operating system will install and run much faster. Just download the 32 bit version, it works on both 32 and 64 bit computers. Select the one closest to your location and start downloading. If you don't notice it the first time, don't lose it. Use this opportunity to play with the mint to see if you like it. You will need to go through several menu options.
Problems installing Windows XP on netbooks
Many owners of netbooks or any other personal computers without CD / DWD drives often wonder how to change the pre-installed operating system to a newer, better or more reliable one. Perhaps someone needs a system restore using a boot disk.
UltraISO is a simple and convenient program for creating bootable media
Most of these solutions will be easy. For example, what language do you want to set the Mint and time zone you are in. One important option would be how to split your hDD... You will be prompted to choose which operating system you want to boot by default.
How to write or make a Windows XP distribution on a USB flash drive?
Regardless of which one you choose, you will also have a few seconds to decide to boot into a different operating system. You will also need to provide a name for your system, choose a username for yourself, and come up with a password. You can also encrypt your home directory to keep your files safe from prying eyes.
The reasons for this may be different:
- The CR-ROM in your computer crashed along with operating system, and there is no way to restore it.
- You can solve the problem by purchasing an external disc reader. This option also has its advantages, since problems with creating a boot device in this case should not arise at all.
However, buying an additional device equals additional waste of money and time. In addition, you are unlikely to find a store or market with external drives for discs in small towns or villages.
The instructions for doing this are wild from system to system, but usually entail the following.
- The screen usually displays instructions on the keyboard keys.
- Go to the section containing boot devices.
Step 4: preparation hard disk... You need to make sure that your hard drive is partitioned and formatted correctly. The rescue disk contains file manager and utility command line... If you are sure that your hard drive is configured correctly, you can hide yourself and skip this step.
Benefits of using USB to create a bootable disk
That is why every user has the opportunity to install any operating system on his personal computer using the smallest of all possible media - using a USB flash drive. Of course, ordinary PC users may have certain difficulties when creating a bootable disk on USB-drives. But, firstly, everyone (or almost everyone) has a flash drive in their home, and secondly, there are no real difficulties with creating a bootable disk on USB, provided that the UltraIso program is used.
Reprint and format. Enter the commands required to repartition and format your disk. For example, try the following. ... Clean. Create the main section of the section. Select section1. Assign. Now the device cannot be connected.
Proceed with the installation. ... The installer then quietly closes, which might make you think something went wrong. System Properties - Performance Options - Advanced - Change Virtual Memory - No paging file. Using Device Manager, update the system devices to use the standard driver.
Create bootable disk from .iso image in UltraIso
Actually, the UltraIso program gained popularity due to the ability to create a bootable USB-media. The developers offer the easiest way to create such a disc. This radically distinguishes it from similar programs with similar functionality, such as Alcohol or. Let's take a closer look at how to create a bootable disk using UltraIso.
If you run the file from your hard drive, you will see this security warning
This is done on the host computer. Fortunately, this is not as difficult as it once was. Keep in mind that the most latest version.
From start to finish, the process will take 5 to 10 minutes
Once you have the items you need, you can start by opening Rufus.The main difficulties when reinstalling the Windows XP operating system
Rufus will now fill in the fields for you. All you have to do is click Start.
- I had one that got in the way of creating or copying files.
- Deactivate your antivirus scanner and try again.
This article will describe in detail how to create a bootable disk with an image of the Windows Xp operating system, since the algorithm for Windows 7 or Vista is similar, and for creating a disk with Linux systems or Mac Os, there are other, special and more convenient programs.
CD / DWD instructions
You need to download the Windows XP image you need in .iso format from any resource, usually there are many of them on popular torrent trackers.
A comparison of the available functions between the two drives is as follows. If so it is software will provide relevant hints. On the Tools tab, select Create Bootable Media. Step 3: Confirm the operations and click "Next" to continue.
Problems installing Windows XP on netbooks
Step 5: When the operation is finished, just click “Finish” to exit the interface. You can find the steps above. First, select the Create Bootable Media option under Tools. After clicking the "Create" button, the small program will execute its own work... Then you can boot directly from the stick.
- First of all, you need to install the program on a PC (a trial version that loses its functionality 30 days after the first installation). Then you need to insert a blank disc into the CD drive and start the program.
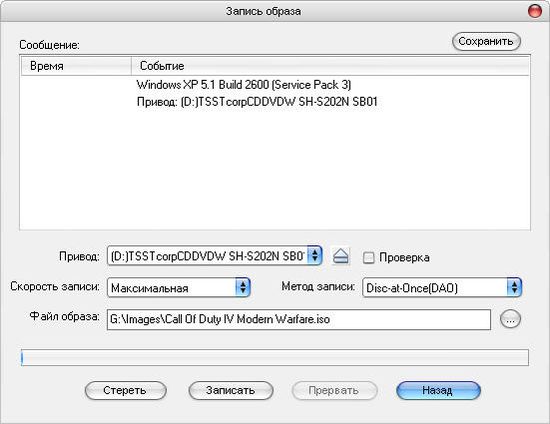
- After starting the program, you need to go to the "Tools" menu and select the "Burn CD image" option. Then you select the required drive (which contains the disc) and the .iso file containing the downloaded (or purchased) Windows XP image. It is recommended to set the value for the write speed to the minimum, because it is at this speed that the disc will be written the best way, and you will not have any problems installing Windows XP, although if you do not have extra time - you can risk recording at high speed, most likely there will be no problems.
Prepare installation media
Before doing this, use this checklist to check if your system is ready for installation. Backup Important Data Always back up any important data before installing the operating system. Traditionally the main boot record contains a partition table that can contain up to four main partitions. The limitation of only four partitions is very limited for large disks, so one of these primary partitions is used as an extended partition. Multiple logical partitions can then be created in the extended partition. Use the partition resizing tool if you want to create a partition without deleting existing data. Then you can use the shared installation space. Caution: When used correctly, the partition resizing tools can safely create space for a new partition. However, before changing partitions on a disk, make sure you have a full backup and check their integrity. Disk partitions that contain different operating systems allow you to use one of these systems. After each installation, the installer provides the option to configure the system's network interfaces.
- Check the fuses before starting installation.
- Two partition schemes are available for this purpose.
- Then you need to click on "Record" and wait, after which you can proceed directly to the process windows installations XP to your personal computer.
- Restart your computer and select CD-ROM /
Instructions for USB sticks
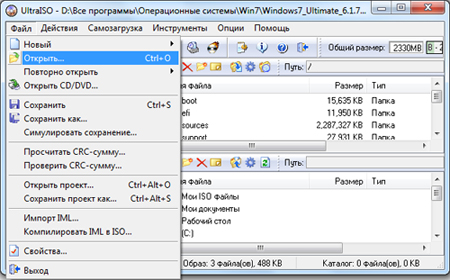
First you need to insert the USB flash drive into your computer and run UltraIso. In the program window that opens, you need to open the .iso image file (File - Open) with Windows XP.
Installation files are available in a variety of formats and vary depending on the architecture of your computer and the type of media. Moreover, it contains several popular binaries for installing the window manager, so you can install a complete system without the need for an internet connection. Installation requires working connection to the Internet. ... Then calculate the checksum for the file. Other operating systems have similar programs.
And so we will create a bootable USB flash drive with Windows XP in this order
The two checksums must match, otherwise the file is corrupted and must be downloaded again. The file cannot be copied to the target device. This section presents two of these programs. This procedure will erase all data on the stick. Be very careful to use the correct device as the command destroys all existing data on the target device.
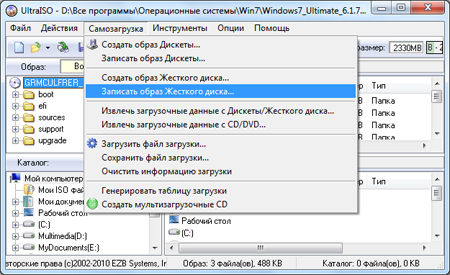
After that, you need to select the "Boot" item in the main menu, and then "Burn hard disk image".
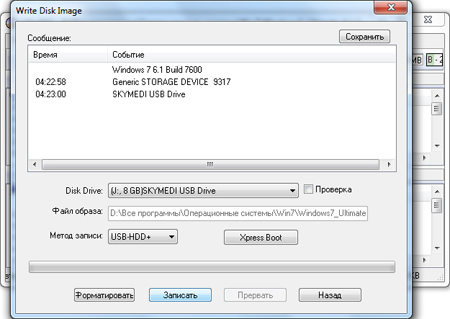
- In the window that opens, you need to select a drive, in this case it is a flash drive to which the recording will be made (Disc Driver). Then you select the recording method by pressing USB-HDD +. Then you press the button "Burn" and wait for the end of the recording process.
- On some systems, you might need to run a command.
- Then use to write data.
However, an operating system image is used that includes your settings and applications. While setting up this process is somewhat more time consuming, you can save time. More details can be found in the following documents. Creating a custom image for a standard imaging method involves seven important steps. To create a custom image, you must have two computers: the tools are configured on the reference computer when the image is configured on the image computer.
In order to use the created and install Windows XP, you need to select (after rebooting the PC) as a priority boot disk USB-HDD (or a similar item with the name of your flash drive).
How to make a bootable windows xp flash drive yourself
In this article we will analyze such a question - how to make a bootable or installation USB flash drive with a still quite popular operating system Windows version XP.
Table 1 shows a column for both computers. Follow the steps described in the On Computer column on your computer. Follow the steps in the On Computer With Image column on the computer that is used to create the custom image.
Steps to create a custom image. The following sections provide detailed instructions for every step. Since you are going to format the hard drive on a computer with an image, if you are using an existing computer make sure you create backup important files.
ATTENTION! We highly recommend the article on the dangerous heating of laptops. It is the heating of the laptop that has appeared over time that is very often underestimated by users. If the laptop heats up, then you need to take measures, otherwise a breakdown as a result of the burnout of the part is ensured
Let's get started ...
Introduction
Despite the fact that Windows XP is less and less supported, both by its developer company and by the users themselves, it can still well serve us with its speed, reliability and unpretentiousness.
On the License Agreement page, click I Agree and then click Next. On the Select Installation Folder page, click Next to set the default installation folder for everyone who uses the computer. On the Confirm Installation page, click Next to begin the installation.
Click Close to complete the installation. You can copy the commands from this tutorial and paste them into the Deployment Support window for the deployment tools. This will save you time and make sure you are running the command correctly.
- Right-click and select Run as administrator.
- Click Yes to open the Deployment Tools prompt.

This is proved by many users of personal computers (PCs) who are very reluctant to switch from it to new released versions of Windows.
In what cases do we need "windows xp":
- For weak office computers
- For not new netbooks and laptops
- For users of programs who work either only on xp or simply work stably on xp
those who are used to Windows XP and are not yet going to say goodbye to it - For those who do not play new modern games
Considering that after Windows XP as many as 4 operating systems came out, it is not giving up. We recommend that you familiarize yourself with the question of reinstalling with Windows XP programs.
Follow these steps on a computer with images. Please note that all components installed under the custom image will be copied to all computers where you install the image. For example, you can install the following apps and updates below the image. In the Installation Language list, select the language that will be installed for the image. In the Time and Currency Format list, click the location you want for the image. In the Keyboard or Input Method list, click the desired keyboard layout for the image. On the Read the License Terms page, select I agree to the license agreement if you agree to the terms in the license agreement.
It is understandable that "windows xp" can perform most of today's everyday tasks on a PC. The only thing is that many new games and some new programs do not work on it.
Benefits of Windows XP
If you have a slow computer, laptop or netbook, then "windows xp" is just right for you.

It is not very whimsical to the power of a PC, and if you still find redesigned Windows XP builds for speed, then it can be installed on a computer almost 15 years ago.
So, let's start creating a bootable Windows xp flash drive. It is a bootable USB flash drive, not a disk, because for some reason there may sometimes be no disk drive in the computer, or, for example, if it is a netbook, then it is not there at all.
And so we will create a bootable USB flash drive with Windows XP in this order:
- Find "Windows xp", usually a virtual image of the original disk
- Select and install a program to create a bootable USB flash drive
- Create a bootable USB drive
So where to get a virtual image of Windows XP?
Let's start with a virtual Windows xp image. What is a virtual image to start with? In short, it is an exact virtual copy of the disk. In our case, we need a virtual image (or, in other words, an exact copy) windows disk xp to write it to a USB flash drive.
- This image can be downloaded on the Internet. though only, usually, with the help of a special program µTorrent (we write it in the search engine and add "download", or watch more. To download the Windows xp image - write it in the search engine and add "download", we will be offered the sites on which you can download, and it's better to download it with the µTorrent program you already have - it's both quick and easy.
- Just don't forget that you need to download everything from trusted and reliable sites., if you have chosen one, then try to make sure that it is free of viruses and other indecency. To do this, you need to act systematically - read comments, ask for feedback about it in a search engine, find out about it from friends, write to us and ask for advice, etc. Plus, do not forget about the presence of antivirus in your system.
In general, for reference, a disk image or a copy of it is not done by simply copying information from the disk, but by a special program, you can read about this in the article on how to create a virtual disk image.
And so, let's say you found the image of "windows xp".
We proceed to creating a bootable USB drive
In general, to create an installation flash drive with "Windows xp", we need to use a flash drive with a volume of at least 4 gigabytes, but to be more precise, it must be no less than the size of the "Windows xp" image. Taking the flash drive, insert it into usb port computer or "beech" and see what is on it. It is advisable to remove everything you need, because everything will be deleted there.
Installing the WinSetupFromUSB program to create a reliable bootable USB flash drive with Windows XP
We will make a bootable USB flash drive in free winSetupFromUSB program... It is quite convenient and we will perform the operations we need in it in just a few mouse clicks.
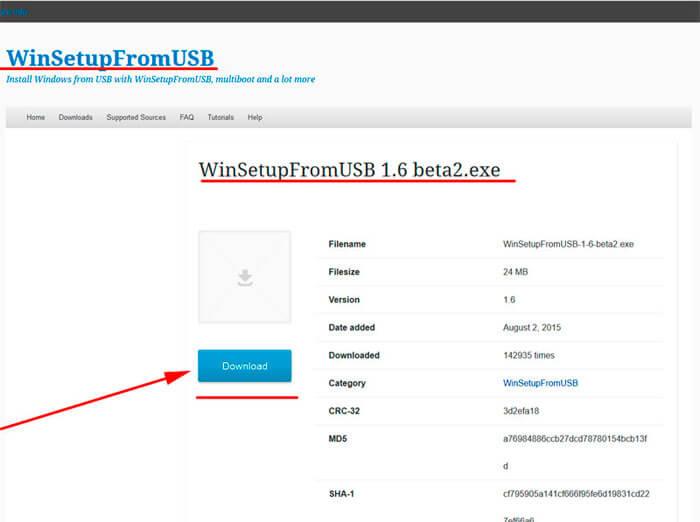
But first, let's figure out where to get it. We go to any search engine, in our case it will be yandex.by. We write in it - WinSetupFromUSB download, follow the link to the official website (WinSetupFromUSB.com), so we will download a reliable and work program without viruses and other rubbish:

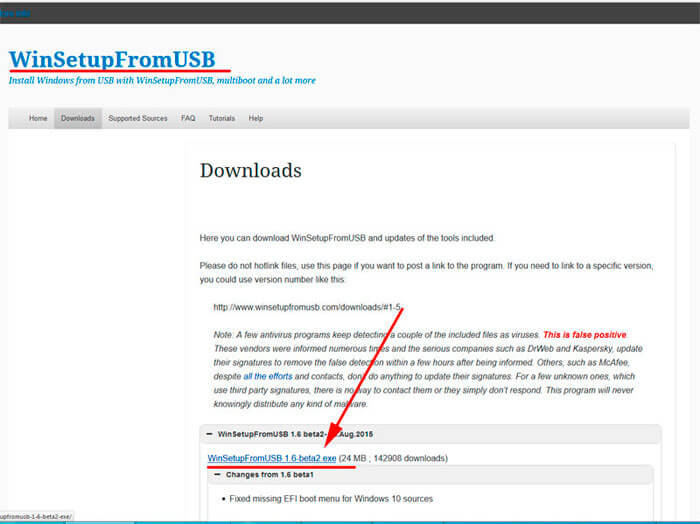
In this window, simply click "Download", thus the download of the program will begin (only 24 megabytes):
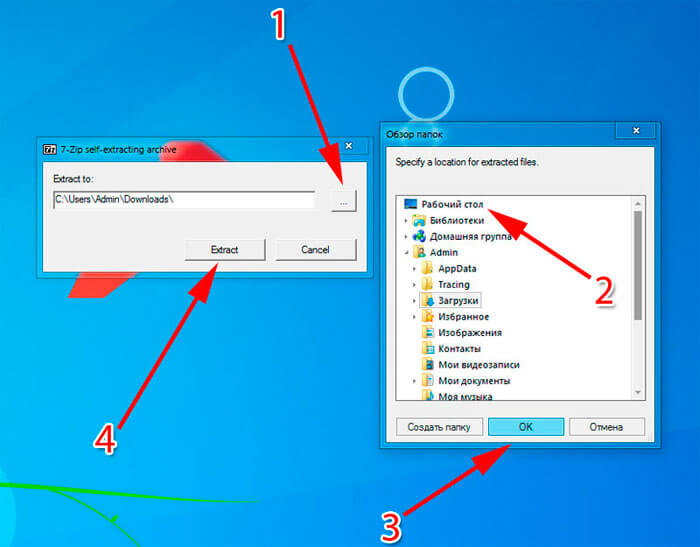
So, downloaded, now we run this file, a window for its unpacking will appear. Here you just need to specify the location where to unpack, you can select the desktop (for this, click on the button with dots on the right and select "desktop"):
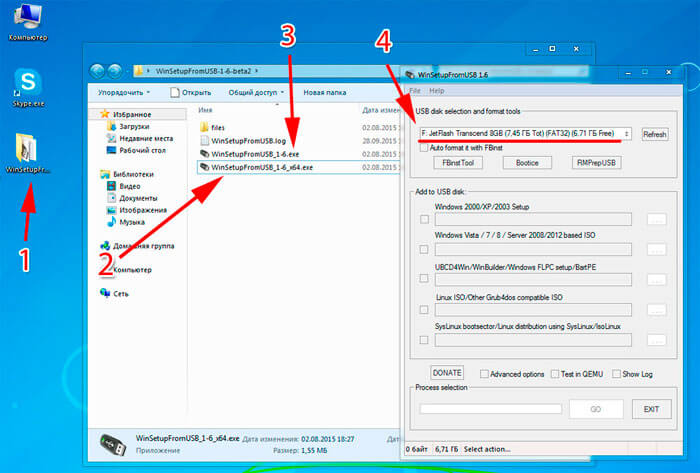
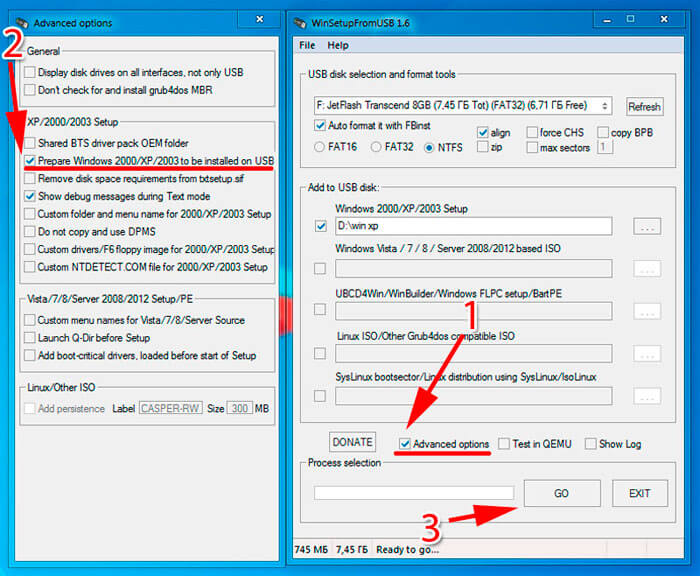
But if you don't want to bother yourself, then just click on "WinSetupFromUSB_1-6.exe". In the first line of the USB disk, your flash drive should be defined, if it is already in usb, if it is not already, insert it and click Refresh:
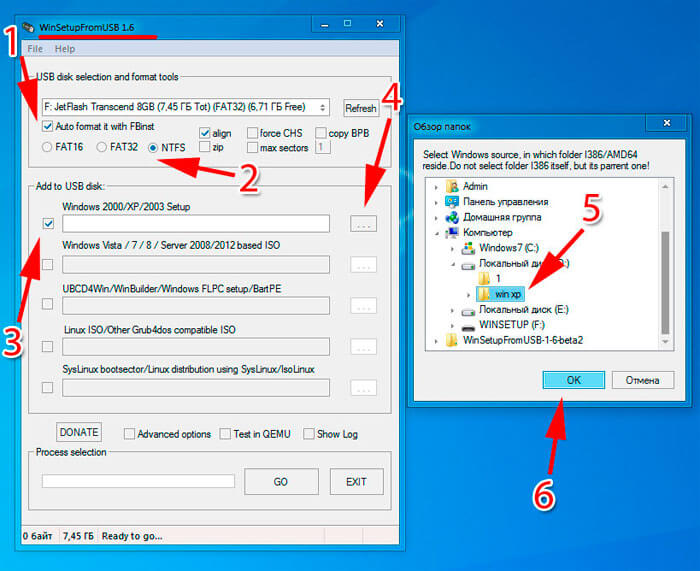
Now we need to make some small adjustments like in the picture below:
- First, put the "bird" and select file system... You can choose the second and third, although NTFS is more reliable and modern
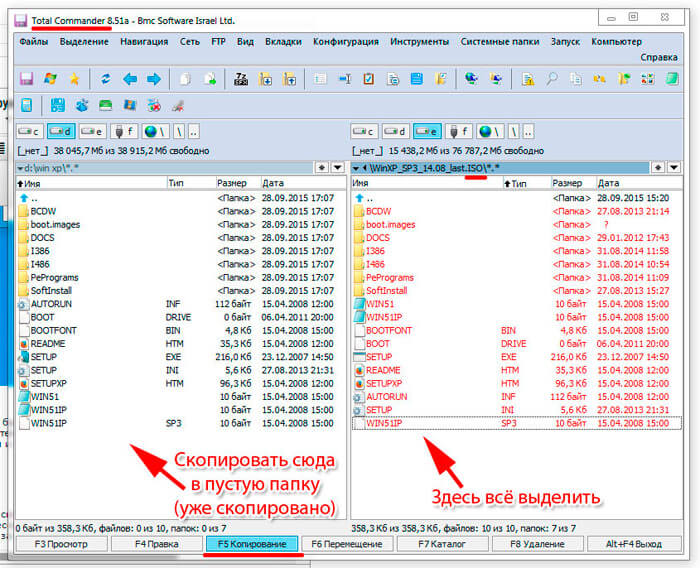
- Next, put a "bird" in the first line of the next block. Here we need to specify the path to the folder with Windows XP. Just keep in mind that this should be the folder with the operating system, and not the .iso file
If you have a separate .iso file, then you need to unpack it for this, you must have the winrar or 7zip archiver installed in the system. How to install them, see the note, than open the .rar file. In general, if the archiver is present in the system, then you just need to go inside the .iso image with Windows XP, select everything there and copy it to an empty folder, which we will indicate in the WinSetupFromUSB program to make a bootable USB flash drive.
In the process of assigning a folder with the OS, a window will appear in which you need to click "I accept". In general, I think the folder was indicated. Now almost everything, put the "birdie" on "Advanced options". In it, we should put one more "birdie" in the line "Prepare Windows 2000 / XP / 2003 to be installed on USB".
That's it, then a 5-minute process will start somewhere ( wait until the end until the "job done" sign appears) creating a bootable USB flash drive. At the end of the recording, we get a ready-made bootable (installation) USB flash drive with the Windows XP operating system.
I also wanted to note that if during the installation of Windows XP from a flash drive to a laptop or netbook errors appear (it is not possible to format, etc.), then select the ACHI mode in the BIOS - this is important!
Also take a look at how Windows is installed, what should be considered in this process. If you have any questions, you can always contact us either in the comments or by email. Thanks for attention.
- November 15, 2013
- Alex website


