Bootable flash drive Kali Linux. Installing a complete system on a USB flash drive using Kali Linux as an example. Installation requirements for Kali Linux.
Kali Linux - This is another Linux-based operating system. Its distinguishing feature is that this OS was designed to test the security of systems, but most users use it for hacking, as it has all the necessary utilities and tools for this. Since unauthorized hacking is illegal and unethical, use Kali Linux solely for security audits. Kali Linux can be installed on a USB drive. Besides the fact that it is just convenient, there are a number of advantages, more about which below. In this article, we will detail how to install Kali Linux on a USB flash drive. Let's get started. Go!
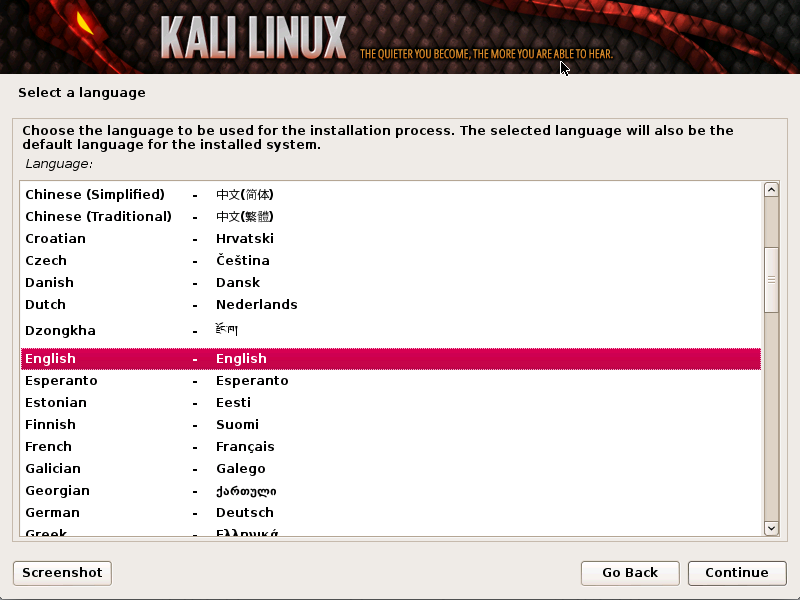
The installation procedure is quite similar to both machines, but we will highlight the differences or specific errors for both platforms. The next step in the installation procedure is location. Select your location and press the enter key. Then we need to select the key map that we want to use for the keyboard.
Network auto-configuration error
After clicking enter the installation process. Wait for it to finish, it may take some time. The following error will appear on the screen. And after trying to install it again. From these options, you should choose to run a command prompt. Another error that may appear during the installation process is an error related to your network settings. You can also skip the error and configure network settings later after installation is complete.
So, what are the benefits you get by installing Cali Linux on a USB drive:
- You can use all the computer hardware to the full.
- Get better performance when compared to a virtual machine.
- Any changes do not affect the computer.
- You have the opportunity to download Kali Linux anywhere, on any computer.
The process of installing the OS on a USB drive is not much different from the usual installation on the hard disk of any Linux-like operating system. The whole difference is that you can’t create multiple partitions on a USB flash drive.
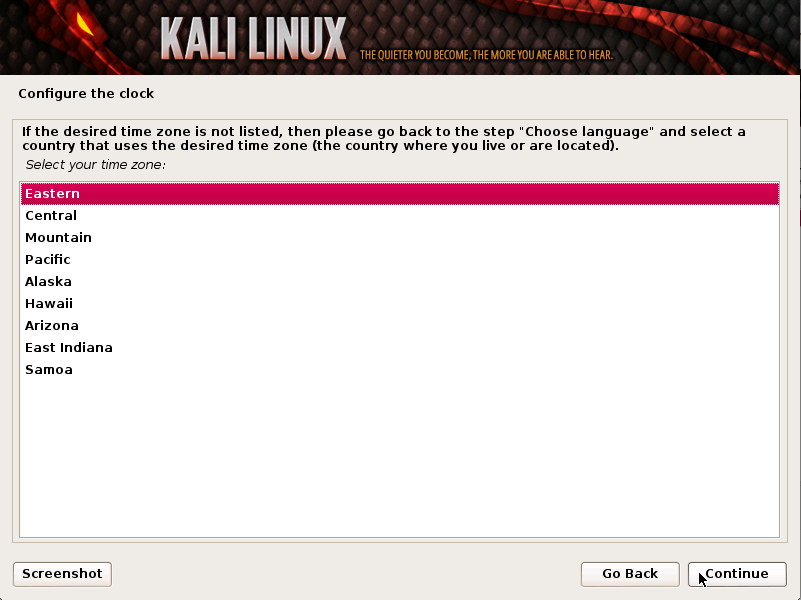
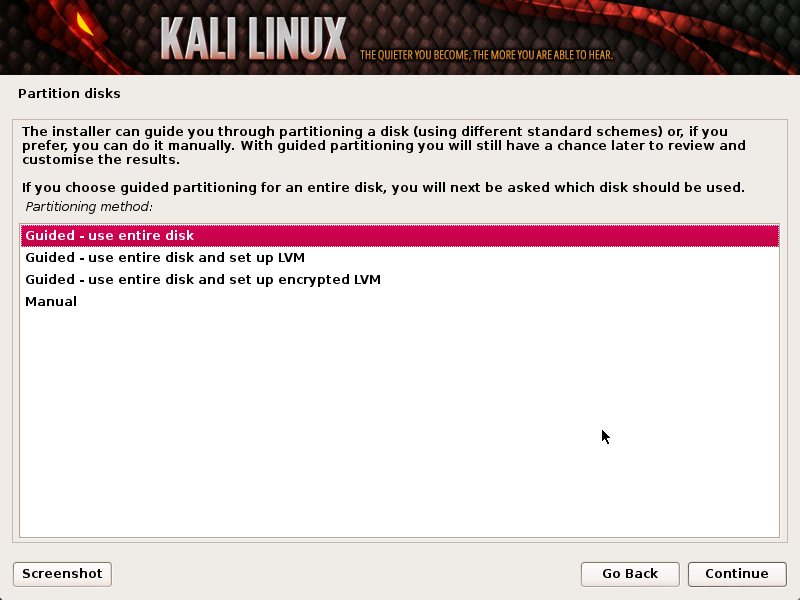
We will save it by default and press “Enter” to continue. Select a password and continue the installation procedure. Now we need to select our time zone for setting the clock. We will use the managed disk partitioning method. Choosing the wrong drive can result in data loss that can be difficult to recover. All data on the selected drive will be deleted! In the next menu, we can choose how to split the selected disk. We will choose for the standard and recommended parameter: All files in one section.
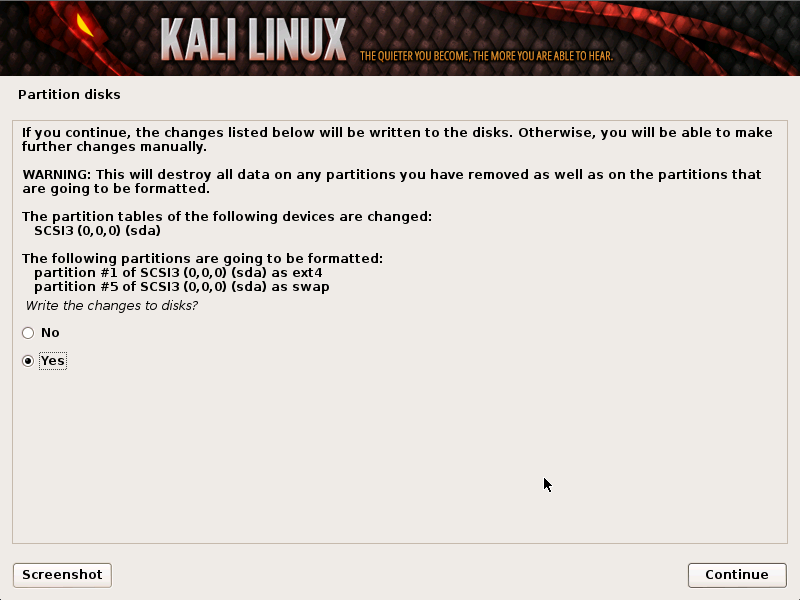
In the next menu we show an overview of the selected partitioning options. Read them carefully and press “Enter” to start the staking process. Confirm your selection by selecting “Yes” and press “Enter”. The disk will be formatted and partitioned, and the installation procedure will start automatically.
Now we proceed directly to the analysis of the entire procedure. First you need to create a new virtual machine. In the "Type" section, select "Linux", and you can specify any version, it doesn’t matter, the main thing is to match the bit depth.
In the next step, check the box “Do not connect a virtual hard disk” and click on the “Create” button, and then “Continue”. After that, start the newly created virtual machine. A window will open where you will be asked to select boot disk. Specify the path to the image with Kali Linux.
USB installation
After that, you will be presented with the following menu. Select “Yes” and press “Enter” to continue. Otherwise, you activate the installation process again. We hope that this will be useful for you and that you were able to successfully complete the installation process without any errors. You can do this by opening a terminal and enter the following commands.
Creating a Live USB Flash Drive
Select “Yes” and wait for the update process to complete. Depending on the downloaded images, available updates, and connection speed, this process may be time consuming. But there are some disadvantages. Dual boot is the easiest way after the initial setup, since it does not require bootable media. This method has the advantage that it is completely separate from your system disk and, therefore, is 100% safe, for example, for virtualization. But since you will not run the machine inside the machine, you will not have so much performance lag.
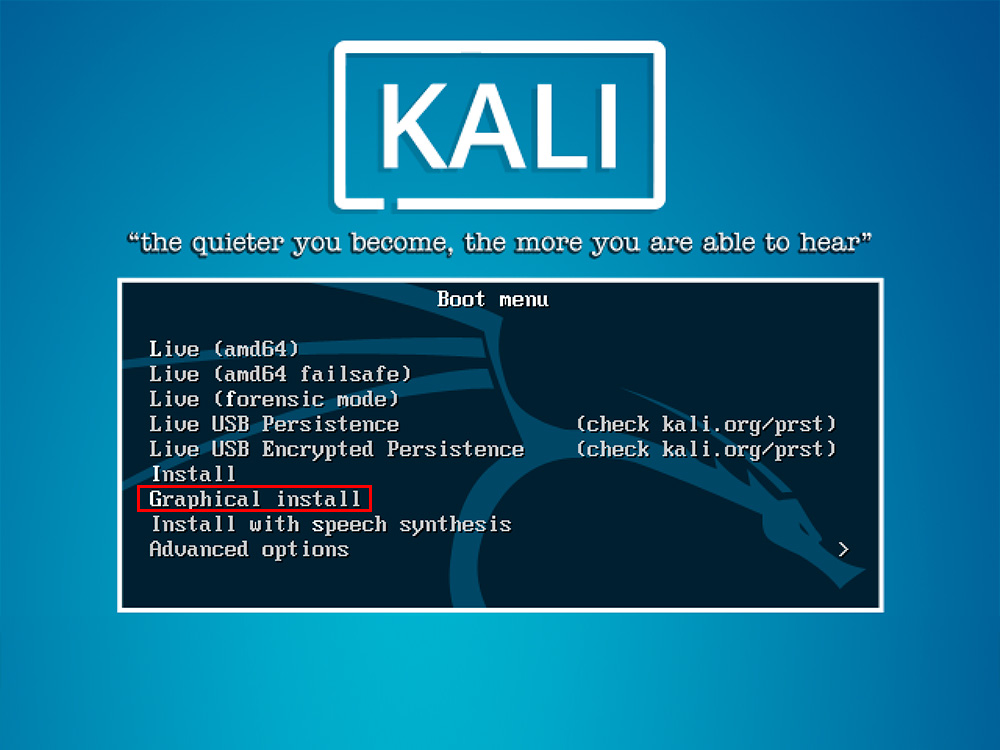
When the boot menu appears on the screen, insert the USB flash drive into the PC. If the flash drive is not detected, reconnect it through another USB port. In the boot menu, select “Graphical install”. Then everything happens quite simply and clearly. First, specify the language, and then select the disk layout method. Since you have a flash drive, check the box "Auto - use the entire disk." As the layout scheme, select “All files in one partition (recommended for beginners)”, and then select “End layout and write changes to disk”. Confirm your selection and click on the “Continue” button. It remains to wait until Kali Linux writes to a USB drive. At the end, confirm the download of the necessary items and complete the installation procedure. After rebooting the computer, your flash drive will be fully ready for use.
In fact, you should not have them. And there will be absolutely no terminal commands. First you need the following. This is a kind of long tutorial, but there are only a few useful elements. Most of this is done on autopilot, and some of these elements you already know how to do. For your convenience, here is a diagram of what we will cover.
The only fussy thing is that it is not always able to format your media for you. Make sure that the correct drive is selected and confirm it. Finally, at the bottom below there is a slider that allows you to allocate space for permanent storage. That is, any programs you have installed, documents you created or settings that you configured will be canceled every time you reboot.
To start Kali Linux from a USB flash drive, you must first go into the BIOS and configure the boot from a USB drive. Once in the BIOS, go to the “Boot” tab and set the highest boot priority for your flash drive. If it does not appear in the list, find the item "Secure Boot" and set the value to "Disabled". When “OS Mode Selection” appears, enter “CSM and UEFI OS” there. Set Fast BIOS Mode to Disabled. Save the settings and reboot. Now open the BIOS again and set the priority for your flash drive, now it will be displayed for sure. Press F10 to save the settings. Done. You can boot from a USB drive without any problems.
Note. If you chose a constant file size, then there will be a place in the installation when it appears in a hang. This may take 10 minutes, so be patient. The installer will inform you when the installation is complete. Just in case, if you decide not to do this, let me explain our purpose.
After executing this command, dd will write the image to the USB flash drive, simultaneously creating the partitions necessary for the bootloader to work
By default, your computer is probably trying to boot from the main internal hard drive. Start by pressing a key to log in as soon as the computer starts to boot. Click a few times if you need. If you don’t see anything like this, find a menu with the option similar to “Boot Device Priority”. There is usually a hotkey for this.
Now you know how to write Kali Linux to a USB flash drive. As you can see, this is quite simple. Write in the comments if you managed to cope with this task, share your own experience with other users and ask any questions you may have on the topic discussed.
You will need to do these steps only once. However, any files that you create or modify will not be saved the next time you download. Otherwise, your user will not be able to install a new software or access the internet.
How many USB flash drives with the installed operating system live
Select the user you just created. You will enter the new desktop. Now you can do your business, add programs, change settings and create documents, and they will all be there when you return. Sometimes things get fun with downloading or installing, which are inexplicable. You don't miss your basic system drivebut you also don’t need to virtualize anything, which means that this solution is 100% suitable for low-power machines.
Installing Kali Linux on your computer is a fairly straightforward process. First you need compatible equipment.
Requirements to kali installation Linux
Kali is supported on the following platforms: i386, amd64, and ARM (armel and armhf). As you can see below, the hardware requirements are minimal, although using the best equipment you will naturally get better performance. I386 images have a PAE kernel by default, so you can run them on systems that have more than 4 GB of RAM. Download Kali Linux or burn the ISO to DVD, or prepare a USB flash drive with Kali Linux live as the installation source.
Installation on * nix
In fact, this is what experienced technical support and data recovery specialists do. They simply download their toolkit and operating system to a flash drive and run it on the client’s machine, even if it does not boot due to a virus attack, hard disk failure, etc. Thanks to the appropriate tools, this is a simple and reliable process. This entry does not yet show a regular installation - this is the subject of the next article. There you will find a “Download” entry that will lead you to your destination.
Installation requirements
• At least 8 GB of disk space for installing Kali Linux.
• Minimum 512 MB of RAM, for the i386 and amd64 architectures.
• Support boot from CD-DVD / USB
Preparation for installation
1. Download Kali Linux [ Kali Linux Weekly Images]
2. Burn Kali linux ISO to DVD, or Kali Linux Live Image, on USB.
3. Make sure your computer is configured to boot from CD / USB.
Preparing to install Kali Linux
As a rule, it is still up to you to decide whether it should be a 32- or 64-bit system. Universities also often help manage load balancing as mirror servers. In cases where it is absent, it is quickly reinstalled on top of repository package sources.
When an empty line is inserted, a large button is activated in the lower left corner, with which you start the recording process. It is enough to specify the source file and the target device. The “Record” button starts the copying process. When you click “Open”, appears in the input field full name the way.
Kali Linux installation procedure
1. To start the installation, you must boot from the source selected for installation. You will immediately see the Kali boot screen. Select Graphical or Text-Mode installation mode. In this example, we selected the graphical installation mode.
2. Select the desired language, and then the location. You will also be prompted to configure the keyboard with the appropriate layout.
The capabilities and limits of living systems
Unfortunately, we cannot tell you which button on your device launches this download option. In the best case, the corresponding key is displayed on the screen when the computer starts. You do not need access codes unless you intentionally or accidentally log out. File system is loaded into working memory, and changes that are possible in the session are lost during shutdown.
Adaptation and modernization of living systems
However, you should not underestimate the value of living systems. A live system is a reliable test for hardware. You have access to all storage media, you can copy user data or perform repairs. This allows you to install additional programs, configure the system separately, or store user files on a later system.
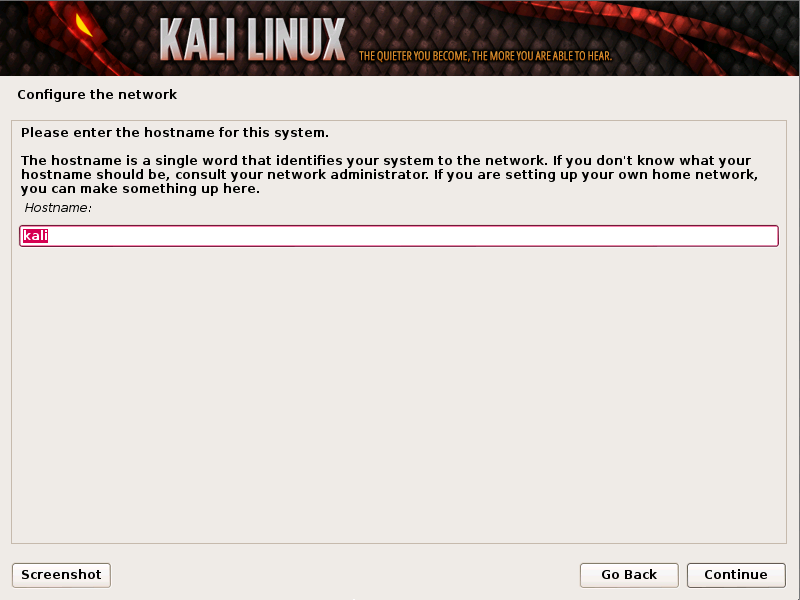
3. The installer will copy the image to hDDchecks the network interfaces and then prompts you to enter the host name for your system. In the example below, we entered “Kali” as the hostname (hostname).
Installation requirements
Then, the system settings and after-installed programs are saved. Extensive installations, long-term system updates, unlimited sets of user files require installation. Only here there is one or more users and appropriate access control. However, optimal system tuning is more complicated than using a convenient tool. There are some trivial but easily overlooked cases in the settings. Before any settings, configure the user to identify future users of the system, and then fill out the configuration in this account.
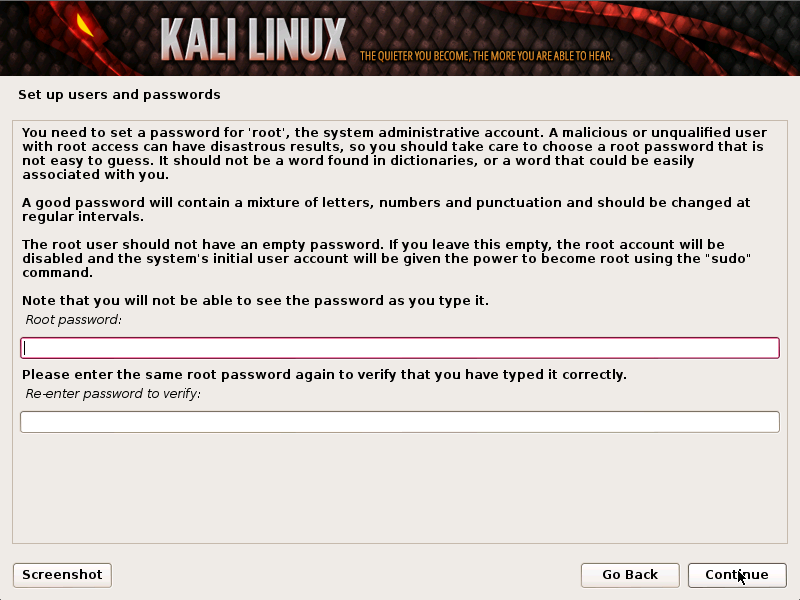
4. Enter a strong password for the root account.
6. Now the installation program will examine your disks and offer four options. In the example, we use the entire disk on our computer, without using the Logical Volume Manager (LVM). Experienced users can use the “Manual” mode for more detailed configuration.
Do not use any proprietary drivers and do not use the power saving options if the system should work reliably on equipment other than the base one. By at least, one reboot with your base system after all measures and trying out all the necessary software: nothing is more annoying than a living system, which you later receive by default with an error message or software that asks you if this is the default program use.
As the main preset, you first define a “memory directory" in the upper right corner. When the process is complete, the image will appear in the “Created Live Images” section. Alternatively, click on the image in the "Created Live Images" section. If the source and destination media are selected, the “Write to destination" button that you are launching is activated.
7. Next, you will have the last chance to view the disk configuration before the installation program makes irreversible changes. After clicking on the Continue button, the installer will begin to work, and you will get an almost completed installation process.
Prerequisites for parallel installation
However, when installing two parallel systems, some rules should be followed - especially on new equipment. The article shows how this happens and what you should consider. This is similar with other distributions, but the necessary steps may vary. Each operating system requires at least one partition.
This is to ensure that malicious software is not installed before it starts. operating system. These systems cannot be installed or started. This is different from each firmware, but it should be found in the manual for the main board. Then you must activate the “Compatibility Support Module” in the firmware setup. This option is usually found in the Download menu.
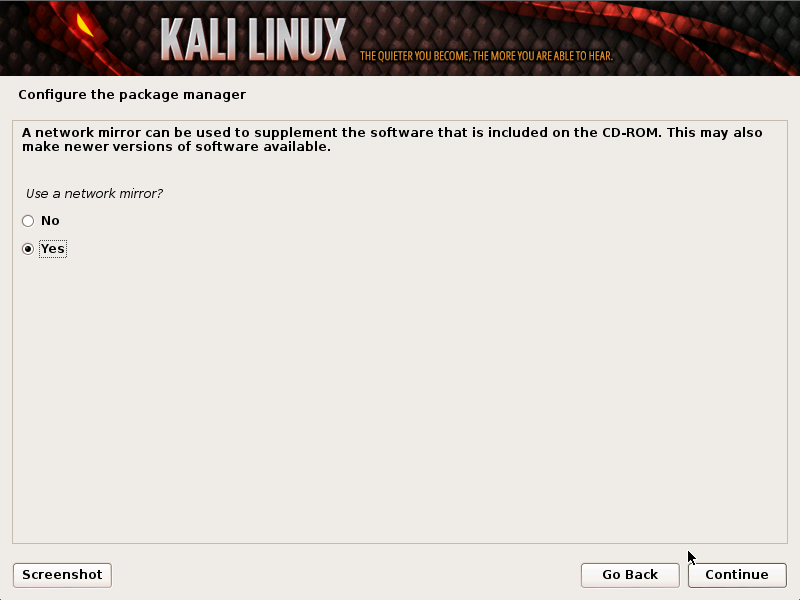
8. Configuring network mirrors. Kali uses a central repository to distribute applications. As necessary, you will need to enter any relevant proxy information.
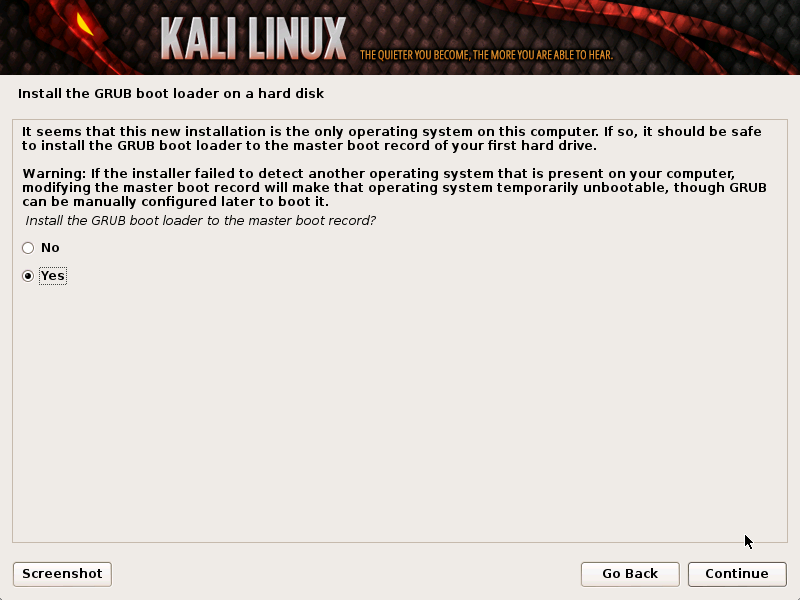
ATTENTION! If you select “NO” on this screen, you will NOT be able to install packages from Kali repositories.
Mint on your own hard drive
You will find more information at the end of the article. Right-click the partition that you want to use and select "Compress Volume" on the menu. Installation alternatives. This is the preferred method if you can fit into the second drive. If there is no partition, click “New Partition Table”.
We have all the necessary files in one. Unzip the archive to your home directory in the Downloads folder. Open a terminal window. Then run the following three lines of commands. Finally run command line. This defragments the stick files.
10. And finally, click the Continue button to reboot and enter the installed Kali.
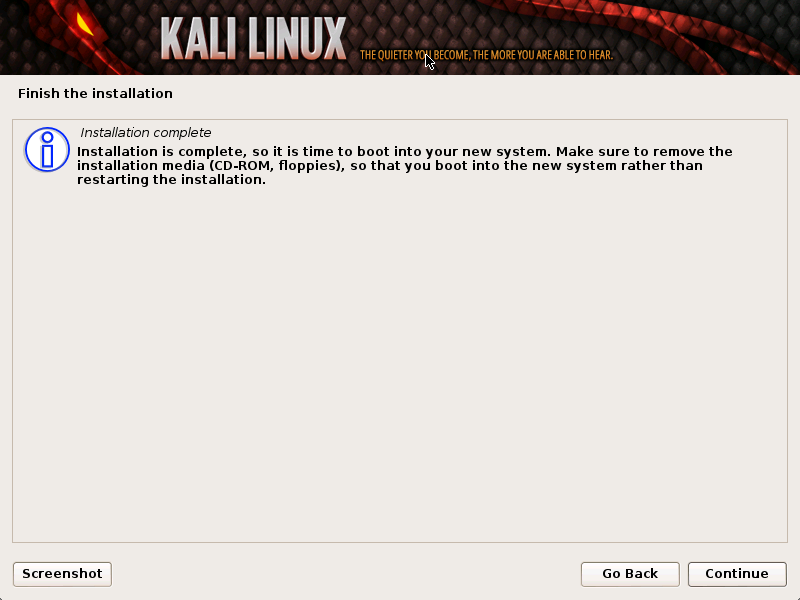
Now, after the installation of Kali Linux is completed, you can get to work and familiarize yourself. Kali Linux - designed primarily for conducting security tests.
Some users believe that after installing Kali Linux, the path to hacking and hacking can be started immediately. This category of people will be disappointed at the first acquaintance. Yes, there are pre-installed software applications, but initially you will have to read and master certain knowledge from half a year. For ordinary users, this is a new OS family and nothing more.