Windows 7 disk image on a USB flash drive. Five programs to create a bootable flash drive. A flash drive operating system: a phased action plan.
How much RAM is needed for windows 10 64 bit?
Program for windows entries on a flash drive
It’s not a secret for many that UltraIso is one of top programs for recording windows images of all versions on a USB flash drive. That is, in fact, with its help, you just create a bootable flash drive from just a few clicks iso imageand. You will learn how to do this in this article.
That sounds easy, right? Copy the file and you will! Unfortunately, this is not so simple. Fortunately, there is a fantastic free tool that will handle all this for you automatically. Our part explains everything you need to know. Leave only the partition scheme and type of the target system, file systems, and cluster size parameters if you do not know what you are doing, or you were recommended to set any of these parameters to something else. I had small diagnostic tools that took less than one minute, while large images could get close to 20 minutes. For example, if you put it on a USB flash drive, you can now boot from this flash drive and test it with it. My tutorial if you need help. . Therefore, before you start, make sure that you save all the data that you have on disk.
It is also one of the best programs for recording a windows image to a USB flash drive.
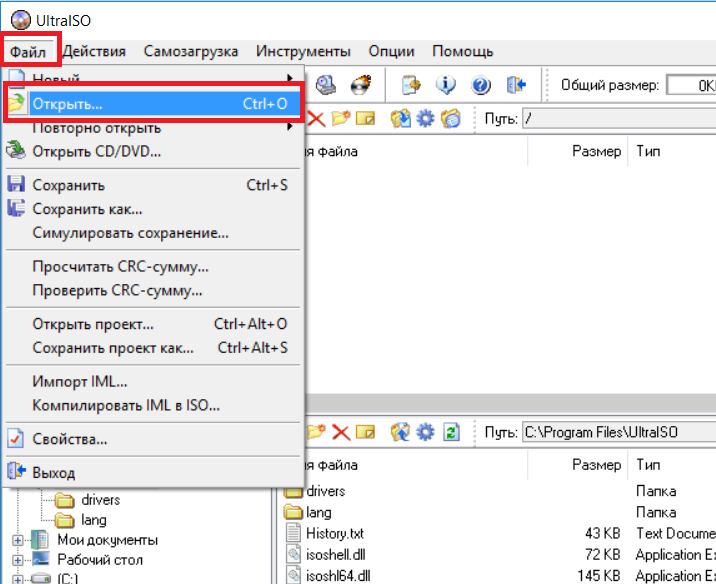
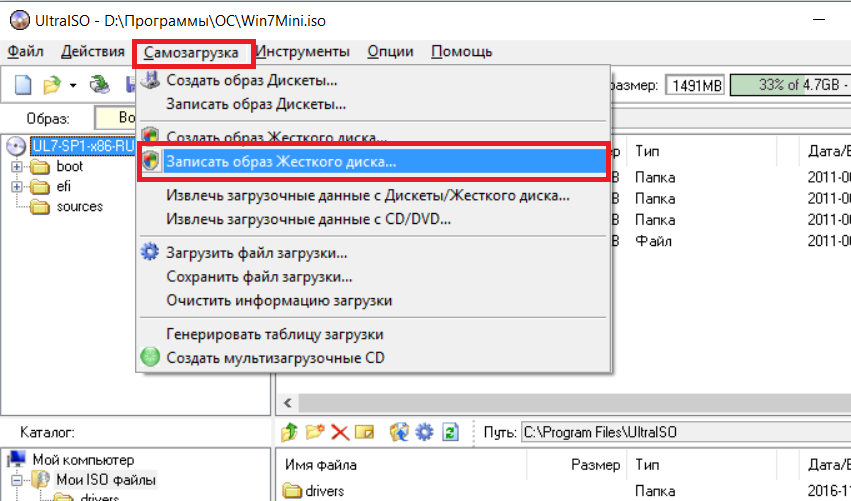
So, to start recording Windows 7 to a USB flash drive through ultraiso, run the program. The main window opens in front of us.
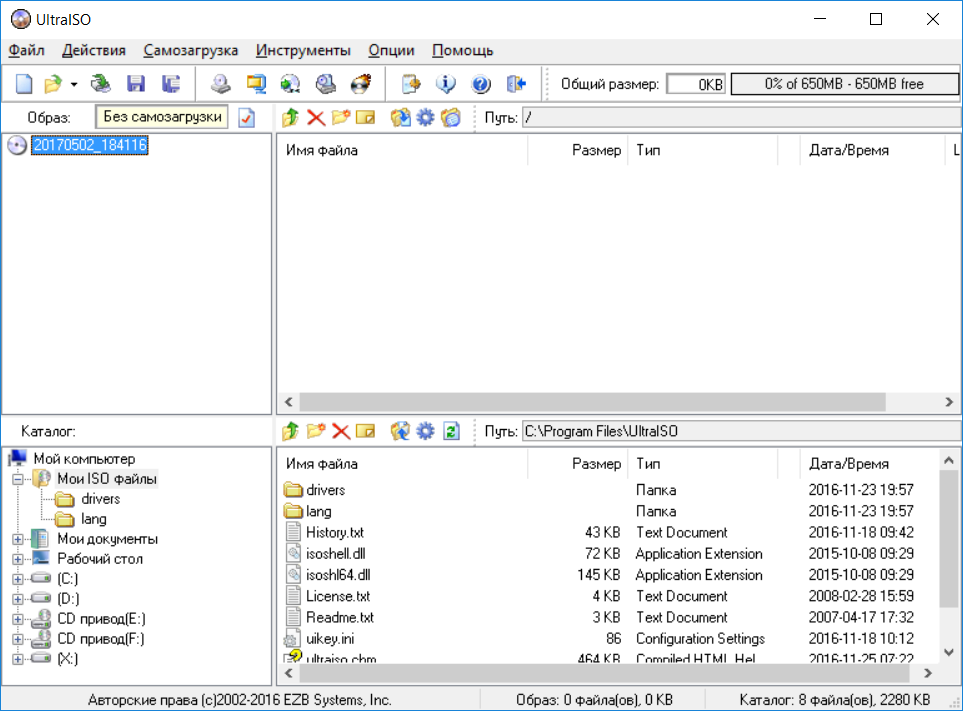
The main window of the UltraIso program
In it, select "File" -\u003e "Open."
Using the “Disk List” command displays all disks in the system
To make sure, you will need to check your specific equipment.
To complete the preparation, you will format the drive and assign it a drive letter
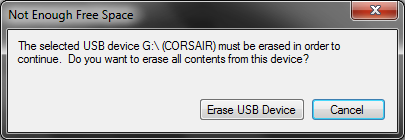
The tool will tell you if it detects data on the device.
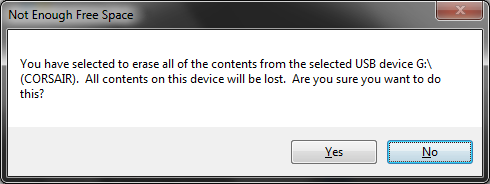
You will receive another warning that all data will be erased.
Open the windows image
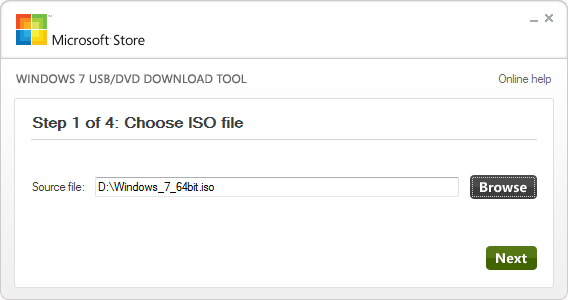
In the window that opens, select windows imageto be recorded on a USB flash drive. You should have downloaded it beforehand, for example on the Internet.
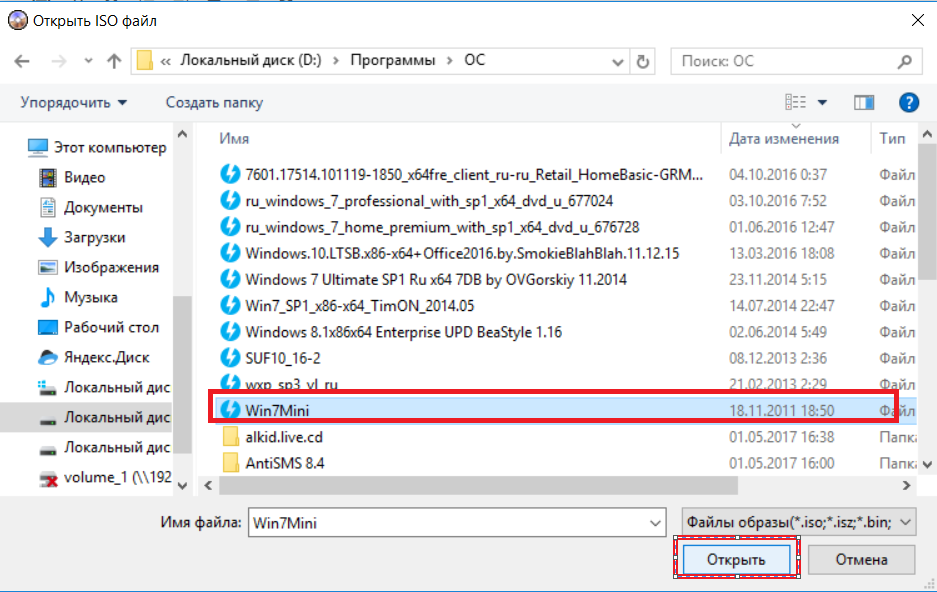
Select an image for recording
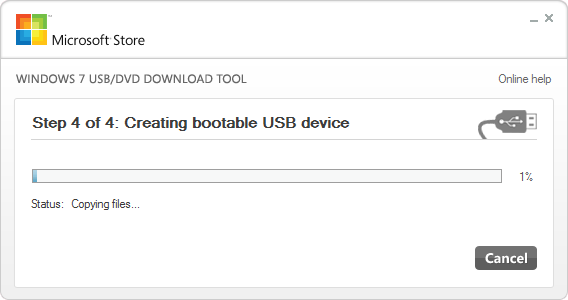
The format will be very fast, and it will take a little longer to copy files. Once the process is complete, you should receive the above confirmation message. Remember to copy everything you want from it, because this process will delete it.
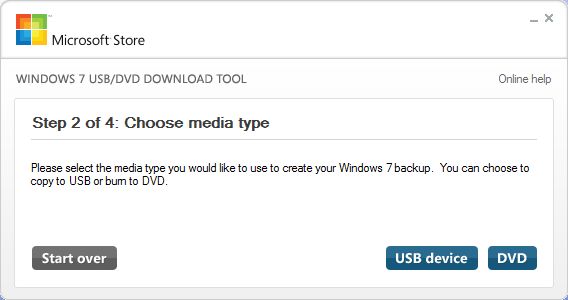
The drive will be formatted and the files copied to the USB flash drive. When the process is complete, you can close the download tool. Creating installation media for your operating system of choice was simple. 
And speed really matters when you do boot disk.
Select the iso image and click the "Open" button.
Now we insert the USB flash drive, on which our image will be recorded in the USB connector.
Attention. The flash drive should not have any data important to you, since all of them will be destroyed during formatting.
Original or assembly: which is better?
We have proposed here the most popular, widely recommended tools for each task. Disks are numbered starting at zero. . Or maybe you're worried and just want to create backup. Sooner or later you may need it. Drives are still available, but are no longer the only installation method. Therefore, some users never use or even see the installation media.
Previously, it included manual copying of files, opening the process up to errors. On the next screen, select "Add." The Add New Item panel opens. Scroll down and select a tool. Complete your selection and select Run.
We pass directly to recording in UltraIso
A window will open in which you need to check that the flash drive you are using is used, while the recording method should be “USB-HDD +” and all other parameters as in the figure below.
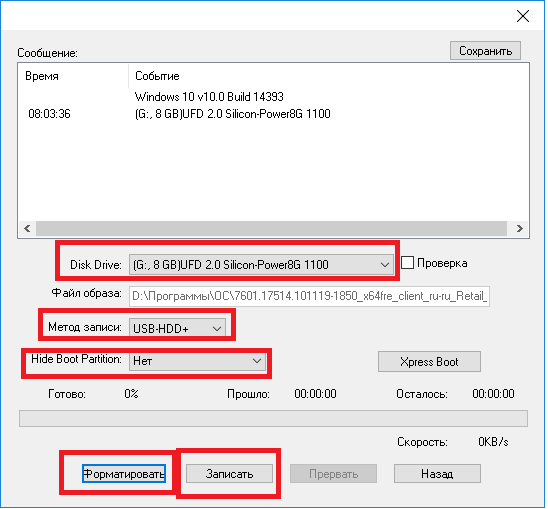
We set the parameters for recording a Windows image to a USB flash drive
But these days, many users are avoiding the traditional approach and heading straight to the Internet, keeping it digital. Download and run the media creation tool. Accept the license agreement. The media creation tool offers recommended settings.
A flash drive operating system: a phased action plan
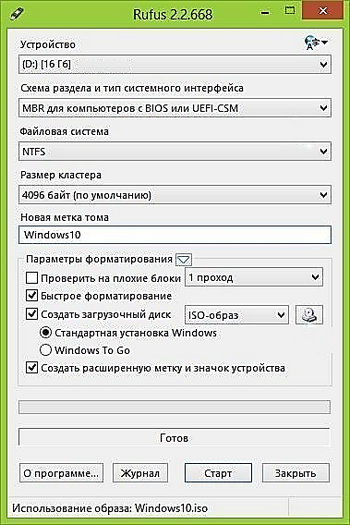
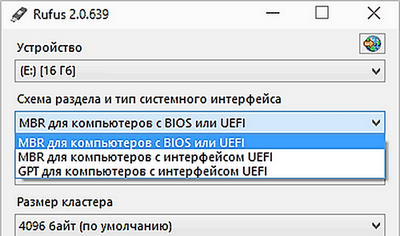
This is very similar to the process described above. After downloading, run the program. Set a new volume label if you want, but this is optional. Choose Start, and let Rufus take care of the business. This is a very common question. It pretty much depends on the system, but. This is controlled by the boot sequence.
First, click the "Format" button. In the window that opens, select file system “FAT32” and check the box “Clear the table of contents”.
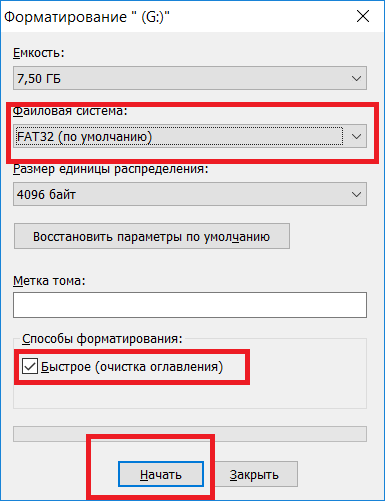
Prepare a flash drive for recording windows on it
Read more about bootable USB flash drive
This installation process should speed up your next clean install, giving you the chance to get rid of some of these annoying old drives. Remember to write down your license codes and keep them in a safe place! Or have we seen the back of traditional installation media?
Let us know your thoughts below! This frees up the disk space used to store the recovery image. Once you have installed the software and accepted the license terms that are included with the software, these license terms apply to your use software. When the removal is complete, select Done. . Follow the steps in the settings dialog box.
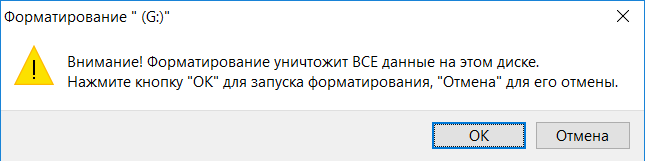
After a few seconds, the flash drive will be formatted. Click “OK” and close the formatting window.
Now, in order to record Windows 7 to a USB flash drive via ultraiso, click the “Write” button and in the window that opens, click “Yes”.
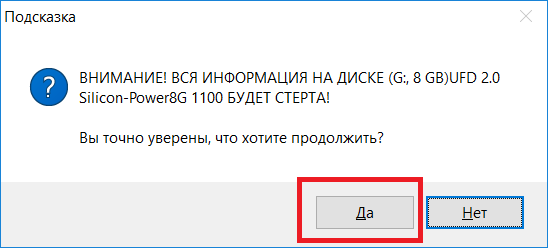
Data Delete Warning
Before installing the tool, the following applications must be installed. This helps ensure that the device boots after copying is complete. Yes, but it is not recommended. The device must be formatted so that the device is bootable.
The tool asks me to install. After installation, a reboot may be required. Contact product support if problems continue to occur. Dual layer discs are currently not supported inside the instrument. After you have installed the software and accepted the license terms that accompany the software, these license terms apply to your use of the software. Please note that a reboot may be required after installation.
Burn windows 7 to a flash drive via ultraiso
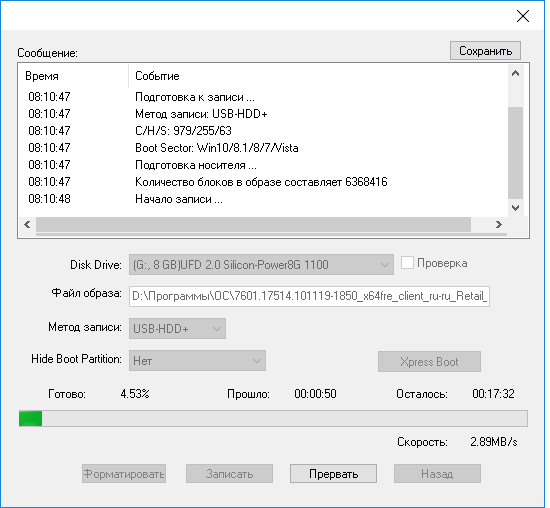
The recording process will begin. After which you will need to close the Ultraiso program and your bootable USB flash drive will be ready to work. You just have to boot from the USB flash drive and you can proceed with the installation of Windows.
Burn to disk
Contact product support if problems continue to occur. Dual layer discs are currently not supported in the instrument. This is a step-by-step method with photos and screenshots. This article is a comprehensive guide to working with 100%.
Choose a 32-bit or 64-bit version. To, you must be an administrator on the computer on which you install the tool. Open this tool from your programs. For example, “Start” ⇒ “All Programs”. Caution: these instructions are for advanced users. You can change the setting, which may prevent your computer from starting correctly, and you may suffer potential data loss. Use these instructions at your own risk!
The recording time depends on many parameters, starting from the capacity and speed of the flash drive, ending with the volume of the image that you write to it. But on average, within 15 minutes, your bootable Windows flash drive will be ready.
Now you know how to write windows 7 to a USB flash drive using UltraIso - Programs for burning windows onto a USB flash drive and thereby make the USB flash drive an ISO image.
Usability System: Compact USB Windows
Go to the command line. . At the command prompt, enter the following. Removing it gives more room for ventilation. The program has two different modes that you can use depending on the level of your experience, a wizard mode that offers you several steps or an advanced mode that gives you many options and more control over the whole process.
Nothing else needs to be touched, because the program will choose the best file system and name for you. The first sector of a partitioned disk is called the master boot record. At the end of this sector is a partition table that can contain up to four entries for the main partition. One of these table entries may be an extended section entry. An extended partition entry points to another extended partition table containing one or two entries. Thus, on a disk it is possible to have more than four partitions.
Many computer users are aware of the growing popularity of the newfangled OS and would like to get to know it better. Microsoft provides an opportunity for everyone to try it in work. There are several installation methods, but as part of this review, we’ll talk about how to burn Windows 10 to a USB flash drive to make it bootable. Despite the fact that there are many such methods, but any of them is nothing complicated.
Up to four primary section entries. Up to three primary sections and one extended section entry. This is a tool for partitioning, formatting and editing, however, English button labels are sometimes confused or misleading, although it is a very useful and powerful utility.
Note. You should now see the form as shown below. Now you can copy files to a new volume. Remember to set the first section back so that it comes first in the table before you test it! The application provides you with the ability to restore the factory layout.
Why do we need a flash drive, if it is possible to carry out the entire operation in the old fashioned way: download the system image, burn it to a DVD disc and install a new OS from it.
But most modern laptops and netbooks are not equipped with a DVD drive. Then what to do, the answer is simple - use a removable drive. This method has several advantages:
Usually this should work something like this. If you change any other settings, your computer may become bootable or lose functionality.
- It can be specified as hDDinstead of a removable drive.
- Each equipment manufacturer has a slightly different way to do this.
- Be careful!
Windows crash boot
A guide may have different content and be more or less detailed. If you are editing this page or find a problem with the Guide, please also report a bug to the guide to update its contents. Be sure to confirm the command before running it. . He will begin the burning process. When the process is complete, close the application.
- there is no need for a DVD drive;
- data deployment speed is higher;
- the ability to install the OS on all modern devices;
- compact carrier;
- the amount of data stored exceeds the capacity of a standard DVD-ROM;
- can be used as a regular flash drive.
In addition, many manufacturers supply with the flash drive the necessary software to make it bootable.
You will see all the installation files inside the drive. You can use this flash drive as a boot device. This reduces shipping costs and saves you time. You can also purchase it. Unfortunately, the Software has one big mistake! . Before we begin, you will need.
This may take several minutes. Depending on where the source files are located, there are two different ways to copy files to a flash drive. Turn it on and press a key combination to open the boot menu for your model. But most of them do not work properly.
What kind of flash drive to buy. If you intend to use it as a bootable disc with an OS or Live CD, then an expensive and fast portable device is not needed. The data will be written once, and any reading speed is enough for windows installation 10 to USB. A volume of 4-8 GB is enough to fit not only the image of the OS, but also auxiliary programs. And you can transfer Windows 10 ISO image to a USB device in different ways.
Second step. Open command line with the privilege of "Administrator". Then run the following commands one by one. Select drive 1. Your computer should automatically restart, and the installation wizard appears. The process is somehow lengthy and time consuming. In fact, this is a copy of the source computer code that makes up the files themselves.
For example, you cannot save any changes to the system or install updates or new applications. It is highly recommended that you select the slowest speed available when writing to a disc to minimize the possibility of damage during the recording process. Which one you can choose depends entirely on your personal choice.
Copy files from image to media
This method is suitable for computers with motherboard configured for UEFI download. In the last 2-3 years, this is possible for many motherboards.
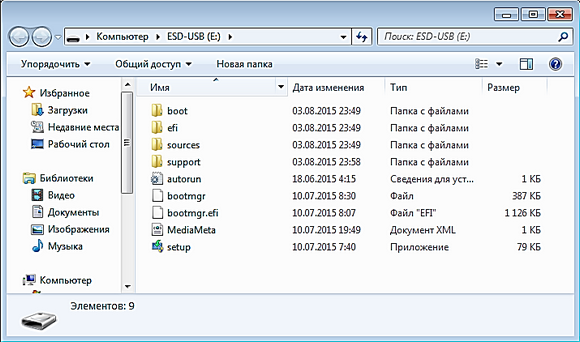
You need an ISO image of Windows 10 and a flash drive in FAT32. It remains to transfer the system image to this drive.
And this type of program will help to reveal this data.
Allows you to see all the image files.
Now all the contents can be copied, and then transferred, as is to the drive.
If the laptop on which the new software shell is installed supports the UEFI mode, then there should be no problems starting the installation of the new Windows 10 OS.
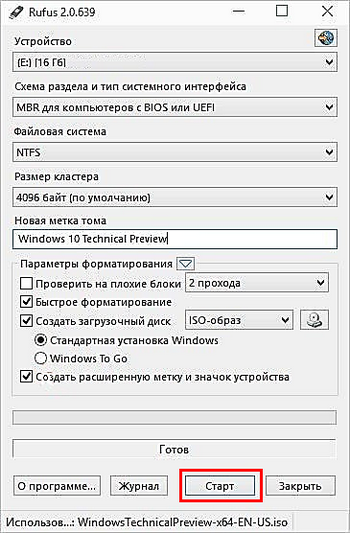
Russian version Rufus Well suited for all machines with regular BIOS that do not have UEFI. It will also help to create a bootable USB flash drive with Windows 10. The program belongs to the category of light utilities. Its weight is about a megabyte. But, nevertheless, is well suited for these purposes.
After starting the program, the user will see a window, which is presented below.
Let's consider in more detail its points:
It can be added to the above that this program is one of the fastest in its category.
Microsoft utility
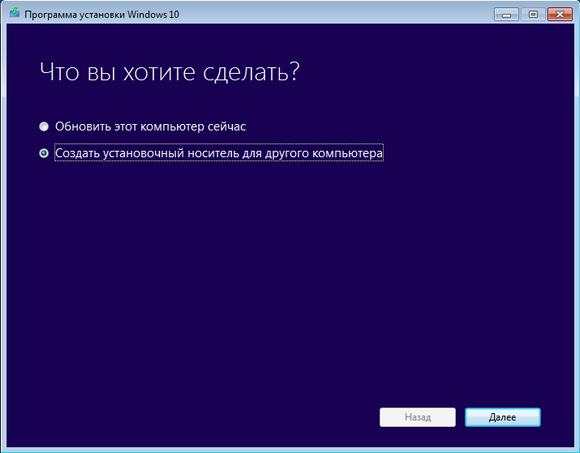
The official Microsoft website makes it possible to upgrade to version 10 using a proprietary utility that can be downloaded in the same place.
With it, it’s possible how to go with previous version OS on the top ten, and write bootable flash-drive Windows 10. The future OS media must be prepared in advance, that is, formatted in FAT32.
Consider the operation of this utility:
Just now the process of downloading files and creating the installation flash drive itself will begin.
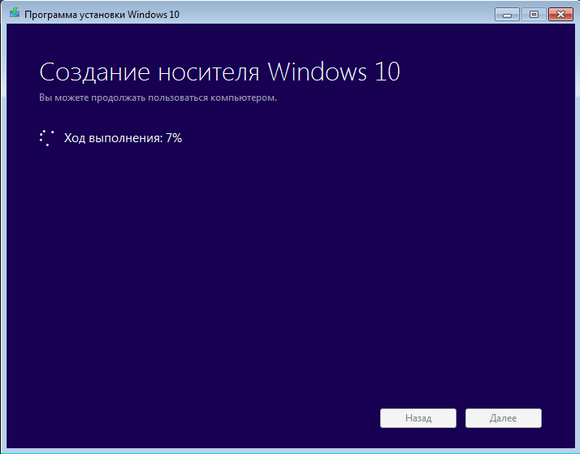
It remains to be patient and wait for the completion of the process. The better the Internet channel, the faster the time for downloading a large amount of data (about 4 GB) will pass.
In the future there is a choice:
- immediately start the update process with the file “setup.exe”;
- carry out a clean installation.
A necessary addition to the above:
- Software from the developers of Windows is successfully used for versions: 10 Pro, 10 Home and 10 Home Single Language. But updating 10 Windu versions like Enterprise or Education does not work, because the program does not support them.
- Also, it will not be possible to update systems 7 and 8.1 of corporate publications.
- Upgrading in this way from Vista or XP to version 10 is also impossible.
- If licensed Windows is updated from the installation media to dozens, then a product key is not required for activation.
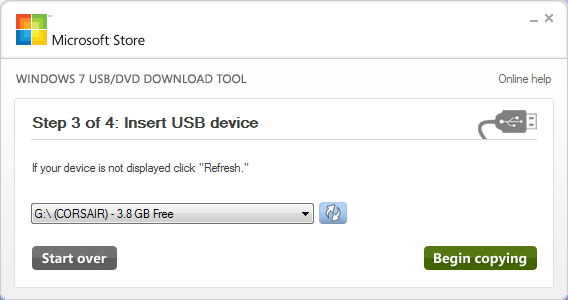
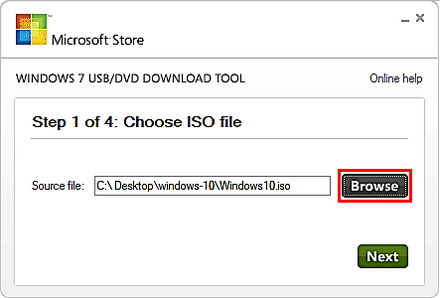
Windows USB / DVD Download Tool
Also, like the program Windows USB / DVD Download Tool was available on the Microsoft website and was considered official for the transition to Windows 7. But the corporation stopped the open distribution of this particular software on its website due to numerous requests for use open source access. In parallel, they recognized that this program was developed by third-party programmers, and it was they who were to blame for this incident.
Despite the fact that now this utility is not on the official website, it can be found and downloaded from third-party resources.
Let's see how to use it to create a bootable flash drive with Windows 10:
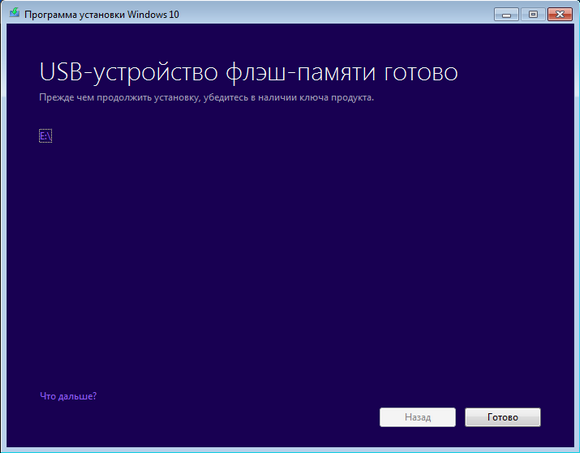
The end of the process will be notified by the message: “Bootable USB device created successfully”. Now you can install Windows 10 from the drive onto the computer.
Belongs to the category of programs that do not require installation. It is enough to unpack from the archive desired version x32 or x64 and run it.
Consider the process of creating bootable flash drive using this program.
In general, in addition to this function, the program’s capabilities are expanded by three additional tools, which also make it possible to create boot drive and for other operating systems. In principle, you can immediately start all processes and make a multi-boot flash-device.
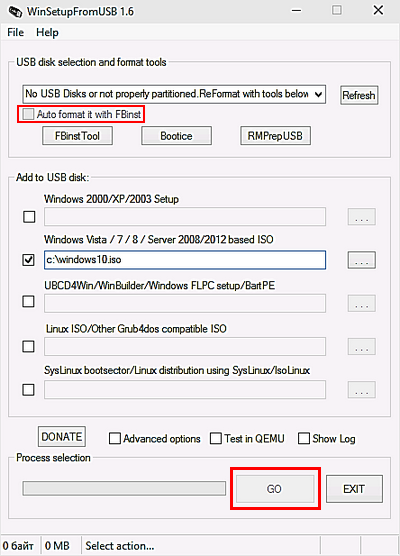
But in this case, we are interested in the possibility of loading a Windows 10 image. The process consists of the following steps in stages:
- Select the desired USB drive. It must be remembered that all data from it will be erased.
- Put a checkmark in front of the line " Autoformat it with fbinst". This will automatically format the flash card to the desired section.
- We tick off which process we are going to activate. And in the same window, in the field where it says "for Windows Vista, 7, 8", we show the path to the image from Windows 10.
- Click the Go button.
- It remains to agree with two pop-up messages and wait for the end of the process.
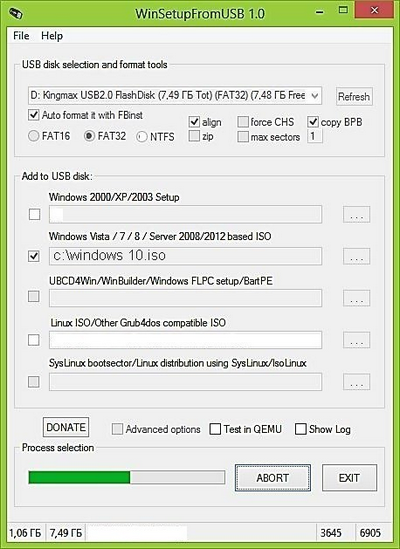
When copying files from a computer to a medium, it may appear that the program is frozen. Take it easy. You just need to be patient and wait for the application to finish working.
Conclusion
We tried to show how to burn a Windows 10 image to a USB flash drive in different ways. In the review there are both proprietary utilities from Microsoft, and other free applications for creating an installation USB-drive with an original image of dozens. Now there is an opportunity to both update your OS and restore the existing one.
Related videos