How to remove mysql server completely. Open Source Systems in IT
Recovering a forgotten password for root "a
Stop mysqld
Sudo service mysql stop
Run mysqld with the parameters --skip-grant-tables --user \u003d root:
Sudo mysqld --skip-grant-tables --user \u003d root
Connect to the MySQL server with the command:
Mysql -u root
Update the password for root "a:
UPDATE mysql.user SET Password \u003d PASSWORD ("") WHERE User \u003d "root"; FLUSH PRIVILEGES;
Now you can log in as root with a new password.
The newly created database will be immediately visible in the menu on the left side of the window. To delete a newly created database, simply select the database from the menu available in the left part of the window, then click the “Delete database” hyperlink in the lower part of the window. AT command line run the following command. This command will create a database called "database". We can delete the database by releasing.
We need to start calling the database functions from a connection to the database server. The script ends with closing the database connection. In all of the following examples, we create a database called “database”. Therefore, to create a database "database" the second way is to delete the first database.
how to add / remove a user in MySQL from the console
It happens that the remote / virtual machine is installed and you need to create users / databases and give them rights, but you do not want to install phpmyadmin. Or just show off the ability to work with the mysql user from the console in front of colleagues;)
First you need to log in as root:
Of course, the way a database is created does not affect its contents or structure. Details are suitable for shortening the timeout. The search engine took the link. An unscrupulous person can accept system passwords and make mistakes and the behavior of some special programs to access your computer. When you have access, you can do a lot. There are people who need information from your computer, and then you cannot know what they can handle. The safest way to avoid this common occurrence is to prevent unauthorized access to your network device.
Mysql -u root -p
After entering the password, we will be in the mysql console.
Create user test with localhost and password "password".
Create user "test" @ "localhost" identified by "password";
User created. To check, see the list of users:
Select user, host, password from mysql.user;
Create the testdb database.
Create database testdb;
Give user test full rights to the testdb base
The fire is covered with these pestles. A firewall is a program that runs on a computer that is installed between the internal network and the external network. In general, such a network is the Internet, but not necessarily. The firewall filters network traffic through packet-switched protocols. It transmits packets that satisfy certain criteria from within the internal network, and vice versa. Criteria are defined in filtering rules, which can be very complex. The packet filter contains packages that do not meet the specified criteria.
Grant all on testdb. * To "test" @ "localhost"
Delete user "test" @ "localhost"
drop user "test" @ "localhost"
If you created users for different hosts and want to delete all, then you need to delete them one by one through the "drop user" command with the host
Attention! The "DROP USER" command does not automatically close all sessions opened by the user to be deleted. If a user with an open session has been deleted, then deleting will have no effect until the user closes the session. After the session is closed, the next attempt to enter the system by the user whose deleted will fail.
At the same time, you may receive an error message on the sender's computer. Thus, firewalls hide from the outside world and increase reliability. The network is protected from hackers. Unfortunately, this method is completely unprotected: there is always a wise hacker who wants to bypass the firewall. But firewalls make life harder for hackers.
This means that your system is connected with someone who cannot do this. Exist various ways avoid this attack. Be careful who can access through these services, you can prevent the use of the network for everyone, except that you allow users.
Delete the testdb database
Drop database testdb;
P.S. Do not forget to put after each team ;
MySQL is one of the most popular systems database management, which is used almost everywhere, ranging from various enterprises and industries to the organization of websites.
Explanation of known deficiencies in the program. Some programs and network services were not originally designed with reliable protection. The best way to protect yourself from this type of attack is to disable vulnerable services. So-called offspring attacks cause a service or program to stop working or prevent others from accessing it. They can work at the network level, sending carefully processed packets without the ability to manage services. They can also be implemented in an add-on program where well-trained teams can overload a computer.
There are several versions of MySQL now. Directly mysql, developed by Oracle and a free fork from the main mysql developer, MariaDB. The program received the name MairaDB in honor of the first daughter of the programmer, as well as MySQL in honor of the name of the second. In most linux distributions Used by MariaDB, including Ubuntu. We will consider installing this particular version, but for compatibility it is still called MySQL. In this article, we will look at how MySQL Ubuntu 16.04 or 16.10 is installed.
Protection against suspicious network traffic and from suspicious software commands is one of the best ways to reduce the risk of such attacks. It’s useful to know the details of the attack method, so you need to research new developments in this area. For this reason, hacker sites are very popular among network administrators.
This type of attack makes your computer or application not work as expected. An adversary’s machine can perfectly simulate a machine with the correct address, so packets with it will get into your system. Avoiding this type of attack is easy: we need to carefully monitor where the package really was and with its internal information environment.
Installing MySQL on Ubuntu 16.04
The program and all necessary components are in the official repositories, so installing it is not difficult. To install from the official repositories, first update the list of packages:
Then install the necessary packages:
sudo apt install mariadb-server mariadb-client
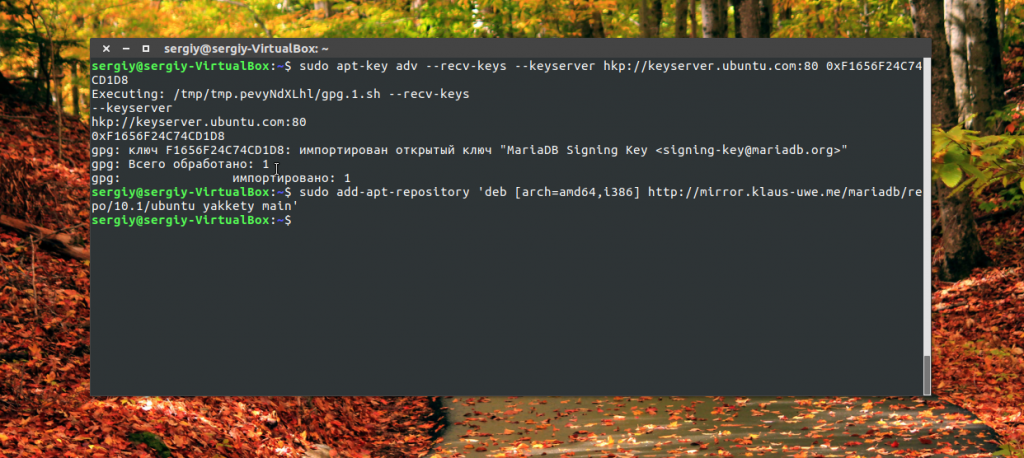
Currently in ubuntu repositories 16.10 there is only the MariaDB 10.0 version, but the stable version of MariaDB 10.1 is already available. To install it, you need to use the official developer repository. To add a repository in Ubuntu 16.10 do:
This is the easiest type of attack. The computer is configured to “listen” and collect data. A smart spell can get a username and password. Traffic encryption helps. You can use many different criteria to determine which packages you want to filter.
In cluster 2, you must select one of the following functions. For kernels of series 0 and above, you need to choose many more functions. There may be a special package of network equipment that must be implemented separately. This greatly simplifies new version firewall. The difference is support for the development model and news filtering packages. Cross-site scripting is a vulnerability in information systems that is usually found on websites, which allows you to embed additional program code on a page that is viewed by the user.
$ sudo add-apt-repository "deb http://mirror.klaus-uwe.me/mariadb/repo/10.1/ubuntu yakkety main"
And in Ubuntu 16.04:
sudo apt-get install software-properties-common
$ sudo apt-key adv --recv-keys --keyserver hkp: //keyserver.ubuntu.com: 80 0xF1656F24C74CD1D8
$ sudo add-apt-repository "deb http://mirror.klaus-uwe.me/mariadb/repo/10.1/ubuntu xenial main"
Then, to install mysql Ubuntu 16.04 or 16.04, just run the familiar command:
This vulnerability is the result of inadequate filtering of input information. When you discover a way to insert a malicious script, an attacker could gain access to the contents of the site, session cookies, or other information. You will need to follow this guide.
Choose protected and make sure you remember it, because you will need it later. For new installations, you want to run the included security script. This changes some less secure default settings for things like remote root inputs and user patterns.
sudo apt update
$ sudo apt install mariadb-server mariadb-client
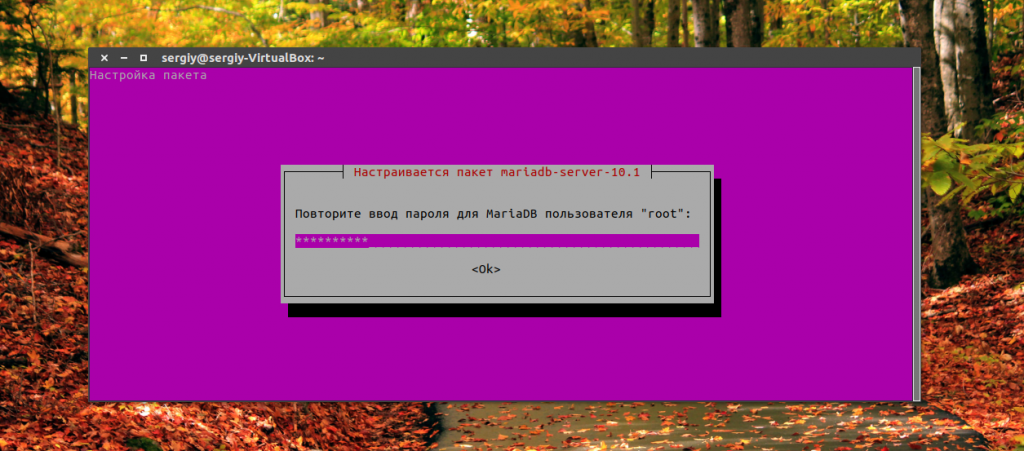
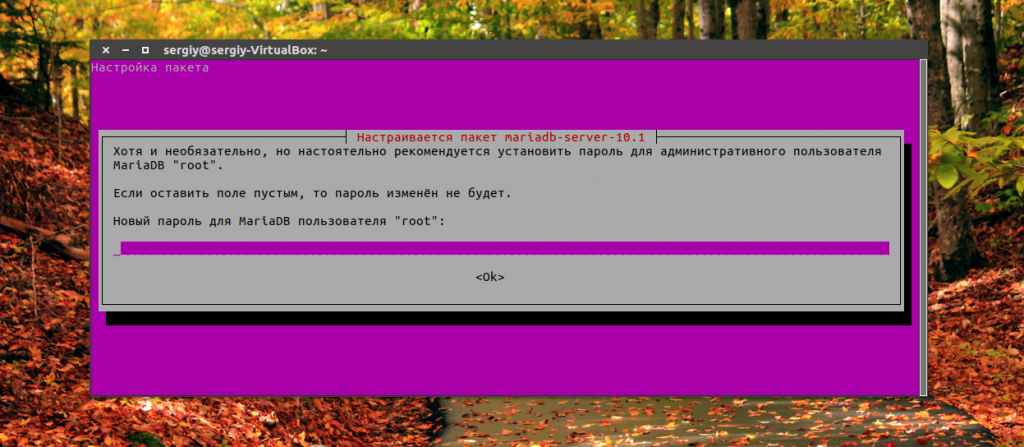
During installation, you will need to enter the password twice for root user Database:
After the installation is completed, you can check whether everything went successfully:
sudo systemctl staus mysql
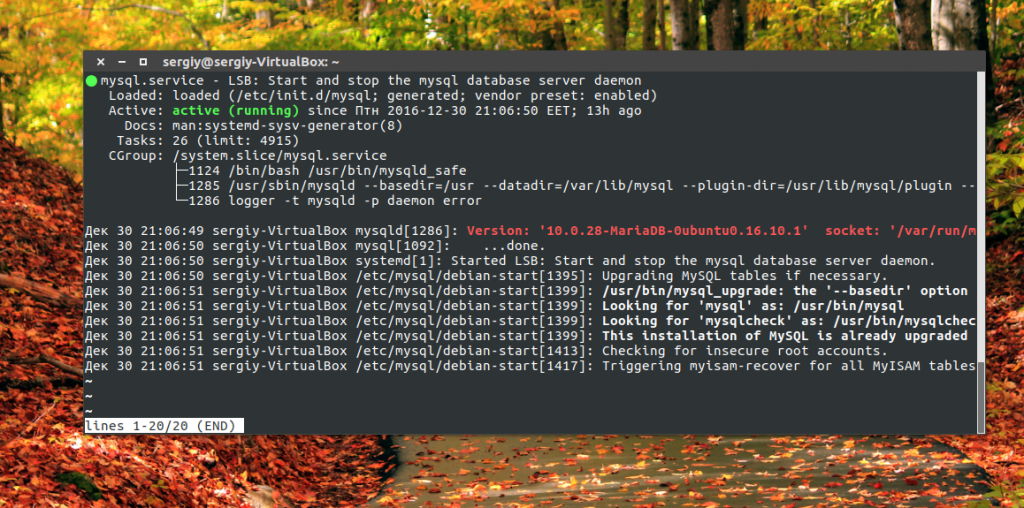
You should see a green label Active Running and the version of the program that you installed.
Mysql setup in ubuntu
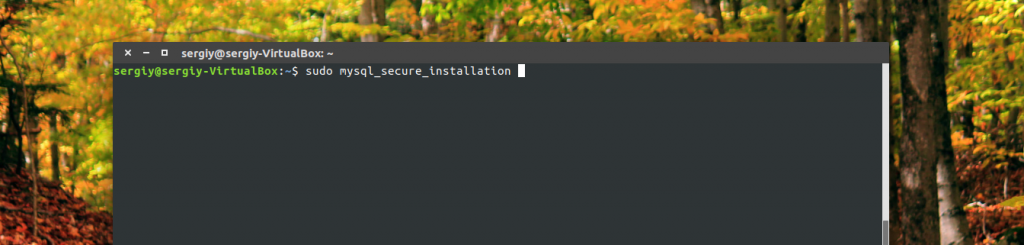
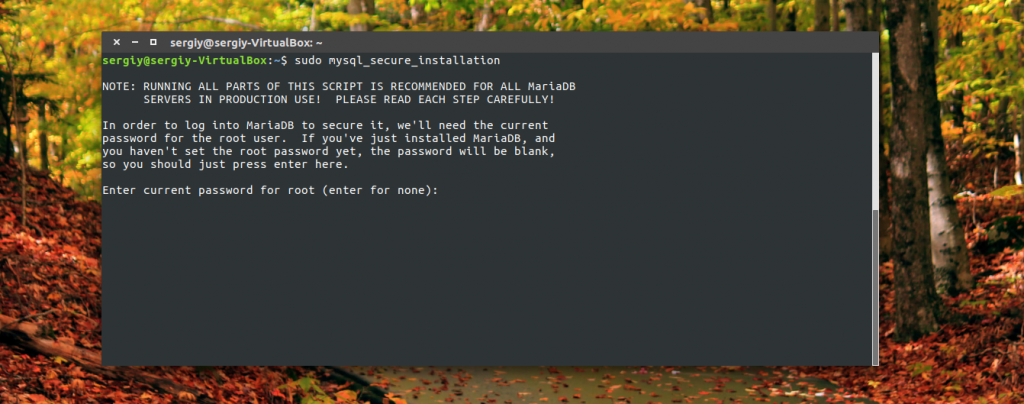
Before you can fully use the newly installed database, you must perform its initial configuration. A special script was developed for this, execute it:
mysql_secure_installation
The first step is to enter a password root user of the database, this is not the root password in the system, if you just installed MySQL, then it has not yet been set and this field can be left blank.

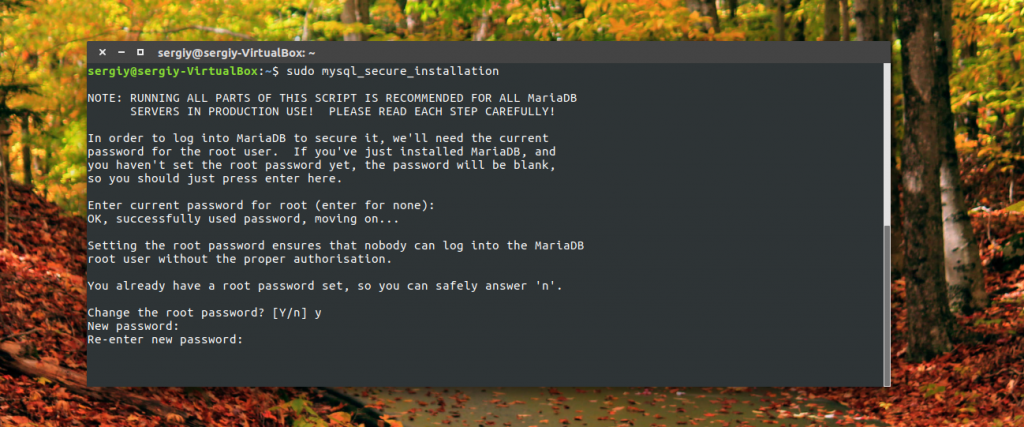
Enter the new password twice:
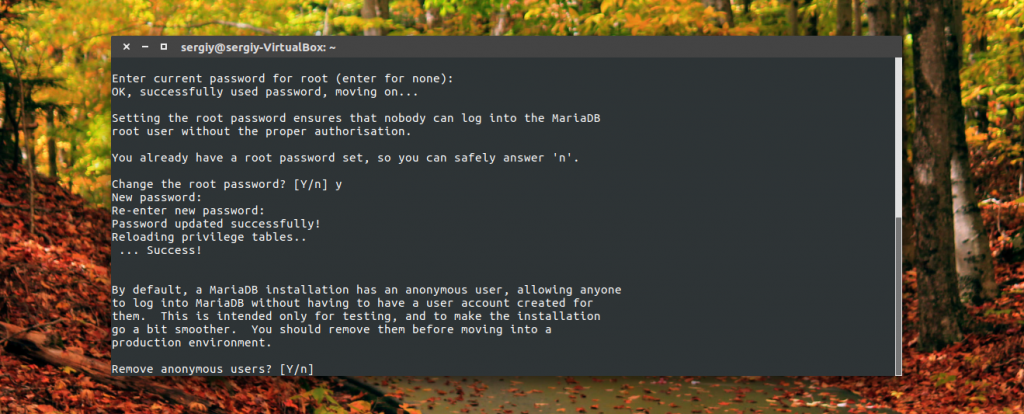
Enter Y to disable mysql anonymous access:
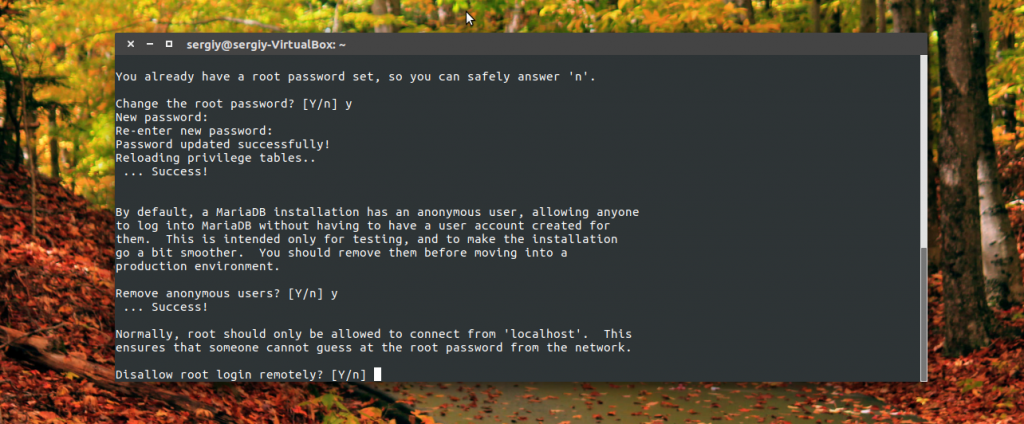
Once again, Y to prevent root from remotely connecting to the database:
Again Y to delete the test database:
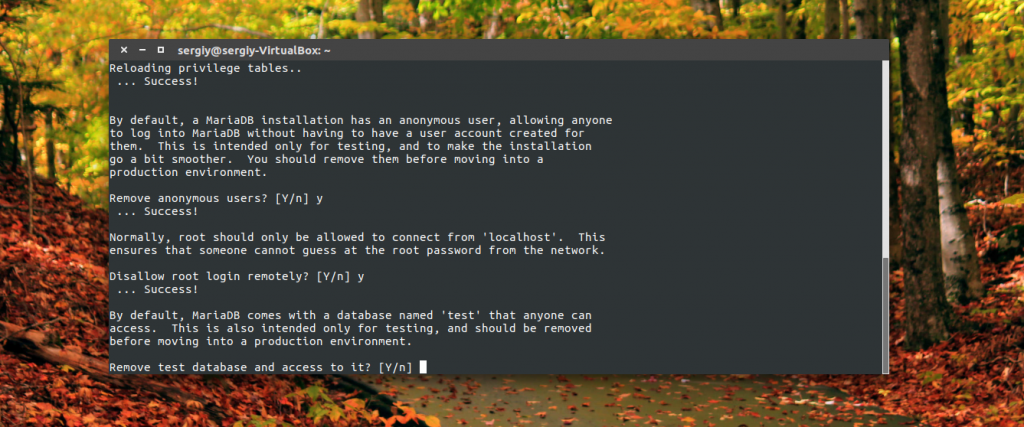
The last step is to update user privileges:

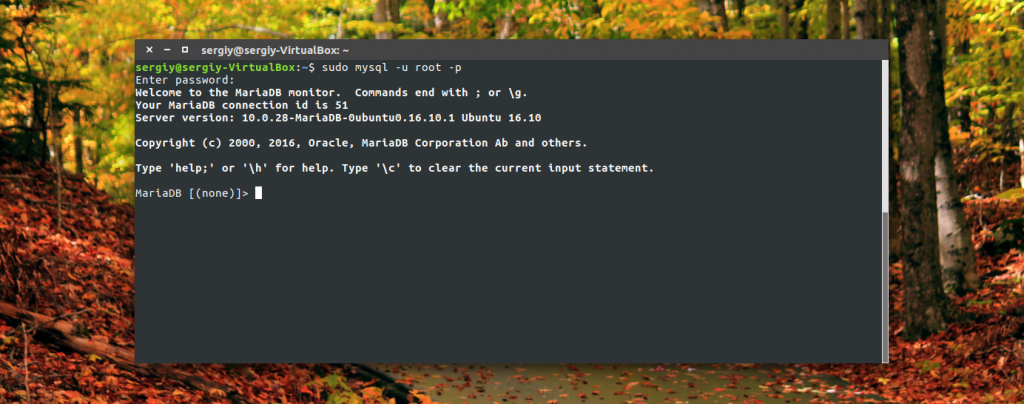
After completing the setup, you can connect using root password to the database server from the command line:
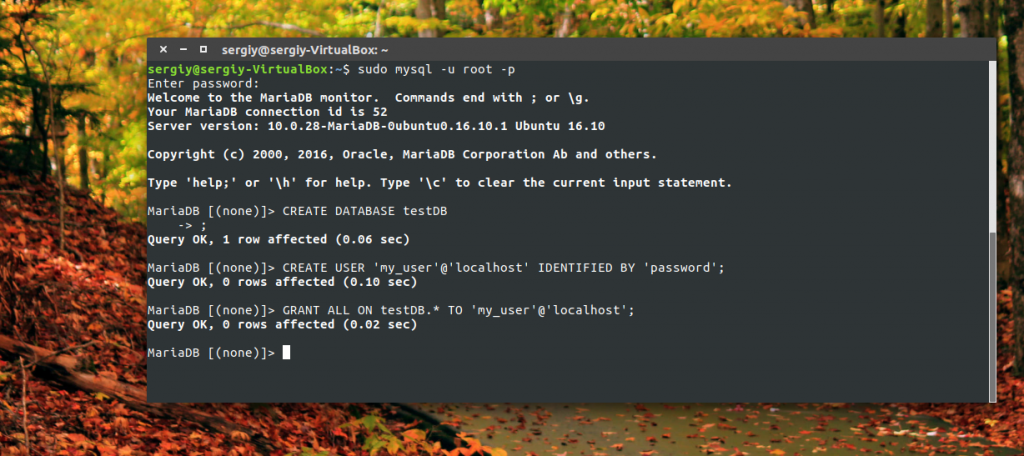
sudo mysql -u root -p
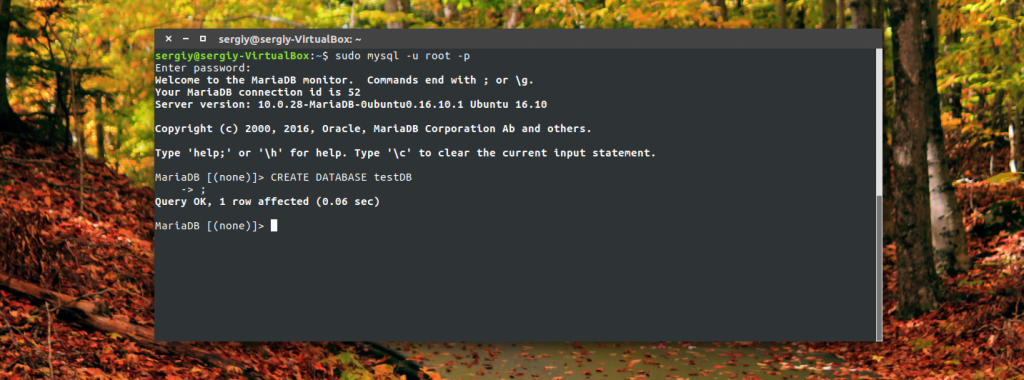
Here we need to create a user on behalf of whom we will use the database, as well as the database itself. To do this, use the SQL commands. First we create a database:
mysql\u003e CREATE DATABASE testDB;
mysql\u003e CREATE USER "my_user" @ "localhost" IDENTIFIED BY "password";
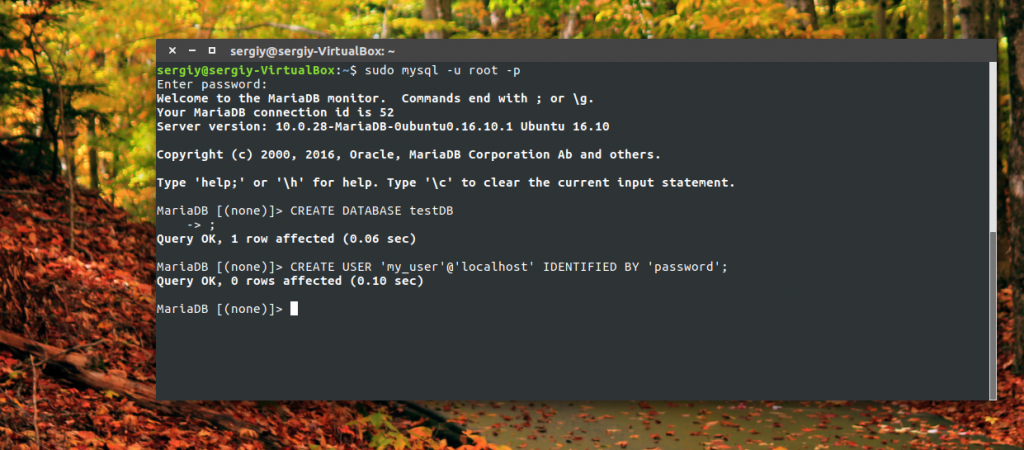
The words my_user and password must be replaced with your username and password. Next, you need to give the user rights to manage this database:
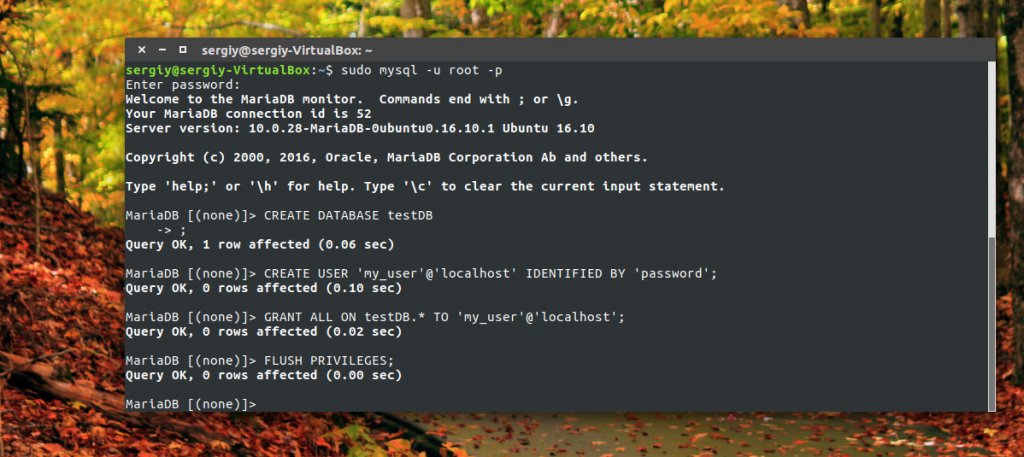
mysql\u003e GRANT ALL ON testDB. * TO "my_user" @ "localhost";
Or you can give rights to only a few instructions:
mysql\u003e GRANT SELECT, UPDATE, DELETE ON testDB. * TO "my_user" @ "localhost";
If any instruction needs to be disabled, delete it:
mysql\u003e REVOKE UPDATE ON testDB. * FROM "my_user" @ "localhost";
After completing work with the rights, you need to update them:
mysql\u003e FLUSH PRIVILEGES;
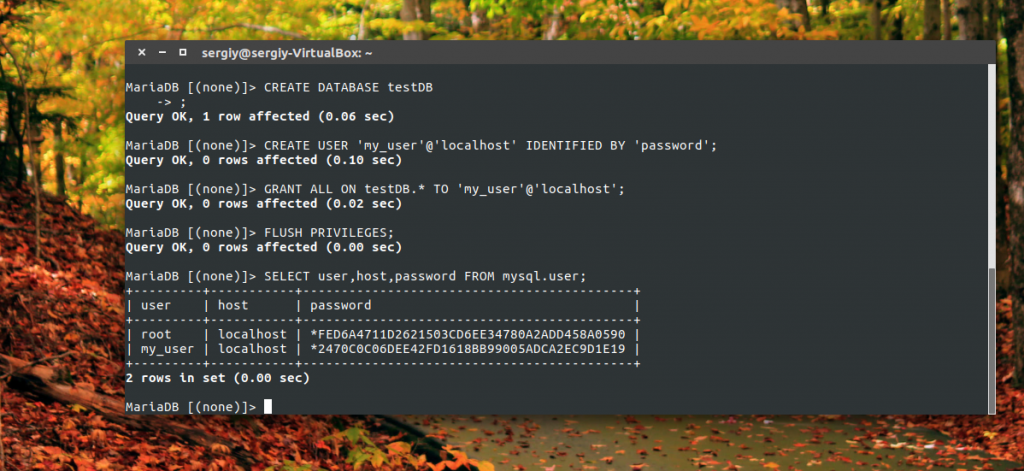
To make sure that there is no one else you can list the users:
mysql\u003e SELECT user, host, password FROM mysql.user;
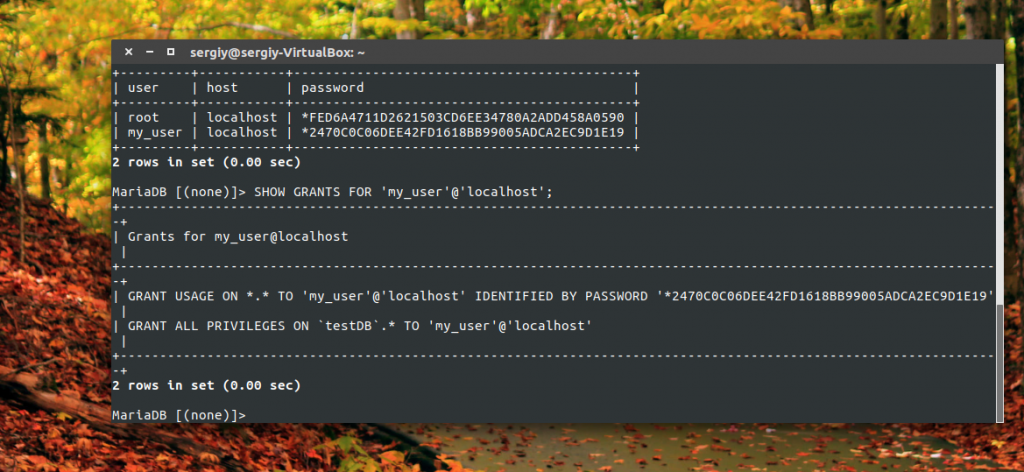
You can also see the permissions for the desired user:
mysql\u003e SHOW GRANTS FOR "my_user" @ "localhost";
Installation now mysql ubuntu 04.16 is fully completed and you can use this database to solve your problems.
Uninstall MySQL in Ubuntu
To remove mysql Ubuntu 16.04, you need a few more commands than to remove a simple package. After removing the main packages, a lot of files remain in the system. We will consider how to delete everything.
First stop the services:
sudo service mysql stop
$ sudo killall -KILL mysql mysqld_safe mysqld
Remove the main packages and their dependencies:
sudo apt -y purge mysql-server mysql-client
$ sudo apt -y autoremove --purge
$ sudo apt autoclean
Remove the mysql user and the rest of the program in the system:
deluser --remove-home mysql
$ sudo delgroup mysql
$ rm -rf /etc/apparmor.d/abstractions/mysql /etc/apparmor.d/cache/usr.sbin.mysqld / etc / mysql / var / lib / mysql / var / log / mysql * / var / log / upstart / mysql.log * / var / run / mysqld
$ updatedb
Remove all mysql connection logs from the terminal:
sudo find / -name .mysql_history -delete
Now your system is completely cleared of MySQL.
findings
In this article, we looked at how mysql ubuntu 16.04 or 16.10 is installed. As you can see, this is not very difficult, although it does require some knowledge and a little time to deal with everything. I hope this information was useful to you.