Open the windows 7 admin folder. The easiest method. An easy way to get full administrator rights in the form of video instructions.
Often, in almost all assemblies operating system Windows 7, creating a user, you are an administrator, but at the same time, and not quite an administrator.
For some “serious” actions, from the point of view of the operating system, you have to click on an additional pop-up window, such as “using administrator rights”.
Each user has his own profile and his own set of permissions, which prevents unauthorized access to files and folders. However, there are times when you can manually configure permissions for a set of files or folders so that other users cannot access the data. This post assumes that other “people” also have access to the same computer that you are using.
If you want to set permissions for sharing files with others, check out my post. The only time you need to bother with access rights to a folder or file is when you get it when you try to access data. This is important because it means that setting permissions on a file or folder does not guarantee the security of this file or folder. When you have ownership, you can set your own permissions.
To prevent this, to be a real and complete administrator, you must activate the built-in account "Administrator" and work under it. Why activate? Because it is disabled by default.
So, let's begin. How to make yourself an administrator inWindows 7?
We call the window to execute.
To do this, press the "Windows" + "R" key combination or call it through the "Start" menu.
So what does this mean in English? Permissions can be divided into Access Control Lists with users and their respective rights. Below is an example with a list of users at the top and permissions at the bottom. Permissions are also inherited or not. This hierarchy continues to the root hard drive. Note that if permissions are grayed out, as in the example above, permissions are inherited from the contained folder.
There are more advanced attributes, but you never have to worry about it. So what does each of these permissions mean? Now that you understand what each permission controls, let's take a look at changing some permissions and checking the results.
As a result, you will have the following.

We enter the command "control userpasswords2" there. If you conduct otherwise, then the desired result will not be. For example, even if you enter “control userpasswords”, without a deuce at the end, it will be a challenge to a completely different application.

Administrator rights through the Control Panel
Before you can edit any permissions, you must have ownership of the file or folder. Now that you are the owner, let's do a few more things. If you set full access permissions for a folder for a user, the user will be able to delete any file or subfolder, no matter what permissions are set for these files or subfolders. By default, permissions are inherited, so if you need user permissions for a file or folder, you must first disable inheritance. Deny override permissions Allow permissions, so use them sparingly and preferably only for specific users, not for groups. There are a few things you can do at the moment.
As a result of this, the “accounts” application will open.

Go to the "Advanced" tab and click on the "Advanced" button there. She is surrounded by a black oval.

Change account type
First, you will notice that the “Allow” column is probably grayed out and cannot be edited. It will show you all users and groups. Now, what happens if we try to remove a user or group from the list. Well, you can easily delete the user you just added, but if you try to delete any of the items that were already there, you will receive an error message.
In the Advanced Security Settings dialog box, clear the Enable inheritable permissions from the parent field of this object check box. When you do this, another dialog box will appear and it will ask you if you want to convert the inherited permissions to explicit permissions or just want to remove all the inherited permissions.
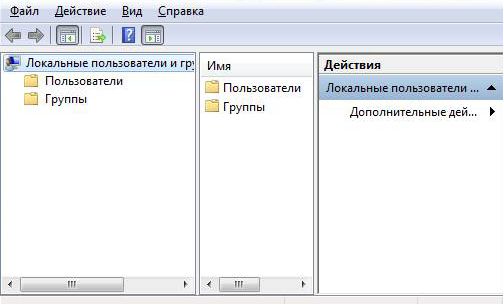
Then, double-click on the "users" folder.

After that, you need to double-click on the user "Administrator". Or, using the right mouse button, call the context menu and click on the “properties” item.

The Convert option is the same as the Add option, and the second is the Delete option. The only thing you need to understand now is the or tab. So what are the effective permissions? Well, let's see the example above. So, I have full control in one resolution, and in the other - negative, which wins?
Easiest method
As you can see, all permissions are not checked, which makes sense. In order to hang all this, you need to play a little. The main points to understand are that you must be the owner to edit permissions and that any administrator can own files and folders regardless of the rights to these objects.
By default, the “Disable account” item is active. You need to uncheck and click "OK." Then, you can safely exit the system and boot under a full-fledged Administrator.
Of course, so that two accounts do not appear at the beginning of the boot of your computer, you can delete the old account, more precisely the one in which you are currently located.
The easiest way to get administrator privileges
You can simply control when you will be notified of upcoming changes on your computer.
- It is no longer possible to completely disable user access control.
- Desktop applications can only be installed with administrator privileges.
In this case, you must run the application executable with administrator rights. Applications that may require administrator privileges. Enable "Run this program as administrator" to resolve any permission problems.
I hope you understand how to make yourself an administrator in Windows.
It is important to understand that account "Administrator" is a full-fledged computer administrator. No other user is comparable in access and features compared to him.
Greetings, dear readers.
This means that the first time you start, you will need to enter the administrator password. But after reading this article, you can feel the freedom and gain access to all services, having received full administrator rights. Access to it is allowed only to the owners of these files or folders.
Therefore, if you need to access, modify or delete such files or a folder, you must first take ownership, and then assign the rights or permissions to your own or other users. Locate the drive on which the operating system is installed. A new window will appear on the screen.
Today I would like to talk with you about a simple - in some way even banal - but very urgent problem of many Russian citizens - about obtaining local administrator rights in windows-systems. They are known to be terribly necessary for the simple representatives of the proletariat at their workplaces to fulfill a wide variety of desires. I will not dwell on the advantages that admin rights provide: everyone who encounters a computer at work knows this well. And I will focus on another ...
User Account Control
If you have multiple users using your system, you are most likely to assign them. This allows you to adjust what they install and how they can control the system and application settings. As much as possible, sometimes you may need to allow standard users to run the program with administrator rights. In such situations, you can use a free third-party utility.
Standard users run programs as an administrator
First you need to know two things before you do anything. The above action will open the system window. Here you will find the name of your computer. After you receive detailed information, you can create a shortcut. The above action will open the Create Shortcut window.
In particular, on how to get the rights of a local administrator, having initially a user with limited privileges. Among other things, the issue of resetting user passwords will be discussed. We will consider some of the most convenient and simple approaches that work quite well in all systems from Win XP to Win 10.
Although this application only displays system information and temperature, it requires administrator rights. Type the following command at the beginning of the file path. Remember to replace the computer name and username with actual data. A completed team looks something like this.
You have created a special shortcut for your program. By default, the shortcut you created will not have the correct icon. The first time you need to enter the administrator password. So, enter the administrator password and press the "Enter" button. After the first launch, when the user launches the application using the shortcut just created, it will be launched with administrator rights.
Method number 1 (brutal).
Its essence lies in booting the computer from some external media - in common people it’s just a LiveCD. How to do this?
Step 1. Record LiveCD.
A LiveCD is a CD / DVD-ROM, a USB flash drive (most conveniently) or another USB-drive with a very stripped-down version of our operating system installed, i.e. WIn 7/8. Making such a drive is easy. Just download the assembly of WIndows PE or ERD Commander. The first is that there is a stripped down version of WIn 7 (PE - pre-installation evironment) with wide functionality to restore an already inoperative system (in case of a terrible virus, malfunctions at a low level, or strong forgetfulness of the admin account owner :)). You can read more about them and. So, download the WinPE or ERD Commander image and write it to a disk or flash drive. How to do boot disk everyone knows. But on the USB-drive the disk image is not as easy to write as it seems. How to create bootable flash drive, can be read, for example, in this article.
There is a short length that can save some time. If necessary, you would encounter catch-22 or “first, smoker or egg.” Now, when you enter the command above in the command line, you will receive a message: the command completed successfully.
How to disable admin approval mode
This created two security issues. This regular user and administrative privileged user method improves security and prevents any unauthorized applications from running. You should now see the many options available to you in the right pane.
Step 2. Boot from LiveCD.
So, the flash drive is created. Now boot from it. To do this, we may need to enter the BIOS settings and change the boot order of the drives there. Of course, first you need to turn off the computer, then plug the USB flash drive, then turn it on and enter the BIOS. It will be very lucky if you are not asked for a password at the entrance. If you ask, things are bad: this means that your employer is not as stupid as you thought. But I hasten to console you: in 99% of cases, there is no password on the BIOS, and you will calmly put your flash drive first in the list of BOOT downloads. And if you're lucky, she will be there first. Next, just save the parameters, overload and observe the process wIndows downloads PE.
Enabling Integrated Administrator Record
Note that the default value is Enabled. They will no longer be immersed in standard user mode, requiring the administrator to approve all actions that require more high resolutions. I have a problem with my computer. After logging in as Administrator.
Admin Command Prompt
Start by searching at the top of the page. . Businesses should restrict administrative access to trusted employees so that other employees do not make unauthorized changes to their workstations. Enter a new passphrase for the administrator and create a password hint.

Step 3. We modify the registry from the outside.
So, we booted from external media and we see something like this window.

The window may be different: a simple desktop and the usual "Start" button. It depends on your specific build with Windows PE. By the way, there is also Windows RE (Recovery environment). It is also suitable for our purposes. It is only important that it has the ability to run the command line (cmd) and the ability to work with an external registry. And these two features are in almost every build win PE / RE / ERD Commander. So, we saw the start window (fortunately, they do not ask for any passwords here). Next, click Command prompt (if the window is of the type shown in the figure) or the combination Win + R and enter cmd. In the console that appears, enter regedit. Hit Enter and get the registry window. Now go to HKEY_LOCAL_MACHINE (hereinafter - HKLM) and go to File \u003d\u003e Load Hive.
Part 1: Remove Administrator Password to Obtain Administrator Rights
C. Computer Science at the University of Central Florida. This built-in administrator is hidden and disabled by default until you enable it manually and its default name is “Administrator” and the password is blank if you have not changed it. When prompted, reset the password to blank.
These rights are not required to run the software after it is installed correctly. Follow these steps to confirm that you have administrator rights on your computer. Note. The software must be installed by an administrator or a user with administrator rights.
Next, in the dialog box that opens, look for the disk with our true system (in which we want to gain local admin rights) and look for the file<диск>: \\ Windows \\ System32 \\ config \\ SYSTEM. Click "Open" and enter any name of the bush. For example, test. As a result, in HKLM, we have a new element - test - this is a segment of the registry (one of the branches we need) of our desired system. We can change it as we like and save it back to the system we are looking for, which gives us simply unlimited just for imagination. :)
Administrative rights using the command line
Any user running software, must have read permissions to the database directory, installation directory, and all subdirectories and files below it. In addition, read and write permission must be specified for the following subdirectories.
The installation directory can be changed during installation, but it will be by default. For best results, follow these steps: Any user running the software must have access rights to the following registry key, as well as each key under it.
Now go to test in the Setup directory, change the CmdLine parameter there: put "cmd.exe" there. We also change the SetupType parameter to 2 (by default it is 0). This will allow the system at boot time to think that the first start is underway and therefore it is necessary to perform what is indicated in CmdLine (usually there is indicated the path for installing low-level drivers at the stage of OS boot), i.e. - in our case, a console with SYSTEM rights will start, which is not just buzzing - this is all we could dream about (of course, not domain admin rights, but still).
Follow these steps to change registry keys. To remove these stubborn files, you need to take them on yourself and configure your permissions. Before you begin, make sure you select the correct folder. Do not change any of the other options if you do not know what you are doing.
Should I get extended rights at all
Enter the name of the user you want to take ownership of the file or folder in the "Enter the name of the object" field to select the field. This closes the dialog box and returns you to the Advanced Security Settings dialog box. You do not need to enter the exact name, just your username.
Now select test and click File \u003d\u003e Unload Bush. Everything, the registry in the victim system is updated. Now overloaded.
Step 4. Reset the local admin password.
In the process of rebooting, we go into the BIOS and change all the BOOT parameters to the previous ones. Further, during the OS boot process, you will see a console window, which is disabled from SYSTEM. In it you can do anything with your OS. You can create a new user, you can reset the password to the existing one, you can edit the Administrators group, etc.
Let's go the simplest way - we will make the local admin user active and reset his password.
So, execute: net user and see a list of all local users of the system. This is buzzing. Of these, by the method of tension of intellect, we select the one that, according to the logic of things, should be a local administrator. If users like Administrator, Administrator, Admin are not in the list (sometimes malicious system administrators rename them, thinking that this will make the system safer: what naivety :)), then there is another way: net localgroup - a list of groups. There will definitely be either Administrators or Administrators. Next, write net localgroup Administrators (if the list of groups included Administrators, otherwise, Administrators). And we see the list of users-admins.
Now we perform a simple set:
net user Administrator Newpass - change the password for the Administrator user (you can have your own) on Newpass.
net user Administrator / active: yes - make the admin user active (unblocked, because often they are blocked).
That's all. This method is not good because you change the password and unlock the local admin, and this fact can be easily calculated by our worst enemies - sysadmins. Therefore, you can do otherwise:
net user superuser Superpass / add - create a user superuser.
net localgroup Administrators Superuser / add - put superuser in the local admins group.
The method is good because later, after booting with this user, you can easily put your domain user in the Administrators group, and then delete the temporarily created account.
So, we created or reset the password for the admin user. Boot from it, but not work all the time from under it: the risk is not just great - it is phenomenally huge. There are two ways: you can work from under the account with limited rights, periodically using such a thing as “Run on behalf of”. Or you can just put your domain user in a group of admins. I don’t think anyone needs to explain how to do this (in cmd we execute compmgmt.msc, go to the management of local users and groups, then to Groups and there we already edit the group of admins in a beautiful graphical interface).
But after all these manipulations, I strongly recommend cleaning the event log: in cmd, execute eventvwr.msc, then go through all the logs and click on the right to clear it. As a result, all traces will be destroyed. It’s better to do this under the new (created) local admin that has already been deleted (that is, it is not in the system, but you are still logged in under it), and after the actions reboot in a hard way: through the magic reset button (user-admin at the same time will already be destroyed). As a result, there will be a record in the locks stating that such a user has erased everything, but there will be nothing more about this user: neither his inputs, outputs, nor other actions, nor even his removal by someone, i.e. phantom user. In the event of a thorough investigation of any incidents that occur with your participation, this may very well save your fate. :)
Of course, there is an even more reliable way: the system logs, so that there is no record of when and who cleaned them, you can simply destroy them so that they do not start at all. AT simple version to do this, simply delete the log viewer itself: eventvwr.msc, located in the directory
Method number 2 (substitution of seth.exe).
This method, in fact, differs little from the previous one. Steps 1-3 the first method is completely repeatable. By the way, in this case, it is quite possible to use the standard as a LiveCD installation disk / installation flash drive from Windows 7/8/10, after selecting "Restore system health" after booting from it (because now we won’t have to work with the registry). But in step 4, when we get the console, we do not reset passwords and do not create new users, but we do this:
copy<диск>: \\ windows \\ system32 \\ sethc.exe seth2.exe - do backup the original file of the standard sticky keys function seth.exe.
copy<диск>: \\ windows \\ system32 \\ cmd.exe c: \\ windows \\ system32 \\ sethc.exe - further confirm the replacement. Replace the original seth with command line (cmd). Do you feel what it smells like? :)
Now after loading the system - at any stage, whenever you want, starting from the login screen, you can call the console with SYSTEM rights, which is very buzzing. Just quickly press Shift 5 times in a row and that's it.

And then at least change the password, at least create users, at least clean logs, at least copy SAM databases (for subsequent bruteforce (enumeration and recognition) of current user passwords), at least something else that you have enough imagination for, but do it all I do not recommend, because the point is different. The advantage of this approach is that you do not change any passwords, you do not create any new users, you simply call up the system console when you really need rights and use it to launch anything that is required.
With this approach, there will be absolutely no mention of your activity in the system logs.. Sometimes there may be launches of strange applications / installers, etc., for which your domain account should not seem to have rights, but you really have no rights and never have. :) And all the suspicious launches occurred on behalf of the system (SYSTEM), so that you remain absolutely clean.
Conclusion
Here, in fact, are the two main approaches that, among all others, I had the opportunity to use in my ordinary practice. They are quite suitable for the purpose of facilitating life at work by removing all sorts of restrictions that modern employers love. Most importantly, do not show others that you can and do not exercise these rights without real need.
But if you want more - for example, domain admin rights or if you want to get into your company's accounting department, then you need completely different approaches. Acting on your machine from your domain or local user, in any case, you run the risk because you are working with the network from your computer, and all the packets you transfer are hard-coded in the firewall and / or SIEM system logs, so you should be careful. To maintain anonymity in this case, unfortunately, it is not enough to clean or destroy local logs: you will be calculated very quickly anyway.
About how to ensure the anonymity of the highest category, as well as more advanced and tidy ways to obtain admin rights, including methods for obtaining domain admin rights, I told you in a recent course on personal information security.
Sincerely, Lysyak A.S.
Warning: file_get_contents (/home/admin/web/comk2content..html): failed to open stream: No such file or directory in /home/admin/web/comk2content.com/public_html/index.php on line 6