Restore grub from the installation disk. Restore the Linux bootloader.
On my laptop there are 2 OSes Ubuntu and Windows, I recently decided to upgrade Windows 8.1 to Windows 10. After the upgrade, the Grub bootloader was successfully wiped. Grub can be broken in other ways, for example, after making changes to the Grub configuration file. In this article I will tell you how to restore the bootloader.
If at boot of your computer you see a black screen with the inscription grub\u003e then most likely your configuration file /boot/grub/grub.cfg is damaged. First we need to define the visible sections, this can be done using the command ls:
Then there are the following possibilities. When you click Next, the installer shows the proposed partition. Drag the line between sections to another position to change the layout. Click Install Now. An overview appears with sections that will rebuild and format the installer. Check this to avoid accidentally deleting invalid partitions.
After clicking “Next”, select the second hDD and click Install Now. This is convenient and not in itself a problem, but complicates subsequent uninstallation. Call the firmware download menu immediately after starting. Select a language and click Next. Appropriate customization tools only offer formatting hard drive and default setting new installation. In this case, select the empty partition that you previously created on the already installed system.
In my case, I found 1 hd0 hard drive, on which 3 partitions: (hd0, msdos1), (hd0, msdos5), (hd0, msdos6).
Find the section containing the root / . This can be done by viewing the contents of the sections.
Ls (hd0, msdosX) /
In my case, it turned out to be msdos1:
 Next, execute the following commands:
If the setup offers the appropriate option, select the root partition as the target for the bootloader, the target drive of the new installation. Often the bootloader can also be disabled. Then install the system in a free partition or on a second hard drive. Select “Something Else” in the “Installation Type” window. Remove it with the - button. All data on it will be lost. Use the button to create a small section for the page file. As a rule, the swap space should be 20-30% more than the main memory.
Removing systems and restoring a boot environment
Check this information carefully. When finished, click Install Now and follow the instructions in the installer. There are probably a few entries related to the system you are deleting. Then set the boot order using the type command.
Grub\u003e set root \u003d (hd0, msdos1) grub\u003e linux / vmlinuz root \u003d / dev / sda1 grub\u003e initrd /initrd.img grub\u003e boot
The first command sets the path to the root / system. The second command tells GRUB the path to the kernel that you want to boot. The third line sets the INITRD file. And the last command loads.
If you did everything correctly, the operating system will boot, after loading, in order to generate the correct Grub configuration file, you must enter in the console:
Background and preparation. Then you can configure both systems completely independently and no need to change the partition. In section. Before you begin, back up all important data, since changes to the partition are always at a particular risk. In the lower half of the window, right-click on the partition panel of the data medium and select "Reduce Volume" in the menu. This is to ensure that malicious software is not installed before the operating system starts.
These systems cannot be installed or started. However, the manual should be found in the manual for motherboard. Just follow the recommendations of the installer. As you customize the menu, describe the point. Therefore, in the "Installation Type" window, select "Something Else" and click "Next." Select it in the "Device for installing the bootloader" section.
Sudo update-grub
In grub rescue mode, similarly, using the ls command, we determine the partition with the root /.
Grub rescue\u003e set prefix \u003d (hd0, msdos1) / boot / grub grub rescue\u003e set root \u003d (hd0, msdos1) grub rescue\u003e insmod normal grub rescue\u003e normal
Grub rescue\u003e insmod linux grub rescue\u003e linux / boot / vmlinuz root \u003d / dev / sda1 ro grub rescue\u003e initrd /boot/initrd.img grub rescue\u003e boot
After a successful download, you need to install the bootloader and configure it:
Use the button to configure the swap partition in the area that is now marked as unallocated. After “Use as:” select “Replace location.” It should be about the same as the installed main memory plus 30 percent. Then create the root partition in the same way. The remaining options remain the same as when creating a new partition. Click Install Now and follow the instructions in the wizard.
If there is no partition on the second hard drive, click “New Partition Table”. To install and run the tool, execute the following two commands in the terminal window. Select the operating system you want to run by default. Click “Apply” to finish. Instead of installing in parallel on a physical disk, you can also use your chosen system on virtual machine.
Sudo update-grub sudo grub-install / dev / sdX
Boot loader recovery with Boot-repair
an excellent program that allows you to literally restore the bootloader in one click. To use the Boot-repair program, you must boot disk with the same ubuntu versions which you have installed. After loading into Live mode, install Boot-repair:
Sudo add-apt-repository ppa: yannubuntu / boot-repair sudo apt-get update && sudo apt-get install -y boot-repair
Virtualization software is free. Installation is performed in the terminal window using the line. After that, the installation wizard will guide you through the installation. If you skip entering the license key, the program will install itself in the free version.
However, for longer testing, the performance of the optical medium is unsatisfactory. We have collected all the necessary files in the package. Open a terminal window. Then run the following three lines. Then run the command in the terminal. This defragments the stick files.
And run boot-repair
Sudo boot repair
In the program window, click on “Recommended repair”:
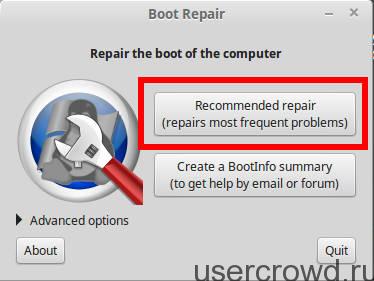 After that, a script will be launched that repairs most of the known Grub problems.
If anyone doesn’t know, then GRUB is the Linux bootloader; if it’s even simpler, this is the menu operating systems, or the download options that you see after bIOS boot. If the bootloader is damaged or jammed, the operating system will not boot.
Especially when new driver software is installed in this process, it can lead to a deterioration after restarting the system. Although security updates and software protect your system from intruders; kernel updates guarantee the functionality of your equipment.
This is because it is nothing but a collection of drivers. Such a software package can become a driver for new hardware components that may not yet be fully developed. To ensure that the kernel file does not exceed a certain size, drivers for very old devices are also regularly removed from the collection.
This usually happens when you are after Linux. Stupid, or maybe just wicked Windows does not like competitors, so it overwrites other people's bootloaders.
If you install Windows first, and then only Linux, then everything will be fine, boot loader save windows bootloader and even include it in his menu. But it is perfect.
If everything was like this, then when Windows crashes and then resets it, the situation described above occurs and you need to restore the grub bootloader.
Fix kernel update
If you have problems after updating the system, you must boot from a previously running kernel. This will show you all installed driver collections. This is important because otherwise you will have to repeat the above steps after each restart. First open a terminal window, and then all the kernels are displayed on your system.
Immediately after removing the new driver collection. With this command you must, of course, configure the version number. For future updates, a newly removed kernel will be offered again. Before thinking about kernel support, you should know how to constantly protect a collection of working drivers. Sort the output of information in the average form for " Installed Version».
How to restore GRUB?
In order to restore the GRUB bootloader, you need to boot Linux from a USB flash drive or from a CD-DVD. Personally, I keep this manual printed on paper so that I don’t look for it on the Internet, and the Internet may not be at hand. Which I advise you. After you boot into a flash drive or CD-DVD, you need to open the terminal, because it is in it that we will "conjure".
To do this, press and hold the control button and left-click on the corresponding entries. Then mark the two linked kernel files with the latest version number. . Finally, select the Package tab and confirm your Block Version entry. A lock appears before recordings.
This action cannot delete the current driver collection. . Do you want to create backup your favorite kernel and never install another version of your system? You can use this flag to indicate which software packages you want to install. Important: enter this command at your own risk.
Step 1.We determine which of our Linux hard drives and which letter it has. To do this, run the command:
Sudo fdisk -l
Step 2 We mount our disk into the system. To do this, run the command:
Sudo mount / dev / sdXY / mnt
Here you need to clarify a little. X is the disk in the system, for example sda, sdb, and so on. Y is the disk number, for example 1, 2, and so on. The win command will therefore be something like this:
You booted with the old kernel, but your problem persists? Perhaps the update was unsuccessful or could not be installed properly. In this case, restart the computer and select the second item. . This will load a sophisticated recovery menu that will allow you to restore your system.
Conclusion: the world in error update
Also make sure your computer has an active Internet connection. Follow the instructions. When the process is complete, you will automatically return to the recovery menu. From there, you can restart the system through the menu item "resume". Then, of course, it is doubtful whether the update really became a trigger for complications. My good friend - these are examples of programming for smartphones. He claims that his company should do an update for the game once a week so as not to lose users.
Sudo mount / dev / sda1 / mnt
But this is just an example, you will have your own letters and numbers.
Step 3 And the last step is gRUB recovery. In order to restore GRUB, execute the command:
Sudo grub-install --root-directory \u003d / mnt / / dev / sd X
Again, X is your drive letter. After that, you need to reboot, for example, with this command:
Sudo reboot
All if you have not mixed anything up and restore grub If you succeed, you will see a menu with a choice of operating systems. Everything, as everything, is quite simple!
The boot menu is corrupted
If there is nothing to improve, then the fonts just change - the main line of update bars appears. However, for kernel updates you can pull the brake. Now enter the following commands one at a time and confirm with the Enter key. In the program you can see which partition is your system partition. . Then try again and run the command.
It should not, which leads to success, there is still the opportunity to check. Also, the connecting cable may be defective. . This allows you to add a missing entry to the boot menu. But even this, you can easily return to the old black boot menu without affecting the system.