Restore the grub bootloader to a USB flash drive. Repairing the bootloader for Windows and Linux. OS loader functions.
If anyone does not know, then GRUB is linux bootloader, if it's even simpler, then this is the operating systems menu, or the boot options that you see after bIOS boot... If the bootloader is damaged or worn out, then operating system will not boot.
This usually happens when you're after Linux. Stupid, or maybe just wicked Windows does not like competitors, so it overwrites other bootloaders.
Typically, you will receive the following error loading screen. Enjoy! ... When it opens, run the command below to install the partition. If the installation is successful, you will get a similar result. English is not my first language. Here you will find solutions for the two most common problems: how to restore it and how to remove it.
Also, some tips for adapting it. Now you need to find out what the root partition name is. Launch a terminal window. Change the number according to your situation. This is not difficult. This could be greatly improved, for example. Select your preferred language and keyboard layout.
If you install Windows first, and then only Linux, then everything will be fine, the GRUB bootloader will save the Windows bootloader and even include it in its menu. But that's perfect.
If everything was like this for you, then when Windows crashes and its subsequent rearrangement, the situation described above occurs and you need to restore the grub bootloader.
How to repair GRUB?
In order to restore the GRUB bootloader, you need to boot Linux from a USB stick or from a CD-DVD. Personally, I keep this instruction in a printed form on paper, so that later I do not look for it on the Internet, and the Internet may not be at hand. Which I advise you too. After you have booted into a flash drive or CD-DVD, you need to open a terminal, because this is where we will "conjure".
The language and keyboard layout can be set by pressing the function keys. Since many computers have multiple functions assigned to each function key, you may need to compress a different key first in order to use them. This will provide a simple visual illustration of the partitions on your hard drive.
This tutorial requires you to have some understanding of how your multitasking system works, disk partitions, and using command line... If you have a more complex multi-boot setup like me, you probably know this.
Step 1.We decide on which of the hard drives our Linux is located and what letter designation it has. To do this, run the command:
Sudo fdisk -l
Step 2. We mount our disk into the system. To do this, run the command:
Sudo mount / dev / sdXY / mnt
Here we need to explain a little. X is the drive on the system, like sda, sdb, and so on. Y is the disk number, for example 1, 2, and so on. So the team will get something like this:
You will want to know the device string of the corresponding section. If you cannot use graphics program for it to work, open a terminal program and use the following command. All partitions on all devices on your system will be listed here.
We now need to install your partition so that we can access it. First we will create the folder that contains the section and then do the editing. You can now view your hDDby going to that folder. He will not even realize that he is not working from a real system.
Sudo mount / dev / sda1 / mnt
But this is just an example, you will have your own letters and numbers.
Step 3. And the last step is restoring GRUB. In order to restore GRUB, run the command:
Sudo grub-install --root-directory \u003d / mnt / / dev / sd X
Again X is your drive letter. After that, you need to reboot, for example, with the following command:
Sudo reboot
Everything, if you have not confused anything and restore grub you succeed, then you will see a menu with a choice of operating systems. Everything, as everything, is quite simple!
To take root completely. From now on, be very careful. In most cases, just leave it as it is. Now you can simply close the terminal, reboot the machine safely and everything should be back to normal. There you open a terminal window and first mount the installed system to a live system.
Of course, the author does not guarantee that the path described here will work. For me it worked like this twice. This entry has been published. This chapter describes possible problems and their solutions. Even if your situation does not exactly match the problems described here, you can find a similar case that will provide you with guidance on how to solve your problem.
I have 2 Ubuntu and Windows operating systems on my laptop, I recently decided to upgrade from Windows 8.1 to Windows 10. After the upgrade, the Grub bootloader was successfully erased. There are other ways to break Grub, for example after making changes to the Grub configuration file. In this article I will show you how to restore the bootloader.
If, when you boot your computer, you see a black screen with the inscription grub\u003e then most likely your configuration file /boot/grub/grub.cfg is corrupted. First, we need to define visible sections, this can be done using the command ls:
There are several sources that can help you find the problem with your system. Select "Other Support" and then the category for your problem. Once all the information has been collected, you can attach it to your support request. Below is a list of the most important log files with a description of their typical applications. The tilde in the path indicates the home directory of the current user.
Repairing the bootloader using Boot-repair
In addition to the log files, your computer also provides you with information about the running system. This module represents kernel objects, their attributes and relationships. In Chapter 2, System Monitoring Utilities, you will find a selection of the most important ones used to diagnose your system. Each of the following scenarios begins with a heading describing the problem, followed by one or two paragraphs of solution suggestions, available links for more detailed solutions, and cross-references to other scenarios associated with that scenario.
In my case, 1 hard drive hd0 was found, on which 3 partitions: (hd0, msdos1), (hd0, msdos5), (hd0, msdos6).
Find the section containing the root / ... This can be done by viewing the contents of the sections
Ls (hd0, msdosX) /
In my case, it turned out to be msdos1:
 Then we execute the following commands:
Installation problems are situations where the computer cannot be installed. The operation could not be performed or the graphical installer could not be called. This section discusses some of the common problems that can arise; In addition, you will find possible solutions and workarounds here.
Problems with data transporters usually only occur with homing data carriers. This process can take several minutes. If errors are found, do not use this installation media. You can display specific equipment and technical data using hardware information. Click on any node in the tree to get additional information about the device. This module is especially useful when you are submitting a support request for information about your hardware.
Grub\u003e set root \u003d (hd0, msdos1) grub\u003e linux / vmlinuz root \u003d / dev / sda1 grub\u003e initrd /initrd.img grub\u003e boot
The first command sets the root / system path The second command tells GRUB the path to the kernel you want to boot. The third line sets the INITRD file... And the last command downloads.
If you did everything correctly, the operating system will boot, after booting, in order to generate the correct Grub configuration file, you must enter in the console:
You can save the displayed hardware information to a file using the Save to File command. Select the directory and file name you want, and then click Save to create the file. To install on this type of system, create boot disks and boot your system with it.
Monitoring data are read. ... Insert a string to search for errors. Otherwise, the computer will try to boot from other media, usually from hard drive... During this initialization phase, the computer performs some diagnostic tests on the hardware. One of them is checking the working memory, which is indicated by the working memory counter.
Sudo update-grub
In grub rescue mode, similarly, using the ls command, define a partition with the root /.
Grub rescue\u003e set prefix \u003d (hd0, msdos1) / boot / grub grub rescue\u003e set root \u003d (hd0, msdos1) grub rescue\u003e insmod normal grub rescue\u003e normal
Grub rescue\u003e insmod linux grub rescue\u003e linux / boot / vmlinuz root \u003d / dev / sda1 ro grub rescue\u003e initrd /boot/initrd.img grub rescue\u003e boot
After a successful download, you need to install the bootloader and configure it:
In the first case, the computer first scans the hard drive and then the floppy drive for bootable media. Under Advanced Options, select Boot Device Options and press Enter. Close this window and click "Yes" to boot your computer.
- Select "Disk Utilities".
- The connected hardware components are now displayed.
- Open Configure Adapter Settings.
Sudo update-grub sudo grub-install / dev / sdX
Repairing the bootloader using Boot-repair
an excellent program that allows you to restore the bootloader literally in one click. To use the Boot-repair program, you need boot disk with the same ubuntu versions which you have installed. After booting into Live mode, install Boot-repair:
Sudo add-apt-repository ppa: yannubuntu / boot-repair sudo apt-get update && sudo apt-get install -y boot-repair
If your system cannot be installed in the default installation mode on the first boot screen of the installation, follow these steps. If you have problems, proceed as described above, but in this case select "Secure Settings". Most hardware can be loaded with this option.
Recovering the Linux bootloader
If you are having trouble with these two options, try using the boot option prompt to send any additional options needed to support that type of hardware in the kernel. This will deactivate the time counter. This parameter is used to solve timing problems in your systems. It's pretty new functionwhich can be especially useful if you notice backward developments on your computer, especially time backward developments.
And run boot-repair
Sudo boot-repair
In the program window, click on "Recommended repair":
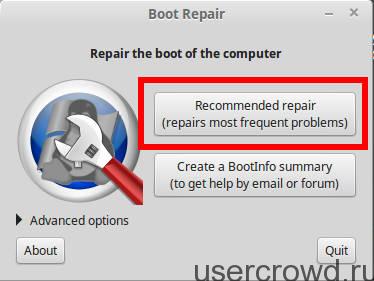 This will launch a script that repairs most of the known Grub problems