Automatic copying to Yandex disk. Data backup on Yandex.Disk with the new Handy Backup. Classic application features built into Windows
Yandex.Disk is one of the few Yandex services of which part is software for desktop. And one of its most important components is the algorithm for synchronizing local files with their copy in the cloud. Recently, we had to completely change it. If the old version could hardly digest even several tens of thousands of files and, moreover, did not respond quickly enough to some “complex” user actions, the new version, using the same resources, copes with hundreds of thousands of files.
You can download it from the game store and give it a try for free without paying a dime. This service is really very easy to use. It comes with some additional features, and one of them is a photocopy, which allows you to upload any photo you take from your phone to the cloud automatically, and the other is folder sharing, which allows you to share any folder with anyone. Thanks to its powerful servers, you will never be able to upload your files.
It allows you to view the history of changes in your documents and share with your friend and let them edit. This service, if it is very good for those users who want to download every moment when they capture and view them on their laptop on a desktop computer or laptop instantly. It is the best to use because it is very easy to use for each user.
In this post I will tell you why it happened: what we could not foresee when we came up with the first version of Yandex.Disk software, and how we created a new one.
First of all, about the synchronization task itself. Technically speaking, it consists in having the same set of files in the Yandex.Disk folder on the user's computer and in the cloud. That is, user actions such as renaming, deleting, copying, adding and changing files should be synchronized with the cloud automatically.
This storage is enough for storing and sharing photos and videos. No matter what you upload to the cloud using mega, all this will be free and encrypted, and the key remains with users. This allows you to synchronize camera images directly with the mega cloud. But if you need more storage space, there are some plans. There are some errors in this application, but most users are happy to use this application.
Every webmaster must have several backups of his website if something goes wrong. So you need to do backup all your files, as well as the database, to have a full copy of your site. Then what is the best place to maintain this duplication?
Why is it not as simple as it seems at first glance?
Theoretically, the task may seem quite simple, but in reality we are faced with various difficult situations. For example, a person renamed a folder on his computer, we detected this and sent a command to the backend. However, none of the users waits until the backend confirms the renaming success. A person immediately opens his locally renamed folder, creates a subfolder in it, and, for example, transfers part of the files to it. We are in a situation in which it is impossible to immediately perform all the necessary synchronization operations in the cloud. First you need to wait for the completion of the first operation and only then you can continue.The situation can become even more complicated if several users are working with the same account at the same time or if they have a shared folder. And this happens quite often in organizations using Yandex.Disk. Imagine that in the previous example, at the moment when we received confirmation from the backend of the first renaming, another user takes and renames this folder again. In this case, again, you cannot immediately perform the actions that the first user has already completed on his computer. The folder in which he worked locally on the backend at this time is already called differently.
Disk is a cloud service, especially popular among Russian users. 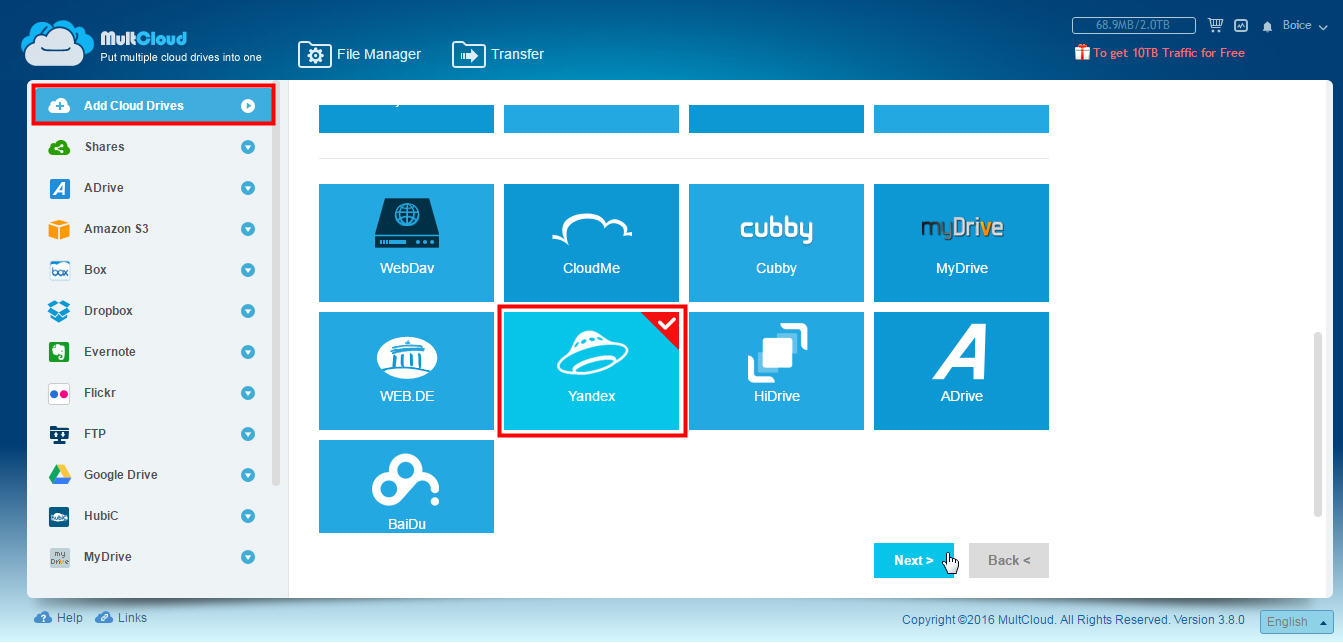
There are many options, but each can be used as you like. When you are ready, you will see that in the column on the left various services will be listed. If you click on someone or you click on the small arrow on the right, you will see the folders that are in each. Of course, you can see what they contain by double-clicking on them. You can also view suggested options using the right-click menu displayed in a folder or file.
There are times when a file on a user's computer cannot be named exactly as it is called in the cloud. This can happen if the name contains a character that cannot be used by the local file system, or when the user is invited to a shared folder, and he has his own folder with that name. In such cases, we have to use local aliases and track their connection with objects in the cloud.
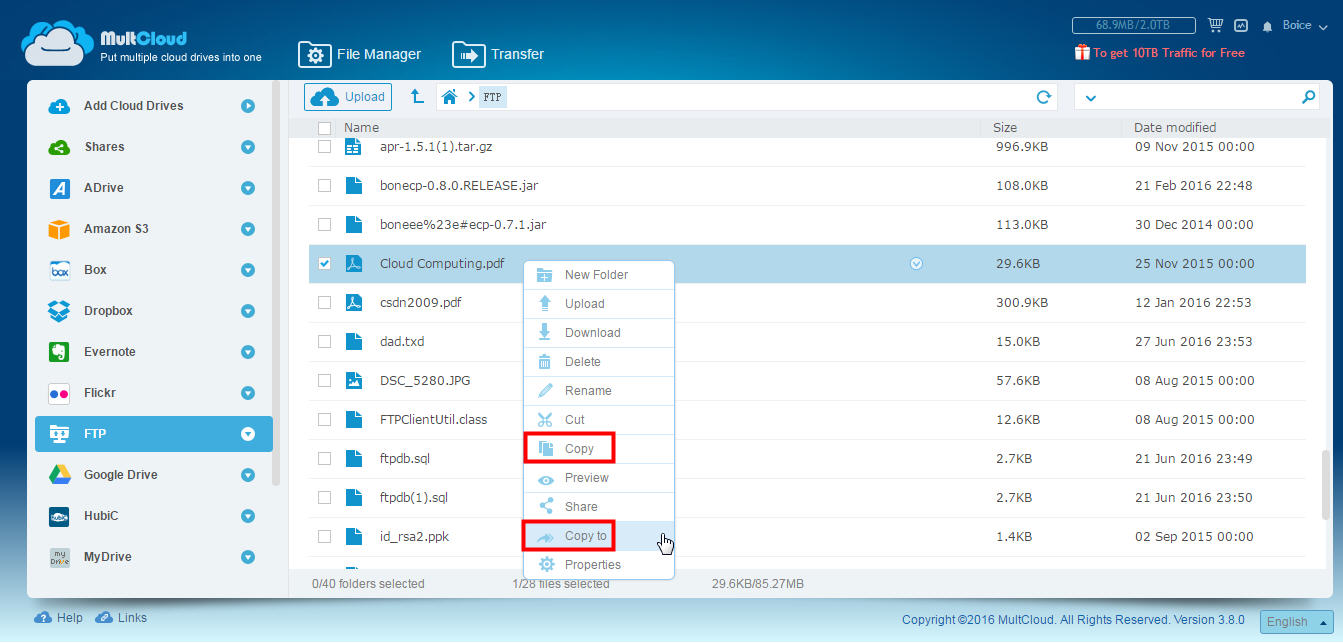
To copy a folder or file from the document explorer, right-click it and click Copy. Immediately launch the window with the storage services available for copying, in addition, we will have the opportunity to select several destinations without any complications. The process is so simple that it resembles an operation performed directly from the storage service.
Scheduled Backups
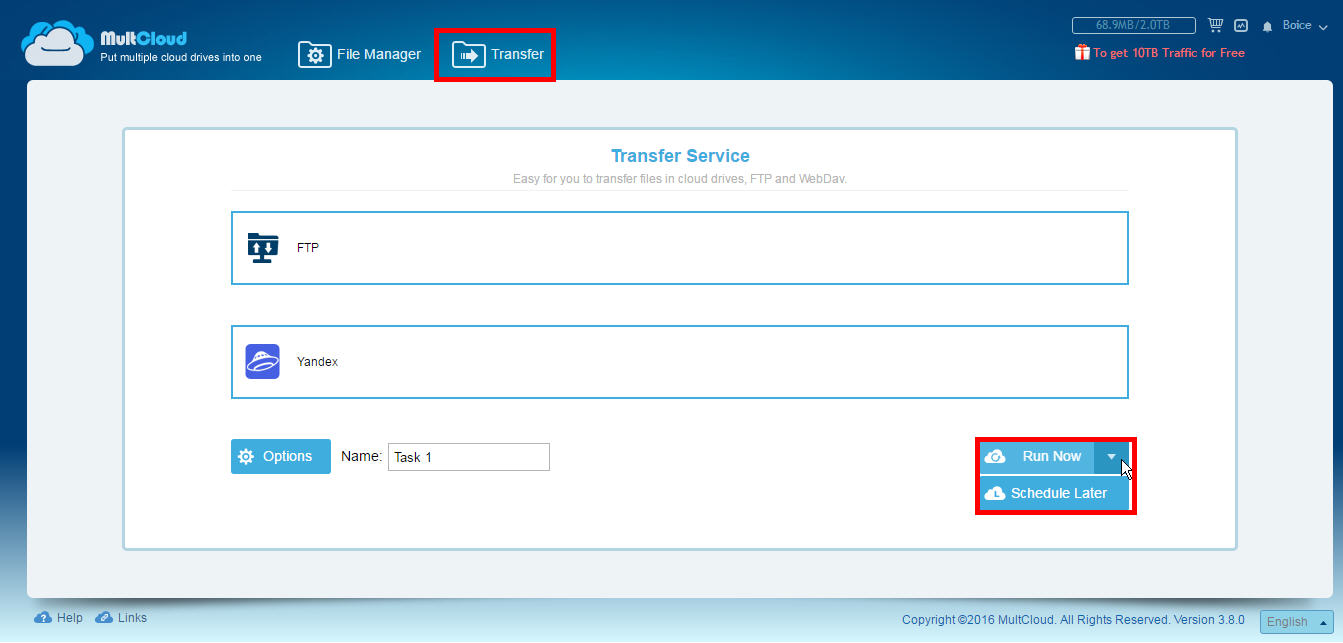
You should think that when you create the copy, the source file will remain in another service, because if you do not want to duplicate, you must delete the source file without worrying about deleting it. Another way to transfer files from one place to another, and also useful for backing up, is to use the “Top Transfer” button, which allows you to select a directory to copy from one service to another, in addition to setting more advanced parameters, such as programming an operation , overwrite if there is a change, rename, send email notifications and include or exclude files.
Previous version of the algorithm
In the previous version of Yandex.Disk desktop software, a tree comparison algorithm was used to search for changes. Any other solution at that time did not allow the search for displacements and renaming, since the backend did not have unique identifiers for objects.In this version of the algorithm, we used three main trees: local (Local Index), cloud (Remote Index) and the last synchronized (Stable Index). In addition, to prevent the re-generation of already queued synchronization operations, two additional auxiliary trees were used: the local expected and the cloud expected (Expected Remote Index and Expected Local Index). In these auxiliary trees, the expected state of the local file system and clouds, after all synchronization operations that are already queued.
Planning options allow you to perform an operation automatically once, daily at a specific time, weekly on certain days and times, and monthly at a specified time and date. To see pending tasks, we can access the manager using the button located to the left of our name at the top.
Now that you know the easiest way to copy files from one storage to another or even to a server, forget to re-upload the files to download them or use your desktop client. The purpose of this guide is that you can manage your various services without stress.

The procedure for comparing trees in the old algorithm was as follows:
- If the local expected tree and the cloud expected tree are empty, initialize them by copying the last synchronized tree;
- We compare the local tree with the expected cloud and, based on the results of comparing individual nodes, add synchronization operations in the cloud to the queue (creating collections, transferring files to the cloud, moving and deleting in the cloud);
- For all operations that are queued in the previous step, we fix their future effect in the expected cloud tree;
- We compare the cloud tree with the local expected one and, based on the results of comparing individual nodes, add to the queue synchronization operations with the local file system (creating directories, downloading files from the cloud, moving and deleting local files and directories);
- For all operations that are queued in the previous step, we fix their future effect in the expected local tree;
- If simultaneous operations with the same file or directory fall into the queue (for example, transferring a file to the cloud and downloading the same file from the cloud), then we fix the conflict - the file has changed in two places;
- After the synchronization operation is performed in the cloud or with the local file system, we record its result in the last synchronized tree;
- When the synchronization operation queue becomes empty, we delete the local expected and cloud expected trees. Synchronization is complete, and we will no longer need them.
Why did we have to come up with a new algorithm
The main problems of the tree comparison algorithm were the large memory consumption and the need to compare the whole trees even with small changes, which led to a large processor load. During the processing of changes to even one file, the use of RAM increased by approximately 35%. Suppose a user had 20,000 files. Then, with the simple renaming of one file of 10Kb in size, memory consumption grew spasmodically - from 116MB to 167MB.We also wanted to increase the maximum number of files with which the user can work without problems. For example, a photographer who stores the results of photo sessions in Yandex.Disk may have several tens or even hundreds of thousands of files. This task became especially urgent when people had the opportunity to buy additional space on Yandex.Disk.
There are several ways to back up your computer. For example, do not back up files in the recovery section. Always keep the media that you use for backup in a safe place to prevent unauthorized persons from accessing your files; a fireproof place other than equipment is recommended.
To create a system image
You may also consider encrypting data from a backup.
System images contain all information about a computer in a certain state
Support different versions of system images. You can store several versions of system images. On internal and external hard drives, old system images will be deleted when the disk runs out of free space. To save disk space, delete old system images.In the development, I also wanted to change something. Debugging old version It caused difficulties, since data on the states of one element were in different trees.
By this time, id of objects appeared on the backend, with the help of which it was possible to more effectively solve the problem of detecting movements - previously we used paths.
If you save system images to a network location, you can only save the most recent system images on each computer. If you have an existing system image of a computer and create a new one for the same computer, the new image will overwrite the existing one. If you want to save an existing image, you can copy it to another location before creating a new system image by following these steps.
Create recovery point
Select the location of the system image. . You can use the recovery point to restore the system files of the computer at an earlier point in time. System Restore automatically creates restore points every week and when the computer detects changes, such as when an application or driver is installed.
New algorithm
We decided to change the data storage structure and replace the three trees (Local Index, Remote Index, Stable Index) with one, which should lead to a decrease in redundancy in the main data structure. Due to the fact that the key to the tree is the path to the file system element, as a result of combining, the amount of RAM used has been significantly reduced.
This is a way to create a recovery point. To search the contents of the backup, select Search Files or Search Folders. When you search for folders, you cannot see individual files in the folder. . If you are looking for files or folders associated with a specific user account, you can improve your search results by entering the location of the file or folder in the search field.
Restore a backup made on another computer
Find files that were restored from a backup made on another computer
If you restore files from a backup performed on another computer, the files will be restored to the folder under the username that was used to create the backup. If the usernames are different, you will need to scroll to the folder in which the files will be restored.We also refused to use auxiliary trees during synchronization, because each element of the tree in the new version stores all the necessary data. This change in structure greatly simplified code debugging.
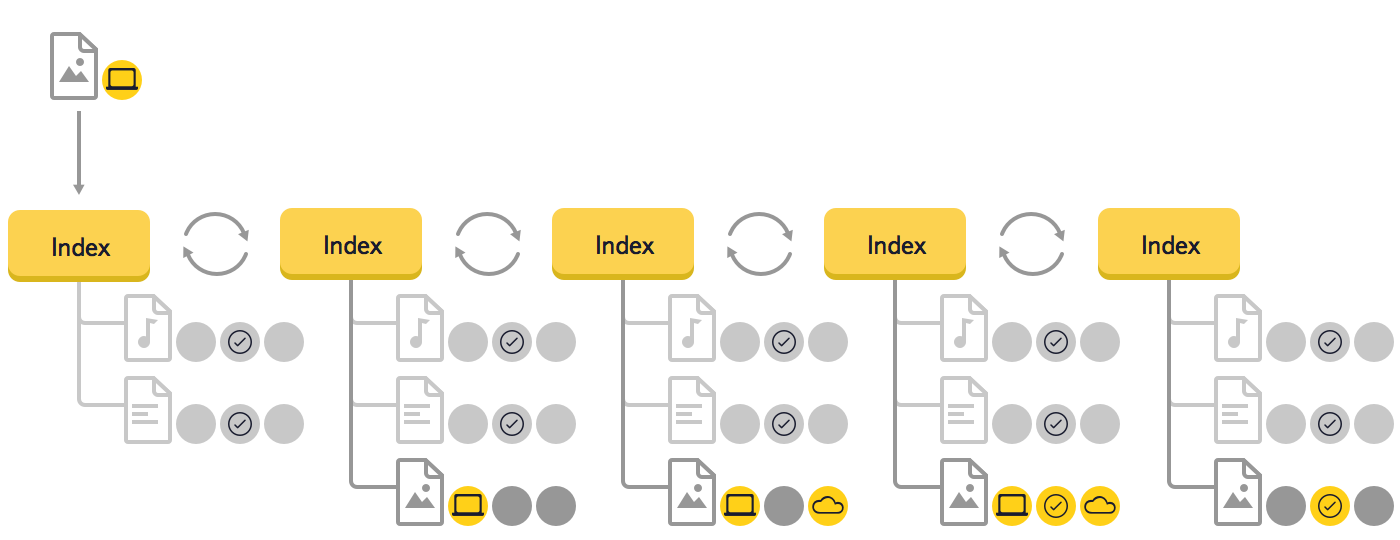
Since we understood that this was a major change, we created a prototype that confirmed the effectiveness of the new solution. Let's look at an example of how the data in the tree changes during the synchronization of a new file.
- After the user added a new file to the Drive folder, the program detected it and added a new element to the tree. Only one state is known for this element - local. Since there are no stable and remote states, no memory is allocated for them;
- The program performs the upload of the file. A push comes from the cloud confirming the appearance of a new file, and a remote state is added to the tree;
- The states of local and remote are compared. Since they match, a stable state is added;
- The local and remote states are deleted. They are no longer needed, since all the information is in stable.
Virtual machines and storage
You can find the recovered files by following these steps. Double-click the username folder that was used to create the backup. The recovered files will be in different folders depending on where they were originally. Restore files from a backup after restoring a computer from a backup of a system image.
- Select the Start button and select Computer.
- Double-click the drive icon where the files were saved.
- Click the Users folder.
- You will see a folder for each account user.
This example shows that in the new synchronization algorithm only those elements and events are processed, the data on the changes in which were received from the file system or the cloud, and not the whole tree, as it was before. If necessary, parent or child nodes will be processed (for example, in the case of moving a folder).
Other improvements
In the new version, we worked on other improvements that affected performance. Saving the tree was done incremental, which allows you to write to the file only the latest changes.Yandex.Disk uses sha256 and MD5 digests to check file integrity, detect changed fragments and deduplicate files on the backend. Since this task is very CPU intensive, in the new version the implementation of digest calculations has been significantly optimized. The speed of receiving a file digest is approximately doubled.
To restore files from a backup created after creating a backup of the system image, follow these steps: Backup, restore and synchronization features are accompanied by an intuitive installation wizard. Use the backup function to access the following backup modes.
Cloud services supported by backup. When you back up for private access, make sure that the user has access to shared folder. In the "Backup" section. Restore the backup made on the backup page.
Figures
Synchronization of unique 20,000 files of 10KbCalculation of digests of unique 20,000 files of 10kb (indexing)
Starting from 20,000 synchronized files of 10Kb
Upload 1Gb. 10 Mbps Wi-Fi Connection
What happened
The examples show that a new version Yandex.Disk software uses about 3 times less RAM and about 2 times less CPU load. Processing minor changes does not increase the amount of memory used.As a result of the changes made, the number of files with which the program copes without problems has increased significantly. On the Windows version, 300,000, and on Mac OS X, 900,000 files.
Backup, synchronization, and recovery examples
Cloud services supported by sync. If several tasks are assigned simultaneously or started manually, the manager saves them in the queue. The owner stores important files in his personal share. Both systems are connected to the same local area network. Back up content to a network storage device that is used outside the local network. The target storage device may also be compatible third-party storage device.
Backing up content to the cloud service
An important picture of his personal exchange was accidentally deleted.In the previous two articles, I configured LAMP on VPS and screwed nginx to it. The next thing you start to think about right away is how to lose it all. That is, it comes to backup.
Let's discuss in order: what, where and how to backup.
what
- All configs that you painstakingly edited ( / etc)
- All user files ( / home, / root)
- Databases (we will mean MySQL)
Where
Today, everything goes into the "clouds." Backups I want to put there.
Fortunately, the owner backs up his data on another storage system. Restore the backup to restore an earlier version of this resource, including the lost file. Log in to the destination storage device from your computer and find the missing file. For example, you can retrieve a file from a cloud storage service that hosts a backup of your personal cloud. Important: the time required to complete the first backup task may vary depending on the amount of data and the speed of your network, which may take several hours or even days to back up your site or in the Cloud.
Yandex.Disk turned out to be a very interesting option for storing backup. It has several advantages:
- Free 10 GB
- It is located in Russia, and files are poured onto it very quickly
- Able to work on the WebDAV protocol, which allows you to load data from the console onto it using the curl command
how
Here is the prescription. Log in as root and create a script:
Click “Add Backup” to start the backup wizard. Select "Backup." . Follow the instructions in the Backup Wizard to perform one of the following types of backups. In the following sections. The table below.
With these optimized formats, you can perform incremental backups. This type of backup allows you to back up new or changed files from a previous backup. If the format is not optimized, you should always perform a full backup each time you perform a new task, in which case all the elements in the source are copied whenever a new task is performed.
Chmod 0700 backup-now.sh
The script text will look something like this:
#! / bin / bash SERVER_NAME \u003d "server1" TIME \u003d `date +% Y-% b` FS_FILE \u003d / tmp / $ SERVER_NAME-fs. $ TIME.tar.gz MYSQL_FILE \u003d / tmp / $ SERVER_NAME-mysql. $ TIME .sql.gz # Archiving filesystem tar -czf $ FS_FILE / etc / root / home # Archiving databases mysqldump -u root --password \u003d qwerty --all-databases | gzip\u003e $ MYSQL_FILE # Uploading to the cloud curl --user USER: PASSWORD -T "($ FS_FILE, $ MYSQL_FILE)" https://webdav.yandex.ru/ # Cleanup unlink $ FS_FILE unlink $ MYSQL_FILE
The first time it’s better to run the commands one at a time, commenting on the rest. If everything goes well, then two archives will appear in your Yandex.Disk.
Now for automation you need to add a symlink to backup-now.sh in /etc/cron.daily (or /etc/cron.weekly). Just keep in mind that on some systems (in particular, on Debian), the symlink needs to be removed from the extension ().
The $ TIME variable is selected so that backups from the last day of each month will accumulate. If you do not want to litter the cloud, then this can be removed from the script, but practice shows that old copies can be useful. It will just be necessary to periodically remove the junk.
And if I do not want Yandex.Disk?
Obviously, you can upload to any resource that supports WebDAV. There are services that provide WebDAV access to Dropbox or Google Drive (for example, Otixo, SMEStorage, DropDAV). Rumor has it that SkyDrive works through WebDAV. And there is also hope that support will appear in Dropbox out of the box.
P.S. Archive Encryption with GnuPG
Since backups contain a bunch of secret information (passwords, data), it makes sense to encrypt them:
GPG_COMMAND \u003d "gpg -c -z 0 --batch --passphrase XXXXXXXXXX" FS_FILE \u003d / tmp / $ SERVER_NAME-fs. $ TIME.tar.gz.gpg MYSQL_FILE \u003d / tmp / $ SERVER_NAME-mysql. $ TIME.sql. gz.gpg # Archiving filesystem tar -cz / etc / root / home | $ GPG_COMMAND\u003e $ FS_FILE # Archiving databases mysqldump -u root --password \u003d qwerty --all-databases | gzip | $ GPG_COMMAND\u003e $ MYSQL_FILE. . .