The diameter designation on the keyboard. Various ways to insert a diameter icon in a Windows application. How to put a long dash in Word?
In those cases when it is required to indicate the size of the diameter, use the sign in the form of a circle with a line "Ø". This symbol is applied before the dimension number.
Examples of using the diameter sign:
Signs of the diameter on the details of rotation of a cylindrical and conical shape
![]()
Dimensions applied with insufficient space
on the dimension line
You can use the character viewer to insert emoticons, dingbats, and other characters as you type. The characters and symbols that you use are often displayed in the Frequently Used list in this window. If you simply send several emojis without any other text, emojis appear three times as much.
To print an accented or alternate version of a character, hold the key until its alternate characters are displayed. If you decide that you do not want to type an accented character after holding the key, enter another character or press the escape key.
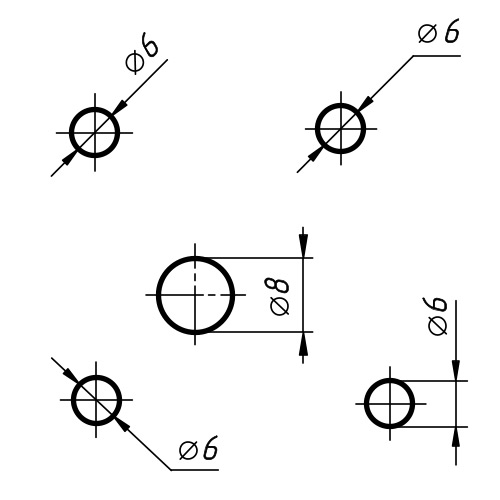
Designation of sizes with a lack of space
for arrows
Diameter - This is the length of the straight line connecting the circumference of the circle. A piece of diameter, in any case, passes only through the center of the circle. They usually designate it with the Latin letter "D" or the sign "Ø". If the radius of the circle is multiplied by two, the sum will be the diameter. All volumetric bodies having a spherical shape, as well as those at least one of the possible cross-sections of which is a circle, are indicated by diameter symbols. The word " diameter"Came from the Greek word" diametros"- the diameter.
If additional characters are not available for the key you are holding, a pop-up menu does not appear. The menu also does not appear if the “Repeat key” slider is set to “Off” in the “Keyboard” panel in “System Preferences”.
Some keys are repeated when you hold them, depending on where you enter them. Hold the spacebar or character keys to repeat these characters in most applications. In applications where accented characters are not used, for example, Calculator, Graph, or Key-letter, and the number keys also repeat when you hold them.
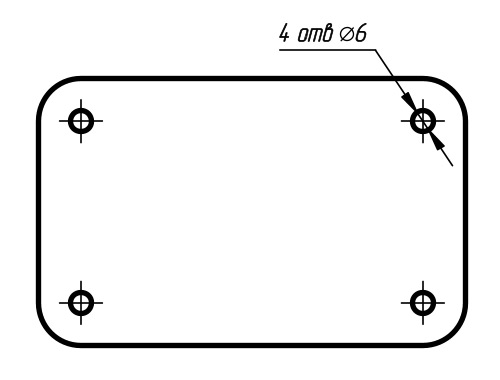
Four hole designation example
with diameter
In the technical drawings, diameters are indicated by the crossed-out “Ø” symbol. This sign is placed in front of the dimensional numbers of parts, which can be either cylindrical or conical.
If the character does not repeat, check the Keyboard panel in the System Preferences to make sure that the Key Repeat slider is not set to Off. If the key is not intended to be repeated in the application you are using, copy the character to the clipboard.
When does such a need arise?
If you need to enter several special characters or characters, you can use the character map or enter keyboard shortcuts. You must use the numeric keypad to enter numbers, not the keyboard. . Expand the list of International Support.
In cross section, the cone is a right-angled triangle, one of whose legs is parallel to or pines of the body of revolution. Its parameters have the following notation: “D” is the larger diameter, “d” is the smaller diameter, “L” is the length. In the drawing, the diameters of the cone are indicated by numbers in front of which are placed the signs “Ø” and the numerical value is long without lettering.
Using a character map, you can copy individual characters or a group of characters to the clipboard and paste them into any program that can display them. It is automatically added to the diameter dimensions, but sometimes you can include it in other types of sizes, as well as leaders, tables and notes.
Open the character map by selecting “Other” at the bottom of the character menu. Select a font, and then use the scroll bar on the right to see all the available characters for that font. You will see them in the “Symbols” field for copying. Not all fonts include every character.
The most common parts with cylindrical surfaces include shafts for various purposes. Cylindrical bodies formed by the rotation of a rectangle near one of its sides are indicated by a diameter. Smooth shafts have some design features, and are divided into varieties: straight, stepped unilateral, stepped bilateral and heavy. For example, shafts of induction motors, in which the rotor is mated to the shaft by pressing on its largest diameter, and on both sides there are steps for bearings, fans, and pulleys. Bilateral stepped shafts can also be found in various mechanisms where any other design features are required. Cylindrical parts, as a rule, have a total maximum length and outer diameter. Depending on the specific configuration of a particular product, its composition may include such elements as internal and external grooves, steps, undercuts, etc. with different diameters whose values \u200b\u200bare preceded by the signs “Ø”.
After selecting the characters you want to use, select Copy and close the character map. Here's a quick video demonstrating how to add a diameter character to a multi-callout using a control code. The same process works for any text and multi-line text objects.
This is for people who want to paint by typing commands. When the command line is active, the command "Command:" turns blue. So, now when you press the key, you enter the commands. Many teams invite you to the command line to request additional data. They tell you what contribution they expect - for example, for example, and list other possibilities in square brackets. This means that the program expects a point or you can select the Cancel or close option.
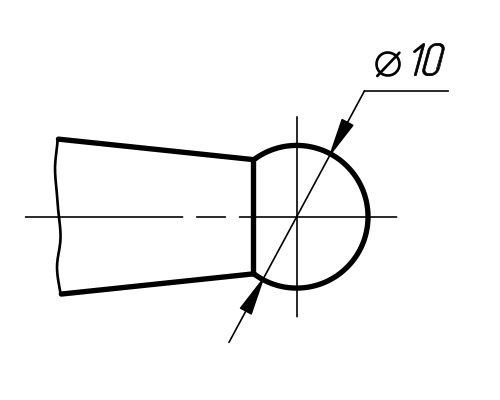
Diameter Sign Example
on a spherical surface
Parts with tapered surfaces include instrumental adapter sleeves in which the outer and inner surfaces are tapered. Such bushings provide high centering accuracy and speed of tool change with sufficient rigidity when used on machines. Reducers are short and long.
Thus, you see that the value for the offset is 5, and you can either set a new value by entering it on the command line, or using the Tool Options toolbar, or you can start drawing parallel objects. Each command described below has a long format and a short format.
Or you can create points by typing on the command line. Generate dots as described in the dots section. After creating a line segment, any subsequent points create a line segment with the point that precedes it. If there are at least two segments, you can close the line by typing it on the command line.
Conical tool parts of this type are called " morse cone"And are divided into numbers. The angles, lengths and diameters of the adapter sleeves can be taken from special tables. The tabular data uses letter designations such as - “d” is the smaller diameter, “D” is the larger diameter, “L” is the length of the part. In the drawings, diameters and lengths are indicated by digital values, with a “Ø” sign placed in front of the diameter numbers.
Drawing a line or other object with an offset
All created line segments can be selected individually. You draw a polyline exactly as you would a line. The only difference is that all segments of the polyline are a single object. You can enter a number from command line or using the Tool Options toolbar, you can select the Rotate option.
The offset works on lines, polylines, circles, arcs, polygons. The offset does not work on ellipses, Bezier curves. If you enter a starting point, you will be prompted to enter a second and third point. After entering the radius, you will be asked to indicate the starting point.
« Morse cone"- in addition to adapter sleeves, it is also used in the manufacture of shanks for twist drills, end mills, tools and mandrels. Tool cones are fixed due to elastic and plastic deformation. To implement such connections in the spindles of milling and turning machines, tapered holes are provided for installing an auxiliary tool. In addition, the lathe tailstock tailstock has the same conical hole.
Arcs directed by the center - radius - the starting point method always goes counterclockwise from the starting point. Note that when using the toolbar, there are more options for drawing a circle. Center and point, center and radius, two opposite points, three points, and finally the Concentric option. You enter the desired text in the multi-line edit box. Above the edit box there are icons that allow you to clear, copy or paste text, save text to a file, or load it from a file.
There are dropters in the edit box to help you enter characters, such as diameter or unicode characters. After filling out the dialog box, you will be prompted to enter "Specify the insertion point." You specify a point using any of the methods described above.
The technology uses a large number of parts and their elements to indicate which diameter sign is used. For standard diameters, a parametric series is used, which includes standard sizes. When developing technical products, design diameters are rounded to the nearest values. When marked on the technical drawings, the sign of the diameter should be accompanied by a dashed-dotted line indicating the axis, which indicates a round section of the part.
Word and other office applications
After entering the point, the text is inserted into place, and you are again prompted to "Specify the insertion point." When scaling and displaying around a drawing, you will most likely use the mouse wheel mainly. Just hover over the part you want and scroll the mouse wheel forward to enlarge. Scroll the mouse wheel back to zoom out.
Zoom to a selected drawing area
This is different from using the mouse wheel because this increase is always centered in the center of the screen. Then it displays the selected area in the entire drawing window. Currently, it is often faster and more convenient to use a mouse with a wheel and zoom in and out using the scroll wheel.
When writing technical texts or in drawings, you often need to insert a diameter sign. In drawing, it is also called the sign of the circle. There is no such sign on the keyboard, so there is a problem. Let's look at a few ways to insert a diameter symbol.
The diameter designation looks like this: Ø or ø. This is a latin letter O with a diagonal stroke.
Scale to display the entire drawing
When you click on the scroll wheel, you can also move around the drawing. When zooming and panning, the most quick and convenient way is to use the mouse wheel. Just click it and you can navigate the drawing in real time. This is very effective in combination with the zoom and zoom function of the mouse.
This command has a big drawback: after one capture and drag, you exit the team. Therefore, it is much more convenient to use a mouse with a wheel and a pan with the wheel pressed, you can also zoom in and out using the scroll wheel.
Method 1: copy and paste
Highlight the Ø sign, copy and paste into Word, Excel or AutoCAD.
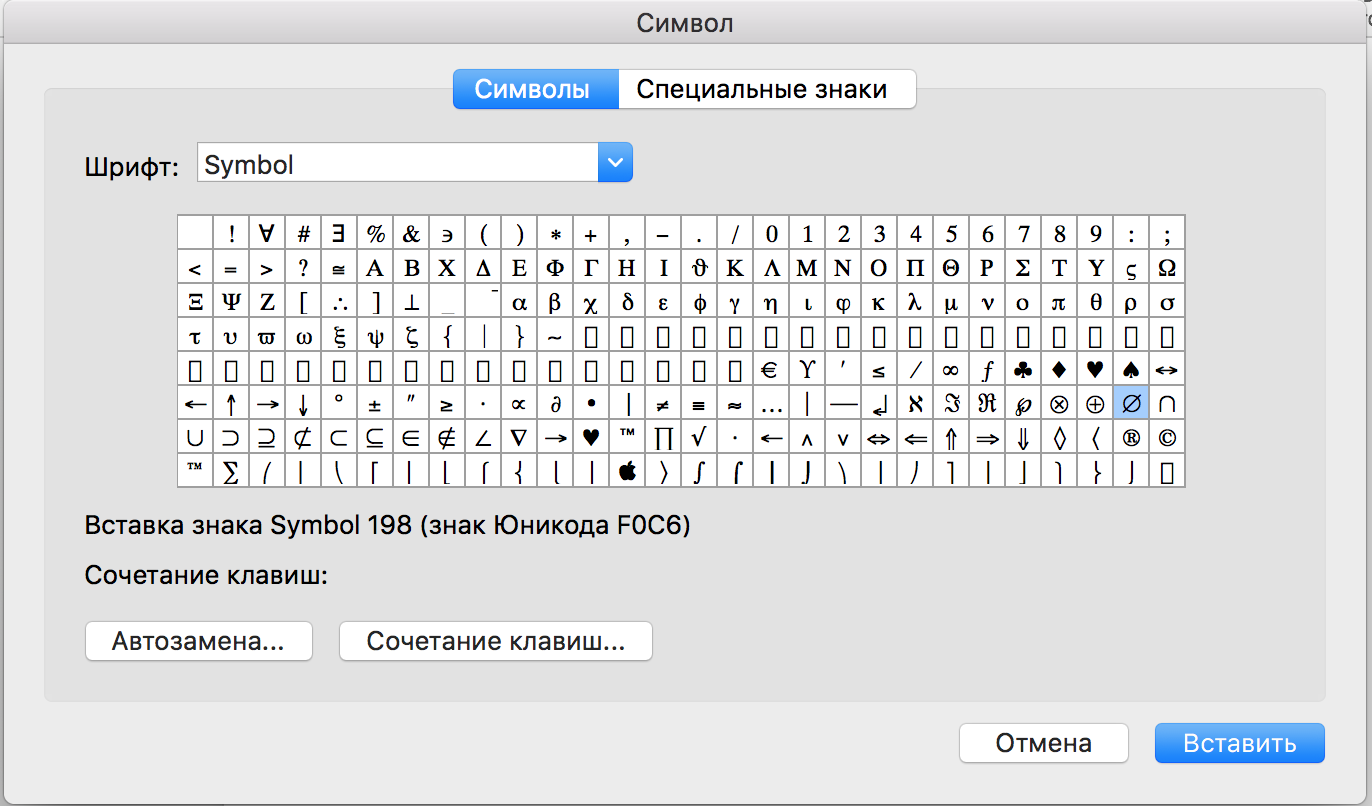
Method 2: button extra characters
In all microsoft programs on the Insert tab there is a button for additional characters. By clicking on it, you can select and insert a diameter symbol in the text.
Undo and redo using keyboard shortcuts
This command, when called on the command line, kills or clears all actions entered on the command line. It does not seem to do anything, but if you open a command prompt window, you will see that it clears all active commands. This is faster and more convenient than using the following two commands. You enter the cancel command on the command line.
Unlike other programs, the cancel command cancels the zoom and pan commands. When you use undo, it is easy to take one step too much undo. This allows you to return to the history of changes. To change the default sizes, you can change the settings.
it the window opens through top panel "Insert - Additional Characters" menu.
If you need to insert a symbol frequently, to save time, configure a keyboard shortcut or auto-replace on it. The buttons for configuring these options are below the list of all characters.
In the settings dialog box, select the “Dimensions” tab. The height of the text is the height of the text of the extension of the line of extension of the dimension - this is the distance that the extension line goes over the offset of the line of dimension of the line - this is the distance between the beginning of the extension line and the object you define. An extension line break is the distance between the text and the dimension arrow. Alignment is measured parallel to the line between the two lines of origin of the internal line.
Specify the dimension line. The linear dimension runs parallel to the line between the two sources of the internal line. You use linear measurement when you need to specify the length at a certain angle. You must set the angle on the tool toolbar. Keyboard layouts can also perform more complex conversions using the so-called dead keys, which do not output characters on their own, but change the output of subsequent keys. Warning. Key codes may vary from system to system.
Method 3: Birman layout
Ilya Birman created a keyboard layout that helps you insert frequently used characters using the keyboard. To use it, download and install it on your computer (Windows or Mac). After installation, activate the layout in the settings of the "Control Panel", this is described in detail on the download page.
If the key cannot be found using the above command, run. Just press a key and its code will be shown. It should also do the right thing for uppercase versions. Define the desired file in the symbol directory. After making additions, the section is as follows.
Adding actions to function keys
First, find the file in the symbol directory that handles existing assignments for function keys. There are two things in this entry. Using a system similar to text styles, dimension styles allow you to design dimensions so that they look the way you want.
To insert a diameter sign, press the right Alt + d.
In order not to forget all the keyboard shortcuts, there is a cheat sheet:
If the symbol on the key is drawn below, you need to additionally press Shift.
Method 4: keyboard shortcut
Hold down the Alt key and enter the code 0216 alternately. Be sure to enter the numbers on the digital block (on the right side of the keyboard), otherwise nothing will work. Therefore, this method is not suitable for owners of some laptops.
For example, the above illustration shows two different measurement styles. If you do not create your own style or change the standard style, all dimensions will look like this. The dimension line has arrowheads, and the dimension text is located above the line and drawn using the current text style. The dimension on the right was drawn using the new style. The arrows were changed to oblique, the vertical alignment of the text was centered, and the current text style was changed.
Using codes
There are many measurement commands that include tools for specifying tolerances and sizes of alternative units. For the purposes of this guide, we will consider only a few teams in linear, radial, and angular categories. This is a special layer that cannot be deleted or renamed.