Linux mint step by step installation. Install Linux Mint alongside Windows without using external drives. Preparing for installation. HDD.
In installation Linux Mint on a computer, there is nothing difficult even for a beginner. But we will nevertheless consider this issue and, as an example, install Linux Mint on a laptop on which Windows 10 is already installed. A distinctive feature of this case is the presence of UEFI and there are some nuances, but this instruction can be used in all cases and advise your friends ...
To install a second OS to your hard drive, there must be a separate partition for it. If you have personal and necessary information on your computer and only two sections hard drive, it is recommended to split an additional section for a new operating system as needed.
You have 30 seconds to select the operating system you want to load. Don't worry, restart it and be done. Once recognized, it will adjust as shown in the second picture of the theme, and if you only want to run one OS, select it from the dropdown menu and uncheck the yellow color.
We will be installing from a USB flash drive, so in the BIOS you will need to set the boot from it. The volume of the flash drive must be at least 2 GB. You are already from our site and the image is stored on your computer. We also need the Rufus program, which can be downloaded from the official website or from the link. If you are installing the system on a computer without UEFI, then you can use the UNetbootin program, which has versions for both Linux and windows. Launch Rufus and the following window will open in front of you:
This is the second paragraph of the previous paragraph. When the computer starts up, the screen looks like this. The topic is limited by my knowledge and natural laziness, accepting suggestions, criticism, comments and additions - reasonable and significant. The installation may look daunting, but with the attached images it is very easy. If you already have an operating system on your computer that you want to keep, we recommend the necessary data for backup.
Before you start downloading, you need to know if you have a 32-bit or 64-bit system. In this article, we will show you both. You can choose different images with respect to the architecture of the computer and the desktop environment. If not, you can use the uploaded image; It will be shown below how. These slides are used to store state virtual machinetaking up relatively little space.
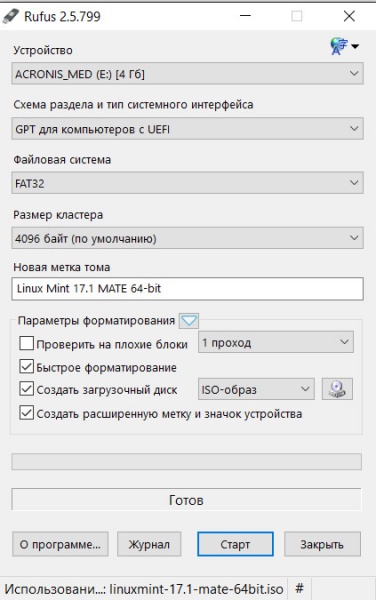
We need to set the partition scheme "GPT for computers with UEFI", and select the file system FAT32. Next, click on the iso image and specify the location of the Linux Mint 17 image. Press start and wait for the USB flash drive to finish recording. Now we go into the biost and find the boot parameters.
If you accidentally break the system, you just need to restore this image and you can work happily. It uses the blue camera icon to create a new image. Create a snapshot of a virtual machine. It takes a few seconds to save the image.
Potential Issue: No Windows Save Option
To restore the virtual machine status, click the blue arrow with the back arrow icon. You can add more and more photos and create backups various conditions. To restore a snapshot, click this icon. Choose any name for this new virtual machine. Now you need to create a new virtual hard disk.
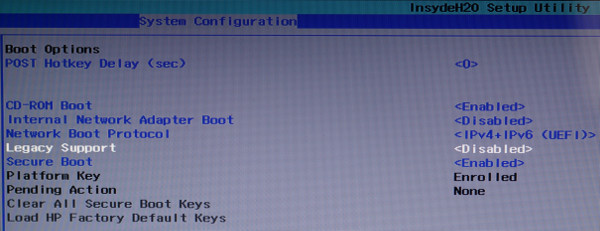
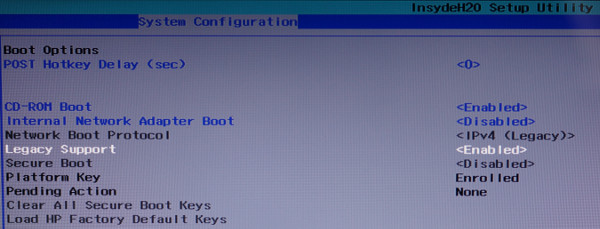
We need to enable Legacy Support and disable Secure Boot. This must be done, because if Secure Boot is left in the Enabled position, then the Linux bootloader will not be able to start Windows 10 and you will be able to boot only in the Linux Mint environment. Grub will not overwrite windows bootloader in any case, so don't worry about that.
We recommend that all options for creating a disc are left at their default and simply click through the menu by clicking Next. At this point everything is ready for installation. When you start the virtual machine for the first time, you must provide the path to installation disk in the window that opens by clicking the folder icon and selecting the downloaded disk image. In it, as the first parameter, select the language that will be used by the system, and then click "Continue" to continue. You don't need to worry about data loss, everything is done on a virtual disk, so nothing changes on your system.
Well, now we boot from the flash drive and see what structure our hard disk has at the moment. For this, Linux has a Gparted program and here is a screenshot of my hard drive:
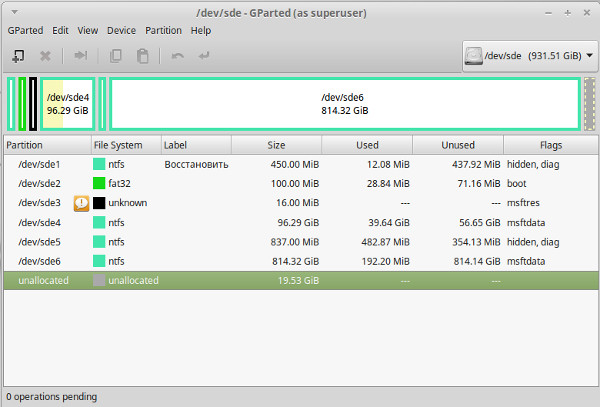
Here my c drive appears as / dev / sde4 and d drive as / dev / sde6. All other partitions are partitions that are necessary for Windows 10 to work, so we do not touch them. I have already allocated a 19.53 GB area for installing Linux Mint, and you need to create it from free disk space d. Now let's return to our desktop and find the system installation shortcut on it.
Click Install Now to start the installation. Make sure the disk is formatted and continued. Select your time zone and keyboard layout. Next, you need to set up a user: your name, computer name, username and password. Remember the password even in case of automatic registration. This password is required to install programs and more important computer settings.
During installation, you can view the work environment and various applications. After successful installation, you must restart your computer as prompted by the dialog box. If you are installing a virtual machine, this is of course rebooting the virtual machine.
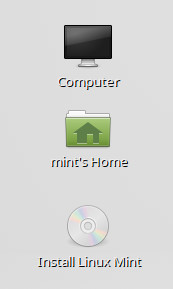
Push double click on Install Linux Mint and get into the installation window. Select Russian from the list.

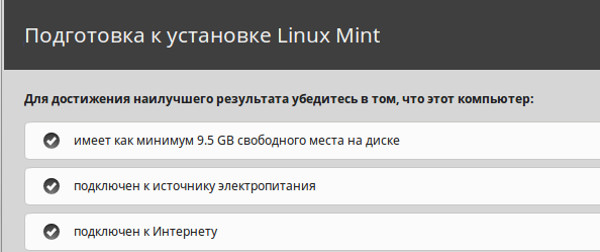
The installer will notify us about the availability of free disk space and the connected Internet
If the computer is connected to a regular fixed network, the connection parameters are automatically set. If the network is not installed by itself, the fixed network setup window is available. To open this window, click the Internet Connection icon at the far right of the taskbar and select Network Settings. In the window that opens, click "Add profile" and set all the necessary data. It's easy to set up, just click the applet icon, choose a network connection from the menu, or enter your password. The network connections menu that you can connect to.
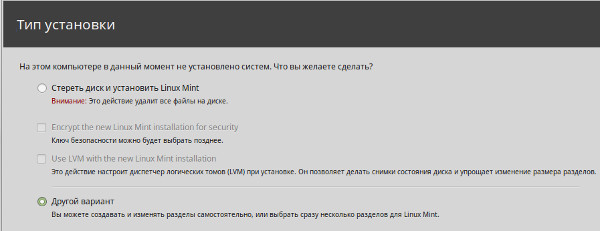
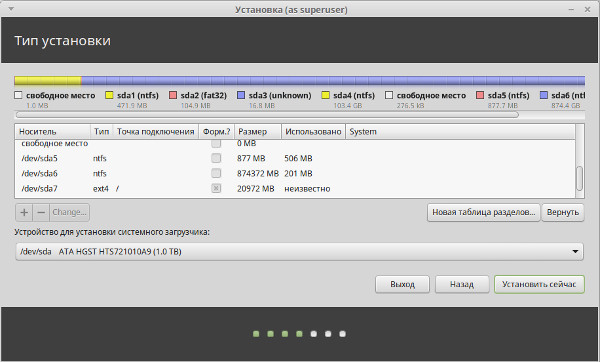
In order not to erase all data on the disk, select "another option"
Find our free hard disk space in the list
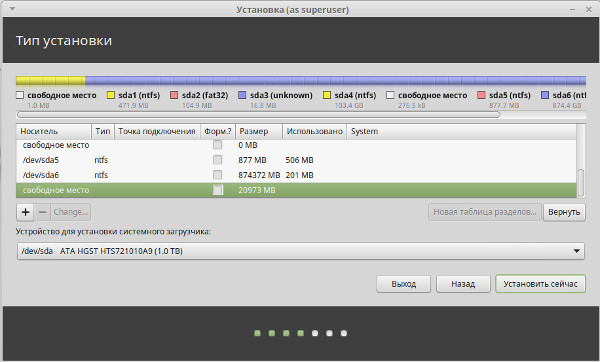
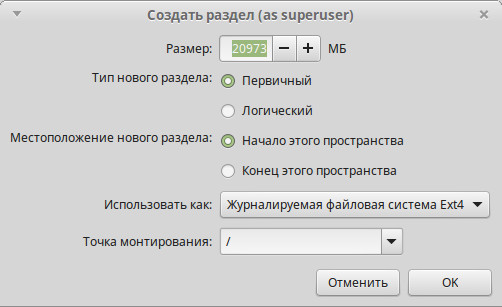
Click on the plus sign and set everything up as in the screenshot below. We allocate all the free space for the system partition /, since we will store all the data on the d windows drive, but if you want to store data in a Linux environment, then you will have to create not one partition /, but divide the free space into three components. The first partition will be / and it is better to allocate 20 GB for it, the second partition will be / home and in it you will store all the files, and 3 GB should be allocated for the swap partition. But to get acquainted with the system, one section is enough for you.
Dialog box for profile settings network connection... But if you already have a system installed and you do not want to lose data and data, beware. Although the following settings are safe, we recommend that you back up your personal data in case of any unusual problems. We select operating systems from the very beginning of the computer from a very simple menu.
- Partitioning required.
- If you have a blank disk, you don't need to deal with this problem.
Operating system selection at startup. Each of the circles has a bunch of ardent supporters and opponents, and each of the groups is right. Some of the pros and cons are justified, and some are highly stretched. But we don't want to fuel competition and force our views on others.
It remains to select the disk where the bootloader will be installed and click "install now"
Further installation steps are very simple. You will need to select your region, type of keyboard layout, come up with a username and password, and wait for the system installation to complete. After rebooting, you will be able to boot in both Windows 10 and Linux Mint 17. We hope that our article will help you, but if you have any questions, then ask them on the forum.
Knowing, knowing the advantages and disadvantages of both solutions and being able to make an informed choice is more important. We are working on similar topics, but simply by constantly checking, repeating and speaking loudly, you can change the stereotypical thinking of a wide variety of users. We will see if an ordinary user can perform all the basic operations without special training.
Preparing for installation. Flash drive
Or maybe you can't do anything. Installation is one of those elements that intimidates inexperienced users. You can use an existing disk partition or create a completely new one. Obviously, this is not something that cannot be taken care of, but new, new concepts or unknown filesystems will take some time to think about. However, the default settings are adequate, but they don't need to go into details. You also need to enter user details.
Windows OS may remain on your computer even after installing Linux Mint distribution kit! Dual booting the system is a very convenient solution. Thanks to its organization, you can choose the operating system that should be loaded after each start of the computer: Linux Mint or Windows.
The organization of dual boot of the system does not present any difficulties.
Aren't these well-known operations? Installation time is the strength of the system. Before you can use the system functions, you need to login. If it's too weak, it won't be enabled at all. Start the system and wait for the login screen to appear. On the left side of the window, you will see a window with the displayed username and a place to enter the password. The names of other accounts registered with the system are displayed below and above. Just click to display the specified data in the field.
The account names are looped through. To select the interface type, click the gear icon that appears in the upper right corner of the login window. Select one of the interfaces from the context menu. After logging in, the first nasty surprise, some function names and system elements are in English. This may offend the user using the system for the first time. Perhaps this is because we decided to install latest versionbut if the polish interface is offered by the installer, it must be completed.
1. Back up important documents
First of all, you need to back up all documents, pictures, music and other data on external media (DVD-RW discs, external USB hard drives, flash cards).
2. Performing a disk check using Windows
Next, you should check file system hard disk by means of Windows. In Windows 7, you can do it like this: you should use the element "Computer" system main menu, select disk "C: /", use the right mouse button to open the context menu and select its item "Properties", go to bookmark "Service" and press the button "Checkout" in section "Check disk".
Besides, they are "almost familiar". There is a launch menu and a toggle button to view the desktop. Installed Apps are not immediately displayed in the form of a long list, but sorted according to the purpose and placed in the appropriate submenu. The group selection shows the tools included in the group. It is important to note that they are described not only by name, but also by their statement. The Start menu also includes a selection of your favorite programs. It can be freely modified and expanded. Open windows are displayed in the pane at the bottom of the window.
By default, the system supports virtual desktops, which refer to a button in the bottom bar. The top bar presents updates, displays the calendar and calendar, controls the volume, and gives you access to shutdown and shutdown functions.
In the window that opens, you must select a single checkbox: "Automatically fix system errors".
Pay attention to the screenshot.
In Windows 8.x and 10, a similar operation can be performed as follows:
First of all, start moving the pointer from top to bottom on the right side of the screen and select "Search" on the panel that opens. If you use a mouse, it will be easier for you to move the pointer to the upper right corner of the screen and start moving it down, and then also select "Search" on the panel that opens. After that, just enter a search query "This" and select the first found option "This computer".
The desktop view can also be switched to window manager mode and installed programs... Use this button to the left of top panel... How to change the set of favorite programs. A list of your favorite widgets appears along the left edge of the Advanced Start menu. To change it, click the infinity button on the left side of the top panel. The left side has been added to your favorite system. If you want to uninstall a bundled program, right-click its icon and select Remove from Favorites.
The display order is changed by dragging the mouse icon. Likewise, new items are added to the toolbar - just drag and drop them from the toolbox or open windows... It remains to be seen whether it is difficult to change the system settings. The Start menu contains the System Tools group. It is logical to look for configuration functions in this place. Everything is well organized and easily accessible. The set of programs offered with the system is extensive. There are work tools and entertainment applications, programs for communicating with other users, and browsing online resources.
In the window that opens, select the hard disk device icon and use the right mouse button to open its context menu, in which we will be interested in the item "Properties".
In the next window that opens, select the tab "Service" and press the button "Check" framed with title "Checking for errors"... In this case, you must have administrator rights! If necessary, you will be prompted for an administrator password or confirmation of the operation.
A good spreadsheet and word processor, presentation tool or graphics editor... Conversions should be tested in practice. It will not always work as expected. Problems arise, for example, in tables with wide formatting, such as those that retrieve external data or contain macros. Otherwise, you will have problems displaying Polish fonts. The important thing is that in the course of repeated attempts to play various films recorded in many formats, there was once no problem with the lack of codecs.
Note: defragmentation is not! That being said, it can save you enough time in the future ...
Finally, you should turn off your computer.
3. Reducing the number of connected peripherals
Before turning on your computer to install the Linux Mint distribution, you should reduce the number of peripheral devices connected to your computer: temporarily disconnect all peripherals from your computer except for the monitor, mouse, keyboard and printer. Are you using a USB hub? If so, disconnect it and connect the mouse, keyboard printer directly to uSB ports your computer.
Everything that was needed was already in the system. An attempt to start it from the top bar ends with an error message. In practice, however, most of the most popular applications are related programs. The same can be said for Internet browsing, email processing, and various communication protocols. The rest of the tools do not always offer the highest quality and greatest features, but that's not the point. It is important what and how you can install. 
The software manager is placed in the favorites menu.
After installing the distribution kit, you can reconnect previously disconnected peripheral devices; they should work without additional manipulation.
Ensure a reliable connection of your computer: temporarily connect it to the global network using an Ethernet cable, and, in the case of using a laptop, to the mains with a power supply unit: you probably do not want the laptop battery to run out during the installation of the operating system.
Important: the next stage of preparing a computer for installing the Linux Mint distribution, namely, stage number 4, is relevant for computers with a pre-installed operating system windows system 8.x or Windows 10. If your computer has more than old version Windows OS, you can safely skip step 4 and go to step 5.
4. Windows 8.x or 10: change some settings
If you are using a computer with Windows 8.x and 10 preinstalled, you should change the settings of the latter: make sure you change the described settings for Windows 8.x and 10 before starting the installation of the Linux Mint distribution.
5. Direct installation of the distribution kit
A. Boot your computer from Linux Mint DVD (make sure you have configured BIOS / UEFI to boot your computer from DVD), press "Space" and select the menu item Integrity check to check the DVD for errors. The disc should be burned without errors. Otherwise, you should write new disc at low speed (4x).
B. A few seconds after the successful completion of the DVD error check, the process of loading a test (live-) session should start automatically, during which you can evaluate the correct operation of your hardware in the distribution in question.
Note: Linux Mint test session is much slower than normal!
C. You can start installing the distribution using the appropriate shortcut on your desktop. The installer will start by asking you a few questions. The direct installation of the distribution kit will begin only when you finish selecting partitions on your hard drive.
First, you will see the following window.
Check the box "Install this third party software» if you do not want to independently install drivers for some devices and codecs for playing mp3 files and click the button "Proceed".
Note: Do you see a window asking you to disable Secure Boot support? In this case, the simplest solution would be to interrupt the installation process, disable support for this technology at the UEFI (BIOS) level, and restart the installer.
This is because the installer's implementation of the feature to disable Secure Boot support is not very friendly. If activated, you will have to perform a number of illogical actions. For example, you will need to answer the following strange question: "Enter the third and sixth characters of the unlock password."
Disabling UEFI (BIOS) support for Secure Boot is much easier. Then you should be able to start installing Linux Mint again.
Then select the option "Install Linux Mint next to Windows" so that the partition of the hard disk with the installed Windows OS is not damaged.
Note: if you are inexperienced in administering Linux systems, do not select the option to use the virtual volume manager ( "Use LVM with new Linux Mint installation")! This option should only be used by experienced users. This technology can cause a lot of inconvenience to users new to Linux ...
Also, do not activate the file system encryption mechanism ( "Encrypt the new Linux Mint installation for security") when installing Linux Mint on a computer that will not leave your home, such as a desktop computer used only by you and your family.
The disadvantage of using the file system encryption mechanism is that you will not be able to access your data if, for example, you forget your password. The encryption mechanism is powerful enough; like all powerful mechanisms, it must be used with extreme care.
Click the button "Proceed".
6. Potential Problem: No Windows Save Option
The installer won't prompt you to install Linux Mint next to Windows? In this case, you will have to interrupt the installation process and consider this solution to the problem (tips for ubuntu distribution great for Linux Mint distro).
7. Changing the disk partition scheme
One of the last questions will be related to changing the layout of the hard disk partitions. The installer will prompt you to free up space on your hard drive. This will reduce the size of the Windows OS partition and clear space for installing the Linux Mint distribution.
Do not worry: the installer will not violate the integrity of Windows files already on the disk and will offer to use only unused hard disk space.
The suggested distribution of hard disk partition sizes will look similar.
You can hover your mouse over the separator and resize the hard disk partitions to your liking.
Basically, you can just accept the partition size distribution suggested by the installer. However, when installing the distribution on small hard disks, the installer often does not allocate disk space optimally (leaving almost no reserve space both on the partition for installing the Linux Mint distribution kit and on the partition with Windows OS). Based on the above, in some cases you will still have to change the distribution of hard disk partition sizes suggested by the installer using the mouse.
Note: the preferred hard disk partition size for installing Linux Mint distribution is 20 GB. The section for installing the Linux Mint distribution is on the right.
In other words, the installer automatically (by default) assumes that you do not want to uninstall Windows and want to dual boot your computer. How do you see, linux distribution Mint is friendly enough!
Note: are you unable to complete the installation because it stops halfway? Perhaps you should deactivate the slideshow within the installer.
After resizing the hard disk partitions, click Install Now... At this stage, the installation of the Linux Mint distribution will begin on your computer, at the end of which you can use dual boot.
8. After restarting your computer, does not the boot menu appear and Windows automatically boots?
After a seemingly successful installation of the Linux Mint distribution on modern computers sold with Windows 8.x or 10 preinstalled, in some cases the boot menu is not displayed. Instead, automatic loading Windows OS as if the Linux Mint distribution hadn't been installed at all.
Usually this problem can be fixed fairly easily by changing one of the UEFI settings (BIOS). Under UEFI Boot Options ( "Boot options") you should find the line corresponding to the OS boot manager ( "OS boot manager"). After that, you need to select it, press the key Enter and put the Windows boot manager ( "Windows Boot Manager") to the end of the list (in HP laptops this can be done using the key F5).
The figure below shows the corresponding section of the HP notebook UEFI settings menu.
9. Adaptation of Windows OS to changed conditions
When Windows starts up for the first time in a dual-boot environment, it will determine that the corresponding hard disk partition has shrunk. It may take some time to adapt to new conditions.
For this reason, when you boot Windows for the first time, you will most likely see blue screen with white letters, indicating that Windows is checking the hard drive and "fixing" errors. Just let the operating system do its job.
At the end of this process, Windows will need to restart the computer. Don't discourage her. After restarting the computer, Windows will be able to work correctly with the new disk space.
10. Done! What's next?
This completes the installation of the distribution kit. You can now restart your computer, boot Linux Mint, and start setting up your new operating system. Linux Mint comes in several different editions, so the setup guide has been split into several pages.