What tablets allow you to establish root rights. Getting ROOT on Android. Root Android with
Everyone has long learned to do or get full access to their smartphone, but not all milestones manage to do this without problems and depriving you of warranty service. It doesn't take much effort. Let's start with the question, what is it for? When we, when buying, do not think about whether your gadget will be able to transfer them to by installing applications? When developers create their applications, by default they put the download on the phone itself, and not on the memory card. So to transfer them, you need special applications which simply do not work without Root access. Even as you noticed that your flagship already has a lot of applications that you will not and never have used. Naturally they interfere with and. When you receive root rights, you can easily remove, move, replace, reconfigure, install any applications and games.
How to keep your secure phone safe
In many cases, fear comes from the unknown. The main risks for a rooted phone are malware and improper operations. Incorrect operations such as deleting system files will lock your phone or cause a boot cycle. Rooted devices are indeed more vulnerable than original ones. Below are the safety tips for an embedded phone and tablet. With great power comes great responsibility. Administrator access can be used good applications for advanced functions, but can also be used by malicious applications for evil purposes.
It is presented to your attention, the most popular and best apps... In this topic, we will consider the work of obtaining rights not on all of these programs, but only on the one that, in my opinion, is more convenient and easy to use. The name of the program
Supported Devices List:
The lists of smartphones and tablets are constantly growing, if your device is not in the list of the program, then it doesn't matter. You just need to click on the button and write to those support that your device is not in the lists and the developers will answer you with a reply email when they add it. The base is constantly filling up and soon it will not be impossible to access your gadget.
Fortunately, the superuser access control tools can act as gatekeepers. And you will be able to allow or deny this app's request. The process for managing permissions is simple. You can save your selections so that you don't have to repeat your selection every time the app goes to work.
Simply put, a firewall is a software data barrier between a program or operating system and the outside world of the network. Phone Repair allows you to remove or delete viruses or redundant files to keep your phone running fast. While most of these problems can be recovered, your precious data will most likely be erased. When you set up your phone again or receive new phone, you can install this application and recover data. Be very careful before installing any application.
Today we will consider two options for installing and getting Root on your device. The first installation will involve installing the program on your computer or laptop using USB debugging and a special cable that comes with your tablet. The second method will be done thanks to the flagship itself, we do not need wires, deposits. Everything is done through the phone itself using.
Conclusion Root Access Control Tool Can Make Your Root Phone at least as safe as an untouched phone. A firewall gives the rooted phone an extra layer of protection. With shared backup, you can enjoy your rooted phone with less worries. But good habits are more important to keep your phone protected. If there is one last sentence, it should be that you are not too obsessed with rooting.
Gaining administrative access to mobile device and allowing apps to do the same is escalating vertical privileges. You may need to open the app first if it is not already listed as superuser. Click "Allow" when prompted for superuser. Select the Remember checkbox if you want your device to remember the changes you made to app permissions.
The procedures are done for free! No one will take money from you! But we advise you to strictly follow the instructions.
Warning:
The administration of the site and I are not responsible for any damaged phones and tablets! If you don’t understand something, don’t bother to do it yourself, ask here in the comments those questions that you don’t work out or you don’t know, for demand I will not bite you. It is better to ask and understand than just sit at a dead trough. All your actions that are not related to the instructions you do at your own peril and risk!
Getting rid of root privileges with
You may need to open the app first if it doesn't appear in the list of superuser apps. Press one of the radio buttons on the superuser prompt screen. For example, clicking "Remember selection forever" will remember your app's permissions unless you manually change this setting later.
Click the Allow button to save the changes to application permissions. Tap an app name to change its access rights. Click the drop-down menu next to Access and then click Grant. When you click Invite, you will be allowed to grant permission to the app every time you use it.
As statistics show, out of 100%, only 5% could not do it, and these are the people who cannot read and understand, I think nothing like this should happen to you, or I shouldn't be crucifying here.
Instructions:
The first instruction will be done via a computer, what do we need?
1) Phone or tablet
2) Computer
3) USB cable for computer connection
Getting rid of root privileges with Universal Unroot
Click the Save button to complete granting root access to the application. There are concerns and problems with rooting. The big danger is that if the instructions are not followed correctly, it can lead to the dead device being known as “soiled” because it is no better than a brick at the moment! If this happens, your invalid warranty becomes a serious problem.
As scary as all this is, a beauty is a relatively unusual thing. As long as you have a working bootloader, you can always restore your device. When you break the bootloader everything goes wrong. Effectively, each device requires its own techniques, tools, and tricks. Fortunately, many of them can be reused from device to device, and as new ones emerge, hardworking hackers are rapidly modifying existing tools to get the job done. They can start out as pretty crude and ready-made command line programs that grind over time to an empty universal root and blinking tools.
4) Internet connection
5) Attention!
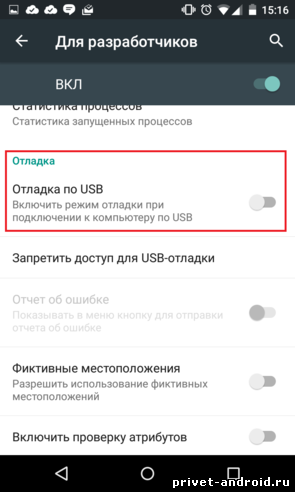
Turn on your phone or tablet and go to the settings, by going to look for the section " Features for developers"and find the column labeled" USB Debugging"and install checkbox... If your gadget does not have an item for developers, then go to information about the phone,in the presented list we are looking for inscription build number and very quickly, about 5 times click on it. If you do this very quickly, you will see that the smartphone congratulates you on becoming a developer... When you see such an inscription, you can go into the settings and the section you need will appear at the very bottom, after which you go and turn on the tab. Your entire device is prepared to acquire rights.
As you might expect, the biggest names are given the most attention. Both of these sites offer dedicated forums for each specific phone model. No matter what your device is, you will need to take your time reading and researching messages. You will find that many of them are complex, requiring you to install obscure drivers, use the command line with complex switches, and perform multiple booting of your device using recovery mode.
Programs for obtaining ROOT rights on Android
If you find a post that seems to offer suitable advice, we recommend reading it on the thread to see what other people's experiences have it. The key advantage of an unlocked and rooted device is that it provides full backups.
Your smartphone is ready and now you should proceed to the next step.
Install the Kingo Root program on your computer. After installation, you should run the program, upon launching it will start installing the necessary components by itself. When all this happens, you will see the following position. The program will ask you to connect the device to the computer. Your desktop or laptop will detect your device and install drivers. After that, the program itself will start scanning and detecting your device and reinstalling the special driver. After installing this driver, Kingo should show the name of your device and offer to install root rights on it. It looks like this:
There are two approaches here. Both options allow you to completely back up and restore all your apps, settings and data. This is a replacement for the standard recovery mode, which is usually accessed by pressing the power and volume down button after turning off the device. As we've seen, backup tools can improve performance by offering access to application data at a lower level.
One of the most popular remote applications for tracking and cleaning, with a rooted device that can hide itself much better, making it nearly impossible. Overclocking is possible on rooted devices. Many other tools take on additional functionality.
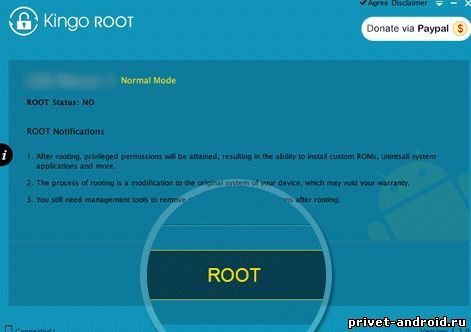
As shown in the screenshot, you need to click on the Root button. After that, the installation will begin, it is advisable to put your phone into sleep mode. This means that you need to go to customization find item display and put as much time as possible, in general, make sure that your screen does not go out.If your phone turns off while receiving root, it can harm the phone, up to and including its complete shutdown. Wait for the process to complete and click "Finish" It will look something like this:
Some devices need to update the system for android rooting
If you find that your device is supported by one of these groups, then you know that you are good. Every time you open apps or games and start using apps or playing games, ads will pop up. Customization makes your tablet or smartphone truly yours and unique in the world. ... However, time is not an issue compared to what you can just do a lot of damage to your smartphone. All subsequent actions can be done at your own risk.

Click on the finish line and restart your phone, but usually your smartphone or tablet should restart itself.
We proceed to the second method of obtaining Root Rights without a computer. This means that we will install the root using one phone.
Go to Google play and in the search box download the application called Kingo root. We install it on our device, after you have completed the installation, you should open the application. If the root has not been previously received on your device, then the program will offer you to go to a special site and download a small add-on. Naturally, we agree and make the necessary installation. When you complete the necessary steps, you will need to click on the Root button and wait for completion. When all this is over, you should restart your phone and rejoice.
If you are not sure about something, it is better to consult a specialist. Let's discuss what are the steps to hold a phone. There are many different rooting programs. Then you need to download and install the program. Accept the request to install a custom recovery and the process will begin. If for some reason you decide to remove root access on your device, this procedure shouldn't take long.
This program is probably the most versatile of all the options available, which allows superuser access. There are best rooted android apps you can use. For those who get annoyed by unwanted pre-installed apps and want to uninstall them from their phones, all they need is to get root access information. You can modify, edit, or remove system applications that require administrator-level or superuser-level permissions.
That's all, if you still have questions or have something to add, we are waiting for your comments below.
Want to take complete control of your smartphone? Having received root rights on Android it is possible, because the user opens ample opportunities... However, you will have to say goodbye to the guarantee, as well as be prepared for the fact that the smartphone may become unusable. In general, this activity is not for the faint of heart.
Part 2
You go from a regular user to a superuser, and this allows you to do certain things the way you want. Device correction allows you to remove these ads and you can play games without any problem. You probably want to install some awesome apps, but can't do the same as they insist on root access before installing. Follow the rooting process on your smartphone and you can be entertained with more apps. Some dominant apps can tweak your device's performance, such as your device's speed and battery life. In short, follow the rooting method and make your android better! This way you can free up the internal memory of your device. How long does it take to change those uninteresting default themes available on your device? You can do this with some of the available apps after rooting. Some devices may not be paired, but not all devices may not be mapped. Now that the warranty is no longer valid, in case anything happens to your device during the remainder of the warranty period, you will be paid by the company for any fix. Without data loss, your device can be rooted from your computer.
Smartphone manufacturers and suppliers have a vested interest in convincing users to opt out of receiving root is right, because if you make a mistake in the rooting process, you can cause irreparable damage to your gadget.
Yet the potential benefits justify the risks. Having received superuser rights, you can:
All you have to do is just follow the simple steps to get your android up and running. Step 3: In a few minutes, your device will be successfully rooted. After entering the root list, a message will appear on the phone screen stating that the process is complete!
The tool uses several exploits including Frodo, Gandalf, Boromir, Gollum, Legolas, and Aragorn. You don't need to worry about your device's warranty as you can restore it by unplugging your device. Before starting work, make sure the battery level of the device is 50% or more. Also, don't forget to make a backup file of your data.
- remove unnecessary software,
- increase processor performance,
- customize each element of the interface for yourself.
We invite our readers to walk with us through all the necessary stages of rooting the phone. On some devices, the process may take only a few minutes. Others will have to tinker with. Rooting is the best way to realize the full potential of an Android smartphone anyway.
Compatible with older devices
Go to Settings on your device, then tap Security and select the Unknown Sources option. If the application exploit worked successfully, look for the pop-up message, "Superuser settings have been set" on your smartphone or tablet.
Possible results after choosing an exploit. You need to restart your device. Sounds pretty complicated and a little picky, doesn't it? It could be a leap in the right direction. This is a long guide and contains the following subtopics. Simply put, rooting your phone gives you the power to do much more than your device can do out of the box!
Rooting a smartphone or tablet is the same as removing restrictions on access to system files on an iPhone (jailbreaking). Both the first and the second allows you to dive into the depths of the whole operating system and smartphone subsystems. Also, by being rooted, you can bypass any manufacturer or vendor restrictions.
When obtaining root rights, you should be careful and careful in your actions. And it's better to create before starting the process backup data.
Root rights to Android: advantages
One of the main reasons why users resort to rooting their Android is to get rid of unnecessary software that cannot be removed without extended rights. On some devices, access to previously hidden settings opens, for example, to wireless teasing (you can distribute Wi-Fi from your gadget).
Other advantages: the ability to install special programs and custom firmware, which in turn can further expand the functionality and improve the performance of a smartphone or tablet.
Indeed, there are not so many really decent programs for rooting, but enough to have something to work with. Let's say you can create a backup with some programs android data and upload it to a cloud service, block ads in the browser and applications, create a secure connection while surfing the Internet, overclock the processor or use your gadget as an access point to a wireless Internet connection.
Root rights: disadvantages
Rooting on Android has four potential pitfalls:
- Cancellation of warranty : Some manufacturers or suppliers will void the warranty if the device has been rooted. However, do not forget that this is a reversible process, and root rights can always be removed. If you need to return the device under warranty for repair, we simply restore all data from the backup, thus returning the gadget system to its original state.
- Non-working smartphone(brick - folk.): if something goes wrong while getting root rights, there is a risk that the phone will become unusable. Therefore, you should make sure that the instructions are up to date and strictly adhere to them.
- System security breach : Rooting carries a security risk. Various types of vulnerabilities may arise depending on the services and applications used on the device. Also, certain malicious programs can use root-rights to steal user data, install other malicious applications, or arrange network attacks on other devices.
- Disable apps : Some secure apps and services do not work on a rooted device, such as Android Pay and Barclays Mobile Banking. Digital copyright services like Sky Go and Virgin TV Anywhere won't launch either.
Programs for obtaining root rights on Android

The easiest way to root an Android gadget is to use specialized applications, including:
- Kingo Root,
These programs have stood the test of time and worked well. They allow you to complete the entire process in five minutes. But some of them are incompatible with older versions of Android.
It is claimed that over 10,000 different gadgets can be rooted with this program, but only from Android 2.0 to Android 5.0. Support for Android 6.0 devices is limited.
List of Supported Devices is constantly increasing, but many of them run on Android 6.0.
compatible with older devices:
- Verizon Galaxy S5
- Galaxy S4 Active
- Nexus 5
- AT&T Galaxy Note 3
- Verizon Galaxy Note 3
On newer devices with Android 6.0 or higher (such as Galaxy S8 or Galaxy S7 Edge), the above apps will not work. They are compatible with Android 6.0, but Android 7.0 Nougat is a different OS, here new function "Verified boot" checks the integrity of system files to protect the device from unauthorized third-party application root access. At the same time, it makes it somewhat difficult to obtain root rights.
Kingo root Is one of the few programs compatible with Android 7.0 Nougat that allows you to complete the process of obtaining root rights in an instant. Supported phones list:
- Alcatel
- Coolpad
- Google / Nexus / Pixel
- Huawei
- Lenovo / Motorola
- OnePlus
- Samsung
Getting root rights through the command line and Fastboot
The instructions below are suitable for obtaining superuser rights on a Samsung Galaxy S7, S7 Edge, Samsung Galaxy S6 or S6 Edge with Android 6.0 Marshmallow. There will also be a description of rooting a smartphone based on. The instructions below are suitable, in fact, for any smartphone, but will require the user to be careful and strictly follow the rules.
Preparing to get root rights
Before starting the process, you should back up any important data. And before installing a new firmware, it is a smart step to create a backup of the current one.
It's also best to keep your device fully charged.
To complete the operation, you will need to enable USB debugging and factory unlock.

Open "Settings" on your device. If the item "Developer options" is missing, enable it as follows:
- We return to "Settings"
- Turn on USB debugging
InstallAndroid SDK
Before the next step, you will need to install Android Debug Bridge on your computer.
- Download the Android SDK from here. The developer platform is available for Windows, Mac and Linux (this guide is for Windows)
- Install anywhere, but we recommend to drive C.
- After installation, run the Android SDK via the Start menu
- The SDK Manager will open. Uncheck all items, except for the Android SDK Platform-tools at the very top
Installdriverfordevices
To connect correctly with your smartphone or tablet, you need to install a suitable USB driver.
We follow the instructions of the installer. After installation, let's move on.
Unblockloader
We will now unlock the bootloader. The bootloader is the program that loads the OS of the gadget. It determines which applications are launched when the smartphone or tablet is turned on.
Some devices require a key to unlock the bootloader. The Motorola, HTC, and Sony websites have step-by-step instructions on this topic. But please note that you will need to create a developer profile.
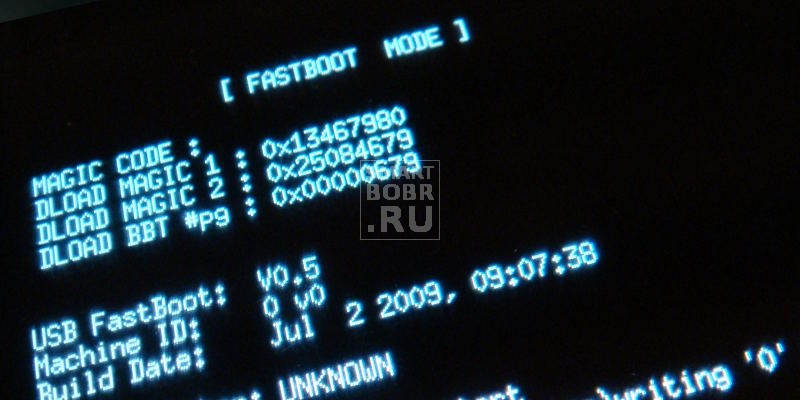
After completing this operation, we can proceed to the next stage. And now you need to put the device into fastboot mode. On most models, it is invoked by holding the power button and the volume down button simultaneously for ten seconds during the reboot (on HTC, you must first press and hold the volume down button, then, without releasing the power button).
Fastboot commands
After transferring the device in fastboot mode, open command line on the computer. If a code is required, a long string of characters will be displayed. We insert it into the appropriate field on the developer's website, fill out the form and wait for an email message with a key, file and further instructions.
To unlock the bootloader, connect your gadget to your computer and switch to fast boot mode again. Then we open the command line on the PC.
For Google Nexus and most smartphones, the commands are as follows:
- For Nexus and most smartphones: enter "fastboot oem unlock" (without quotes) and press "Enter"
- For Pixel: enter "fastboot flashing unlock" (without quotes) and press "Enter"
- The command for Motorola looks a little different: enter "oem unlock UNIQUE_KEY" (without quotes), replacing "UNIQUE KEY" with the received code.
- For HTC: enter "unlocktoken Unlock_code.bin" (without quotes), replacing "Unlock_code.bin" with the resulting file.
We confirm unlocking and get one step closer to getting root rights.
Unlocking the bootloader is not provided on devices of some manufacturers and suppliers, but this does not mean that it is not feasible in principle. Again, in this case it is worth looking for information on specialized forums.
We get root rights toAndroid using programs
There are many ways to obtain superuser rights. Here are some of the preferred ones.
Root the rights to Android using
CFRoot is a restriction removal utility from Chainfire. I must say that obtaining rights through it is not the easiest way, but at least one of the most reliable. The program is compatible with more than 300 gadgets and supplies the user step by step instructions during the process, so rooting is as easy as possible.
Download the ZIP file suitable for your device.
Then we do the following:
- We extract the folder from the archive.
- We find the file root-windows.bat there. We open it.
- We are waiting for the script to do its job, and press any key
- Next, the device should automatically reboot with already root-rights
Rooting with

Baidu Root is a utility from the Chinese company Baidu that is compatible with over 6000 devices, from Android 2.2 to Android 4.4. It is clear that the program is in Chinese, but there is also a version in English and Russian.
Removing restrictions with Baidu Root is one of the most simple ways... After downloading the program, you just have to follow the step-by-step instructions.
First, let's unpack the ZIP archive. Find Baidu_Root.RAR and extract the content (on Windows, you can use the 7-Zip program for this).
And manually install Baidu Root. To do this, do the following:
- On a smartphone or tablet, go to "Settings", then go to the "Security" section
- We put a tick on the item "Unknown sources" and agree with the pop-up message
- Open the folder with BaiduRoot and click on the file with the APK extension. Follow the instructions to complete the installation.
Now we are working with BaiduRoot.
- We open the program and accept the license agreement
- Click on the "Root" button in the center of the screen
- After a few seconds, a message will appear stating that the device was successfully rooted
Route with

The method of obtaining root rights using Towelroot is one of the most optimal and does not require unnecessary actions from the user. Unfortunately, the program is not compatible with all gadgets - some smartphones from Motorola and HTC are not supported.
In addition, the utility is only compatible with devices with a kernel build before June 3, 2014. You can find out the assembly of the kernel by following the path "Settings" → "About the device", and, having scrolled below, find the item "Kernel version".
In order to use Towelroot, you need to check the "Unknown sources" box in the device settings (the process has already been described above). After that, we can move on.
- Open Towelroot.
- Click on the "Make it rain" button. If the gadget starts to reboot, the rooting process has failed. If not, then the device was successfully rooted.
Root Android with

Kingo Root can be installed on a Windows computer or directly on a device that needs to be rooted.
First, it's worth checking this list to see if it has a device that we're going to root for.
Then we find the version of Kingo Android Root for Windows and install the program. Or we download the version for the gadget (before that we check that there is a check mark on the item "Unknown sources" in the settings), and also install it.
Those who will be using the Windows version should enable USB debugging on the smartphone.
Now we do the following:
- Launch Kingo Root on the computer and connect the device via USB
- The program will automatically detect the user's gadget and offer to root it. Select "Root" and just wait - the whole process will take Kingo only a few minutes
Those who want to do without a computer should do the following:
- Install Kingo Root
- Opening the program
- If the device is compatible, there will be a One Click Root button on the screen. Click on it and gain patience - the process can take a lot of time
- After successfully obtaining unlimited rights, a large checkmark will appear in the center of the screen
We get the root on a phone or tablet using
As with Kingo Root, KingRoot has a Windows and Android version. Since the program supports over 100,000 devices, the chance that it is compatible with a smartphone or tablet on which you need to get superuser rights is very high.
You can use both the Windows version and android version, but we recommend using the latter. After installation, follow the instructions below:
- Open KingRoot.
- If the device is compatible, there will be a button "Try to Root" on the screen, click on it
- Be patient - the process may take some time
- If the operation is successful, a large checkmark
Programs that you need after getting root rights
There is probably no other mobile operating system that is as diverse as Android. That is why there is no universal way to get root rights for this platform. If all the options mentioned above did not fit, do not lose heart. Surely there are already instructions on the Web for the desired device, you just need to find them.
After finding the right guidance, all that remains is to follow all the instructions. The process can be delayed, certain difficulties can arise. But if you follow the instructions, you can avoid many mistakes and reduce risks to a minimum.
Downloading
To check how well the rooting went, we need one application. In general, Google Play has several applications with which you can check for superuser rights. Root Checker is very popular for this purpose. You just need to install and run the program.
Installmanager root-right
Rooting makes the gadget more vulnerable to security threats. It will be calmer with a root manager. Typically, any application that asks for superuser rights will also ask the user for permission. It is for such applications that you need programs like SuperSU. With SuperSU, you can accept or reject site requests for root rights, monitor applications that infringe on root rights, and automatically grant access permissions. SuperSU also determines the number of requests to superuser rights from a specific application.
How to remove root rights on Android
Even with all the benefits, perhaps some will want to return everything as it was. In any case, it doesn't hurt to back up your data before doing this.
Getting rid ofroot-right using

To remove root-rights using SuperSU, just go to the program settings and select the option “ Complete removal root-rights "(Full unroot). Really very simple.
Launch SuperSU. Go to "Settings", scroll down and find the item "Full unroot". Click on it, then click on "Continue" - and the process of removing superuser rights will begin.
Getting rid ofroot-right usingUniversal unroot
There is one app that takes care of all the hard work. It's called Universal Unroot and it does root removal on most Android devices. However, not everything is as smooth as it seems.
For example, many smartphones from Samsung are incompatible with the program, and on gadgets from LG, after successfully removing root rights, the application will display that they are as if they are.
Deleteusing native firmware
Installing factory firmware is one of the most reliable ways to remove root privileges. All traces of rooting will be removed, but let's say right away: this process is not an easy one.
First of all, download factory firmware for your device to your computer.
Then we extract the contents of the archive. There will be another one inside - unpack it too. The unpacked folder should contain a bootloader image, various scripts and another archive in ZIP format. Guess what to do with it?
You will also need an Android Debug Bridge and Fastboot on your computer.
- Download Android SDK Tools from the official site. There is a version for Windows, Mac and Linux. The instructions below are for Windows.
- Install anywhere, but it's better to install on C drive.
- After installation, launch the Android SDK, launch it through the "Start" menu
- The SDK Manager will open. Uncheck all the items, except for the Android SDK Platform-tools at the very top.
- Select "Install 2 packages" on the top right
- We accept the license agreement and click "Install"
Check that bootloader unlock is enabled
Open "Settings" on your phone or tablet. If the item "Developer options" is missing, enable it as follows:
- Click on the item "About device" and find the "Build number"
- Click on "Build number" seven times and "Developer options" will appear in the settings menu
- We return to "Settings"
- Open "Developer options"
- Turn on bootloader unlocking
Now we are working on the computer
Transfer the boot.img file from the unpacked folder to the directory with the Android Debug Bridge.
We connect a smartphone or tablet to a computer. Then open the command line on the PC
And we enter the following commands (as it is written here):
- adb reboot bootloader
- fastboot flash boot boot.img
- fastboot reboot
Deleteroot-right using file manager
If your device is running Android Lollipop or lower, you can get rid of root privileges by deleting the files responsible for them. We recommend using a file manager such as ES File Explorer. In the program settings, we find the item "Tools" and a list appears in front of us. To enable the ability to manage root-rights, set the switch opposite the "Root-Explorer" item to the on position.
- Find the main drive of the device
- We go along the path "system" →» bin ", delete the" busybox "and" su "folders
- Now we go from "system" to "xbin" and delete the folders "busybox" and "su"
- And finally, go to the system folder, then open the "app" folder and delete the supeuser.apk file
- Restart the device and you should be unrooted.
Deleteroot-right through updates "over the air" (OTA)
Sometimes a simple over-the-air update will remove root privileges. To update the software, go to "Settings" and go to the "About device" section. Also, do not forget that with some methods of rutting, a rollback to the original state is impossible. In this case, you may need to install the stock firmware.
There is no such method of rooting that does not involve risk, so before that you should back up your data, fully charge your gadget, follow the instructions exactly and take your time.