Disabling the password when starting windows 7. Configuring the command line. Method to reset key data from SAM file
In that case, when you are just tired of every time you turn on the computer and wake up the system, enter the secret code from your account, it's time to act - this article is for you. We will help you get rid of the “unnecessary” protection and, using a practical example, we will show you, dear reader, how to remove the password when entering Windows 7. For those who hopelessly forgot so carefully and sophisticated the selected combination of secret characters and numbers, the article will become a valuable gift. If you are keen on spy games, we ask you to change your mind, because hacking someone else’s account is an illegal act ... However, let’s start, ladies and gentlemen!
Disable password entry using system settings
We have seen how, using these two methods, we can eliminate the need to enter a password after the computer is sleeping or paused. But remember that this is practical only if it is us or trusted people who access the computer, but if they are different users, it is best to allow a password request.
As you can see, the home screen is much more customizable than it looks with the naked eye, and you can tailor the content to suit your needs. Did you like and help in this tutorial? You can reward the author by clicking this button to give him a positive.
Today we will consider:
How to remove a password when logging into Windows 7: the most standard way to "ease for those who remember"
So, tired of being distracted, waiting, something was wrong with the nerves lately, or the wife / husband for some reason suspects “... password set (s) ?!”. In general, about the reasons - this is superfluous. Let's go straight to practice.
Master Password Definition
Version 52 Version 45 Version 38 Version 31 Version 24 Version 17. Was this article helpful? You can view them and delete those that are no longer needed. But what if you share your computer and you do not want others to see your passwords? When you set the master password, you only need to enter it once per session. To set the master password.
Change or delete a master password
If you have lost or forgotten your master password, you can reset it.Warning. All usernames and passwords that will be saved will be deleted. Click on the Tools menu and select the Error Console menu. . This password will be required to enter your account and, thus, access to all information stored in this account. In addition, a login password will not be requested every time we turn on our computer, but it will also be necessary if our computer goes into suspend mode or a few minutes of inactivity.
- Go to the Start menu.
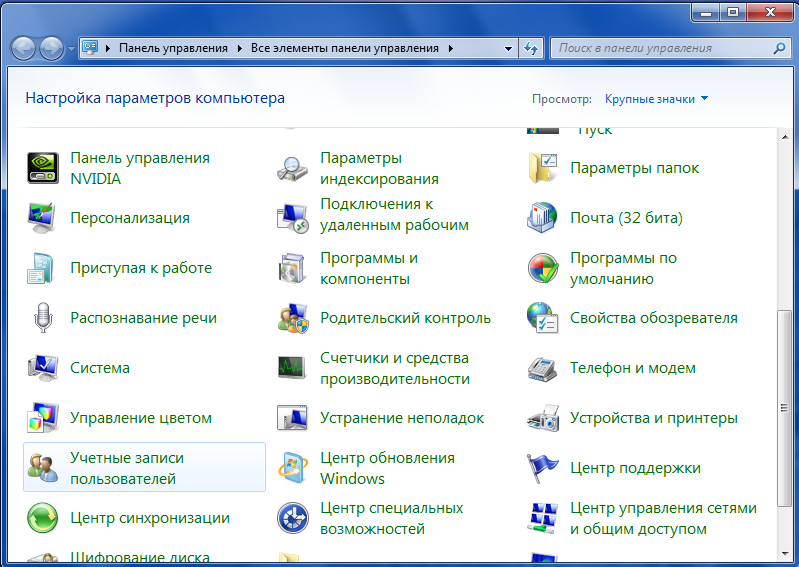
- In the right part of the pop-up list, activate the "Control Panel" section.
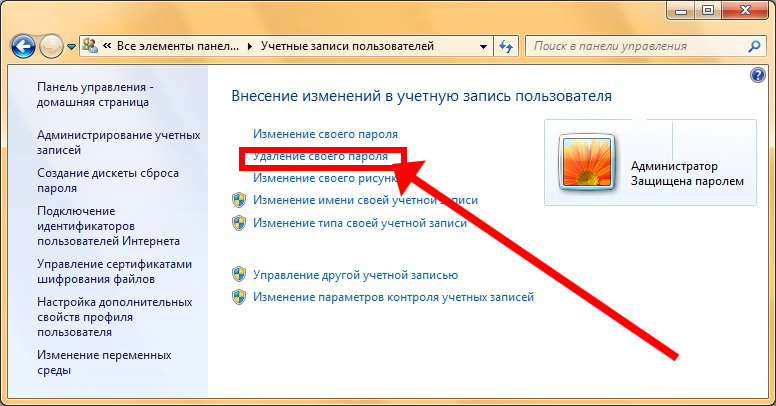
- In the main window of the above menu, click on the "User Accounts" icon.
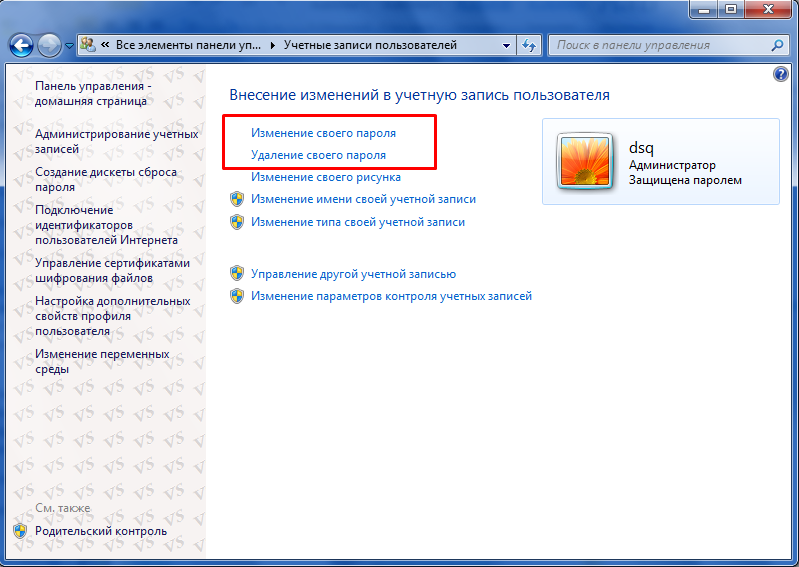
- Now click on the link “Delete your password”.
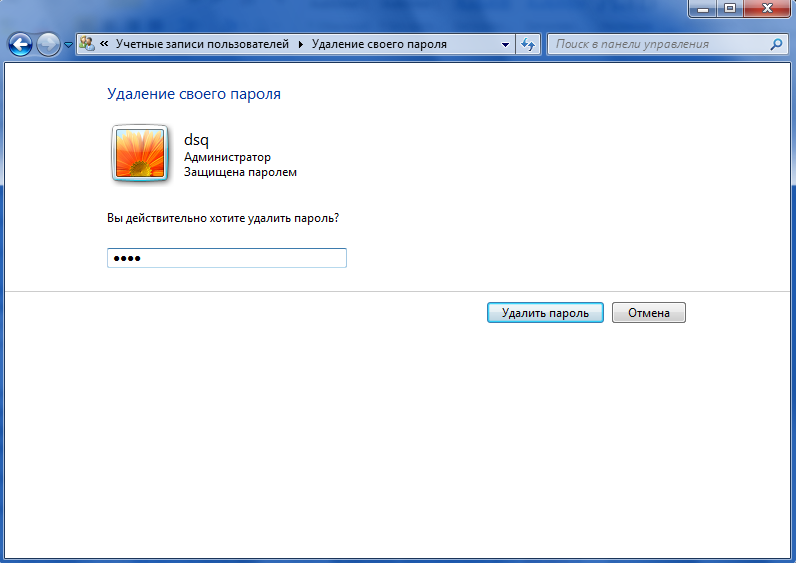
After you enter a valid password and press the appropriate confirmation button, the protection for entering your account is deactivated.
Method 1
Another post that may also help. In the next line, you will need to open the “Accounts” parameter, which will lead you to a new window, on the left side of which several parameters will be shown, and you will need to select the one that says: “Login parameters”.
This will display a number of options on the right side of the window. Among these options you will find the section: Require login. If this section matters: When the computer activates after it is suspended, it means that after the suspension, you will need to enter a password after turning on after each suspension.
Option for the forgetful: Reset a valid password through the registry editor
In the event that the user has forgotten the code set of numbers and symbols, you can use the option below to restore access to your account. However, for the implementation of the conceived, it is necessary to have an installation windows distribution 7. Moreover, the OS edition should be exactly the one that is used on a locked computer.
Method 2
Important Note. That is why if, after completing your work with your computer, instead of turning it off, you are in hibernation, this may not be a good idea. However, the first thing we need to do is open the control panel, in particular, in the “Energy Settings” section. As soon as the parameter is displayed in the search results, you will need to click on it so that the control panel automatically opens for the specified section. After the window opens, you only need to click on the option: Require password for reactivation.
- So, install the distribution disk into the drive (USB flash drive).
- Reboot.
- We call up the BIOS menu (how to do this in detail).
- Install the drive (USB-stick) as a priority bootloader.
- We save the changes and exit the BIOS environment.
- To the query “Press any key ...” we agree by pressing any key on the keyboard.
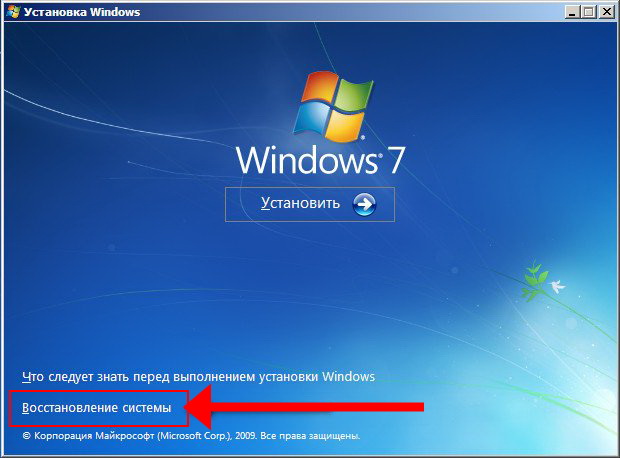
- Choose a language - click "Next".
- In the lower left part of the installation window, click on the "System Restore" link.
- In the recovery console, activate the command line item.
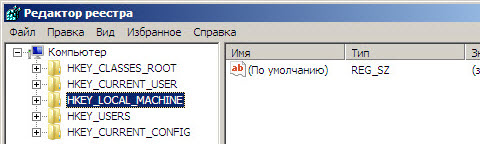
- In the console that appears, write the command “regedit” (without quotes).
- In the registry editor, select the "HkeyLocalMachine" section.
Command line setup
This option is located on the left side of the window. When you select this option, a new window will open in which you will need to click on the option: Change currently unavailable configuration. This will result in several options that were previously locked to enable at the bottom of the screen. Among these parameters is a configuration that you must activate: no password is required. When a computer responds to a suspension, everyone can access the data because the computer is locked.
Before leaving the window, do not forget to click the “Save Changes” button so that from now on you no longer need to enter a password when your computer is activated after suspension. And there are people who don’t like it. They claim that, in the end, the machine belongs to them, no one else uses it, they want immediate access, as soon as they call, and consider it a waste of time, they are forced to provide a password to guarantee access to their system. Well, the argument makes sense.
- In the upper left corner of the service window, click on the “File” tab.
- In the drop-down list, select the "Download bush" item.
- In Explorer, go along the path: C: \\\\ Windows \\ System32 \\ config \\ System (if the system is located in another section hard drive you must specify a valid directory to find the destination folder).
- For the query "Enter the name of the section ..." we write any numerical value (in our case it is 888).

It has two tabs
So, let's explain how to get rid of the password requirement. However, it is necessary to study the reasons why this is done. But in fact, the system was not so unsafe. This is more a configuration issue than a problem inherent in the system. But all your security requirements can be configured or disabled. And since security is good, but it's hard work, most users believe that they can enjoy the best of two worlds: set up their account to enjoy administrator privileges with full access to the system, but prohibit all warnings and locks for ease of use. it became an insecure system in which each user was an administrator, had access to the files and settings of others and led to the infection of the computer with all kinds of malware, from viruses to trojans. complaining about the lack of security, they started complaining about the excess, saying that almost nothing could be done on their machines without asking for a password or administrator authorization.
- We go to the directory: HkeyLocalMachine \\ 888 \\ Setup.
- Double-click on the entry “Cmd Line” and enter the parameter “cmd.exe”.
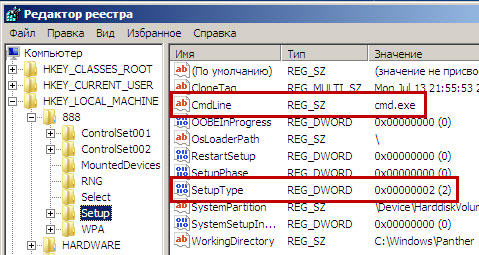
- In a similar way, we call the setup window of the SetupType item and prescribe a numerical value - 2 (two).
- Select the bush “888” created by us and call the context menu “File”.
- The final team is "Unload the bush."
- Close all active windows and exit the Windows installation interface.
First, let's see how to turn off the password request. Just turn on the machine, boot operating system, click the "Start" and "Control Panel" buttons to open the panel. This leads to the “Make changes to user account” window, where a user who stores one account will probably be highlighted, stating that he is “administrator” and “password protected”.
Just click “Delete Password”, enter the current password to confirm this intention, and click the “Delete Password” button. But from now on, everyone will have access to the machine with administrator rights. Anyone who wants to use this algorithm does this at their own peril and risk, as the machine will become vulnerable to any type of attack and, if it is used to connect to the Internet, sooner or later it will be infected. This should contain an active administrator account, but create an additional account for current use without a password, but also without privileges.
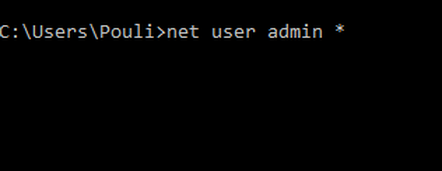
At primary booting windows a command console will appear asking you to enter secret data: write down the username (assigned to your account), then just put an asterisk (press SHIFT + 8 at the same time) ”, then press three times "Enter". Remember sbeginnings in the command line must be separated by a space.
How to do it and what advantages and disadvantages it brings will be the subject of the next column. The ability to create custom user interfaces for an administrator account is one of the functions that dynamically assign to a user. This means that, roughly speaking, a family can use the same computer, changing only the name of the machine during the login process.
It is clear that the preferences of each user can be protected with a password. Therefore, there is no need to enter your security code every time you start software. In this lesson, you will learn how to manage user accounts to eliminate the need to enter a password when you turn on the computer.
We are sure that you will succeed. However, do not neglect, albeit a primitive method of protection, which is the password for the account, but still ... Be reasonable in your actions and all of you safe!
Password is the basis of the security of any systems that helps to block the computer from third parties who intend to use it. Neglecting safety, you consciously assume all the possible consequences of your actions. It often happens that it's too boring to enter a password, especially when you are the sole owner of the computer. So how to remove the password when logging into Windows 7?
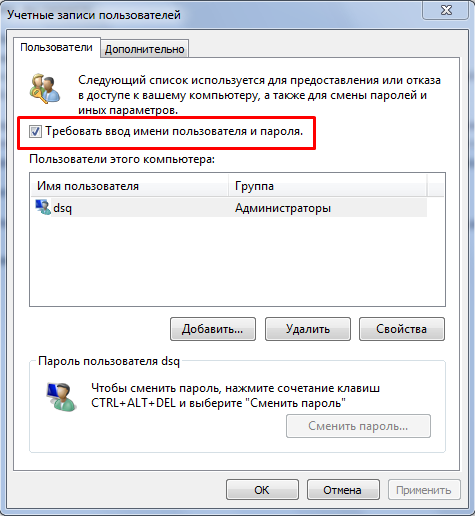
Click the Run Command button. Notice that the User Accounts window opens. Make sure you are logged in to the administrator account and then manage the user’s security settings. Click on the name of the profile for which the password function will be disabled, and uncheck the box "Users must enter a username and password to use this computer."
To repeat the request for a security code report, repeat the procedure described above, but enable the option "Users must enter a username and password to use this computer." Do you want to change the security code? Computer name is easy to get from. Uncheck the box at the top: “Users must enter a username and password to use this computer.”
Before you remove it, let's get acquainted with the advantages of such a system.
To achieve the desired result, it is not necessary to remove your password set for the account, there is an option to create a new account.
Thanks to such actions, you can:
- Be protected from unwanted computer use;
- Log in to an unsecured account;
- Protect your PC from the malicious actions of certain viruses that cannot be executed without the required access level.
Such an alternative exists, and within the framework of this article we will briefly consider it; read in more detail in the next publication. But for starters, we will perform actions related to the immediate topic of the article. To achieve the desired result, you will need access on behalf of the administrator and, of course, the password for the recording during the procedure.
This is the easiest method. Repeat to create the following values. If the computation is now addressed to the entire family, it necessarily includes some problems, such as sharing a single computer between several people. The most obvious example is setting up a computer: the whole world will not want to have the same wallpaper, the same screensaver, and so on. Of course, there are themes that allow you to save all these settings, but changing the theme every time you use your computer will quickly become painful, and with regard to software, personal files, etc.
Disable password requirement when logging in Windows 7
1. Open the “Run” line, here the administrator rights will come in handy, without them you won’t get access, press Win + R;
3. You get to the “User Accounts” window, all user accounts created earlier are presented below, select the necessary one and uncheck the box “Require username and password”;
Direction Control Panel
In short, it is sometimes necessary to be able to split users on one computer. At the beginning of the computer, the user will be able to choose his personal account and thus not encroach on the platforms of his neighbors. The goal is that at the end of this chapter, two users share a computer. Then the computer startup screen offers two options. Let's start from the beginning: creating a user account. The section that interests us is as follows.
![]()
Click Add or Remove User Accounts to go to the User Management page, which displays all existing user accounts on the computer. A priori, you should only have two accounts: yours and your Guest account.
 4. After that, apply the specified changes, you will be asked to enter the old password to confirm these actions.
How to convert GPT to MBR?
There is also another method, it is almost identical to the previous one, except that it does not need to use the command line to search for the account settings window.
Standard user or administrator?
A guest account is a special account that we will return to now. Ignore him for now. Existing accounts. 
Below, you must select the type of account: “Standard user” or “Administrator”. Choosing an account type is very important because it determines that new user may or may not be able to do. As you can imagine, an administrator account will have more rights than a standard account. Let's see what this means in practice.
The method also differs in that you do not remove the requirement to enter a password before starting the system, but delete the password, thereby removing the need to ask for it.
How to remove a password?
Starting requirements are the same, access to the administrator account and password of the desired account.
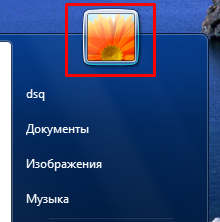
1. The most affordable way to get to the right menu is to click on the picture denoting your profile picture. In the current account, for this, open the "Start" and click on the picture, go directly to step 3;
Have you ever noticed small shields that ran around the control panel? We just came across one. This means that only the admin user can access this configuration item. The user account created by default is the administrator. You are the administrator of your computer, and, fortunately, who can be in your place if not? However, at school or in the office, you do not have to be an administrator.
If a standard user tries to access the marked functionality of a small screen, a pop-up message appears asking for the password of the device administrator account. 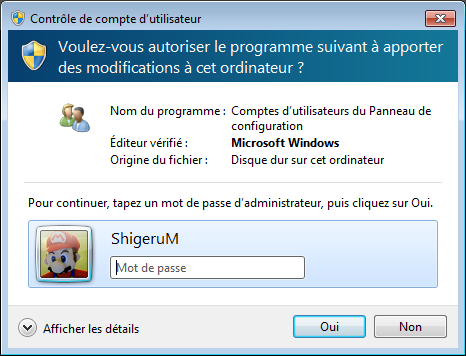
Another limitation of standard accounts is file access, because an administrator can access all files and folders on a computer. On the other hand, a standard account will not be so free: for example, it will not be able to consult personal files of other computer users.
 2. This item has the right to life, because in some versions of topics used by third-party developers, there is no such window, you should go the other way:
- Click on the Windows sign in the lower left corner, “Start” should open, select the “Control Panel” option;
- Find, often below, “User Accounts” and click on it.
 3. Go to the “Delete your password” tab;
 4. Enter it in an empty line, and click "Delete Password";
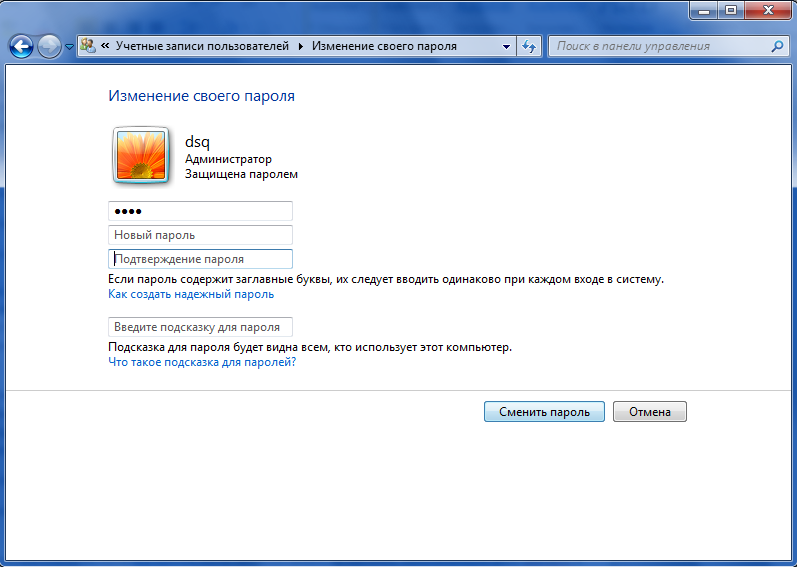
 Another, similar to this option may be: instead of deleting the code (point 3), go to “Change your password”, enter the outdated password, and leave a place for a new one, so the password will simply not be empty.
 Sometimes the option does not work out to the end, the computer asks you anyway for a password at the entrance, but allows it to the account by simply pressing Enter, without a password. If you have such a problem, then use the first method by disabling windows function responsible for requiring a password at login.
Creating a Windows 7 Account
1. Open the account settings menu, as we did just now, and click "Manage another account";