Resolution in Photoshop. What is DPI?
What is DPI on the mouse and how can I configure it?
Is there such a concept of "DPI on the mouse"? DPI is dot per inch. What are the points in the mouse? After all, this is for the printer. So what is DPI on the mouse? Is it sensitivity? If so, is it possible to configure it (this DPI) on an arbitrary mouse? The driver there is special or windows setup... Thanks in advance.
Maria asked this question February 17, 2015
person | January 8, 2016, 14:35
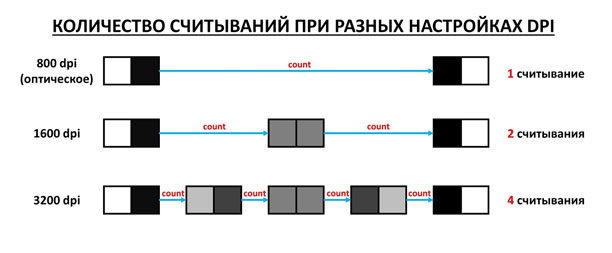
in fact, it’s more correct to call this mouse parameter CPI (counter per inch). However, this notorious DPI has taken root, so we will say this. DPI is related to mouse sensitivity; more precisely, it significantly affects mouse sensitivity. This is one of two parameters that determine the final sensitivity that the user feels. DPI (CPI) characterizes how many minimum steps (counter) a change in the position of the mouse while moving it per inch is detected by its sensor.
lty | August 4, 2015, 13:00
dude above thing says
Greagor | February 20, 2015, 13:10
In fact, it is more correct to call this mouse parameter CPI (counter per inch). However, this notorious DPI has taken root, so we will say this. DPI is related to mouse sensitivity; more precisely, it significantly affects mouse sensitivity. This is one of two parameters that determine the final sensitivity that the user feels. DPI (CPI) characterizes how many minimum steps (counter) a change in the position of the mouse while moving it per inch is detected by its sensor.
It sounds somewhat absurd, but now it will be clear. Suppose we have a mouse with a DPI of 1000. Thus, moving it 1 inch (2.5 cm) horizontally, we tell the computer that we need to change the cursor position to 1000 “changes”. But how to interpret these changes is solved using the driver settings.
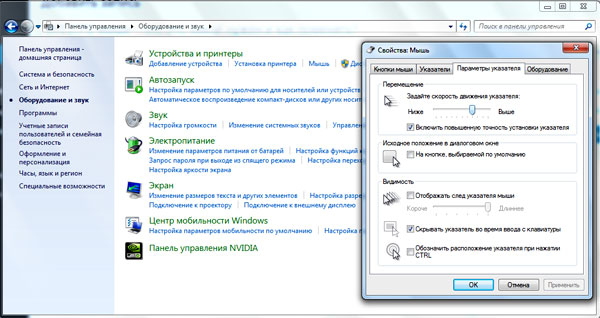
In its simplest form, this setting can be found in Control Panel - Mouse - Pointer Settings (for Windows 8). Here in the section "Moving" there is a slider "Set the speed of the pointer." This is the factor that characterizes how many pixels on the monitor will accommodate one minimal "change" in the position of the mouse. If this factor has a value of 1, then for a movement of 1 inch of the mouse, we will have a cursor movement of 1000 pixels. If this factor stands at 0.5, then for the same inch of mouse movement we get a cursor that runs 500 pixels across the monitor.
Thus, combining this parameter and the DPI of the mouse, we can achieve a comfortable cursor positioning. Please note that for different physical sizes of the monitor and different resolutions, comfortable factors for work will be different. For example, if you have a monitor with a resolution of 2000 pixels, then dragging the cursor across the entire screen with a low DPI and a low pointer movement factor can be extremely tiring and inconvenient.
You can increase the DPI on the mouse only if it supports this function. On these mice, as a rule, there is a DPI button. She switches modes. Most often, such mice have two DPI options, but individual game models may have more. The button is needed to quickly change the sensitivity. For example, for more accurate aiming in sniper mode shooters or the same WoT.
This is a question from the archive. Adding responses is disabled.
- Transfer
Windows, starting with Vista, provides two mechanisms for adapting applications to monitors with high pixel density (dots per inch, DPI): enlarged system fonts and full-blown windows. Unfortunately, an attempt to get some of your applications to work in any of the modes may be unsuccessful, due to a combination of negligent developers and poor decisions made by Microsoft.
This page is designed to help users understand and correct, possible problems when setting high DPI values. Please note that we will only consider traditional Windows applications, not the Windows Store ("Metro", "Modern UI") applications. The latter use the new WinRT API, which provides its own scaling mechanism.
From translator
The following abbreviations are applied in this article, which I did not consider appropriate to translate: Graphical User Interface (GUI), Dots per Inch (DPI), DPI-Aware applications - applications that can display their GUI correctly, without distortion, without distortion, Device Graphical Interface (Gdi). My comments (in italics). Scaling methods
Traditionally, native Windows desktop applications use two display mechanisms: - Graphical Device Interface (GDI) functions for accessing the display. Typically, GDI coordinates are measured directly in the pixels of the screen, regardless of monitor size and pixel density.
- And text output using Windows system fonts. This is optional, but most applications use system fonts for most of their graphical user interface (GUI).
To remedy the situation, Microsoft decided that it would be nice to build some kind of scaling method in Windows. One of the two methods described below (Windows XP or Vista) is used when the user sets a DPI with a value higher than the standard 96 dpi. Both methods try to increase the size of image elements.
Windows XP-style scaling
The first of these methods, as you might guess, appeared in Windows XP. This method, in fact, is not a method of scaling applications with a graphical interface per se. Scaled, with higher DPI settings, only system fonts and some elements of the system user interface (I would call it a "NOT scaling method" in the style of Windows XP).All other application elements are still displayed at a 1: 1 scale. The only difference in their appearance is that any text and some GUI elements displayed using system functions suddenly become larger. For example, the text on the buttons. This causes obvious problems that we will discuss a bit later.
Windows Vista-style scaling or DPI virtualization
Windows Vista introduced a second option with a strange name, “display scaling,” without any clarification, apparently to completely confuse users. We will use a more descriptive name - the method DPI virtualization. When this method is enabled, Windows still performs Windows XP-style scaling. As before, the sizes of all system fonts and some elements of the system interface are increasing. The difference is that applications that can correctly use high dPI valuesmust report this to Windows. Such applications should set a new DPI-Aware flag, either by calling the Win32 API "SetProcessDPIAware" function, or, preferably, by embedding a manifest with the dpiAware flag. But if the application does not have a DPI-Aware flag, Windows behaves differently, first it forms an internal display at a scale of 96 dpi (emulating for a DPI application equal to 96)and then it scales the resulting image in accordance with the current DPI settings before displaying it on the screen.
It would be a fantastic scaling method if all of our monitors had the pixel density of the latest iPhones (326 dpi). Unfortunately, it is not. Application windows scaled in this way look a bit blurry, with the popular resolution of 120 dpi (@homm is not a resolution, by the way). Therefore, Microsoft disables DPI virtualization by default if you select a pixel density less than or equal to 120 DPI.
How to change DPI settings
In Windows 7/8, open the Control Panel, then select Appearance and Personalization, then Display, and finally select Set Font Size (DPI) (Windows 7) or Custom Size Options ( Windows 8). You will see the following dialog box (Windows 7, in Windows 8 is almost identical): 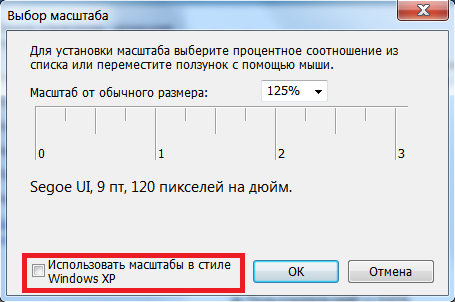
You can select from the drop-down list. desired setting DPI as a percentage, where 100% corresponds to 96 DPI, 125% - as in the screenshot, corresponds to 120 dpi (you can more accurately record the value manually). Prior to Windows 8, the actual DPI (“pixels per inch”) was displayed next to the size of the system font. Windows 8, for unknown reasons, does not show the DPI value, so you have to calculate it yourself.
You can also attach a ruler. (which has a scale in inches) to the screen, and try to combine the markings on it with the markings on the screen, changing the value in the drop-down list. The checkbox circled in red below determines whether to use only scaling in the style of Windows XP, or also a new way of DPI virtualization. If the checkbox is not checked, as in the screenshot, then DPI virtualization is enabled.
Recitation. This dialog box is an example user-friendly interface. At first glance, it seems that this is a flag to disable scaling in the style of Windows XP. But this scaling method (which only increases system fonts and other elements of the system’s user interface - scaling Windows XP) is always enabled when a high DPI value is selected. In fact, this flag controls whether this method will be the only one (Use only Windows XP style), or the DPI virtualization method will also be applied for applications that do not have a DPI-Aware flag. So this flag does not control the scaling method specified in its name, but controls a different scaling method not mentioned anywhere - and allows you to use the new method when the box is unchecked!
Error in Windows 8. In addition to this, in Windows 8, this error dialog box appears. As a rule, everything works as in Windows 7, but the state of the flag is not saved at DPI values \u200b\u200bof 150% and higher. When you check this box, DPI Virtualization is turned off correctly. However, the checkbox itself remains unchecked the next time you open this dialog.
Changes in Windows 8.1, or why is everything blurry?
In Windows 8.1, the flag for scaling in the style of Windows XP disappeared, and now “DPI virtualization” is never used at DPI values \u200b\u200bup to 120 inclusive, but is always used at higher values \u200b\u200bfor those programs that do not have DPI-Aware flag. If some applications seem fuzzy to you, you must manually disable DPI virtualization for them. Windows 8.1 allows you to use multiple monitors with different DPI values. However, this feature also forces the use of “DPI virtualization” for traditional applications that move between monitors with different DPI values. To avoid this, you can disable the DPI scaling in the DPI settings using the new option “I want to select one scale for all displays”.
Windows 8.1 also adds a special switch to configure 200% and a new API so that developers can selectively disable "DPI virtualization."
Help, my system fonts are not the right size!
Sometimes, after changing the DPI settings, you may notice that some system fonts become too large or too small for new installations. The likely reason is that you are using a custom desktop theme based on your old DPI settings. Windows does not scale custom theme fonts. If you actually created a custom desktop theme and want to save it, you will have to adapt the fonts yourself to the new DPI settings. However, Windows has the annoying habit of “helpfully” creating custom themes without your knowledge, for any reason. So if you have never created a custom desktop theme, just delete it and return to the standard theme.
In Windows 7/8, open the Control Panel, select Appearance and Personalization, and then Personalization. If you see the selected entry in the "My Themes" line, this means that Windows is using a user theme whose system fonts Windows will not scale. Select a standard theme, for example, the first entry in the Aero Themes (Windows 7) or Windows Default Themes (Windows 8) section and delete the unwanted entries in the My Themes section. Now, all system fonts should display correctly.
Types of applications, how they scale (or not scale)
Now let's look at what methods should be used for existing Windows applications at high DPI. The following table summarizes, later we will consider various cases in more detail. DPI-less applications at all - it is either very old or poorly written, but, nevertheless, still used. One famous example is Apple's iTunes for Windows. Here, developers use system fonts for the GUI and, without worrying about the actual font size, they rigidly bind window sizes to 96 DPI, naturally distorting the GUI when font sizes increase at higher DPI values.
Such applications require a new method of scaling "DPI virtualization", unfortunately, this often makes the interface blurry. Otherwise, you will encounter problems ranging from trimming text to overlapping controls, sometimes making the GUI completely unusable (fortunately, this rarely happens). Over the years, I have collected several sample screenshots of incorrect applications.
Sample application, works only with DPI equal to 96
Resolution 150% (144 DPI)
Applications that can adjust their GUI to different DPI values, but do not have DPI-Aware flag - These are typical applications of the Windows XP era. Here, the developers took care to get the actual font sizes of the system before creating the GUI. Such applications are displayed correctly when using scaling in the style of Windows XP. Unfortunately, since they do not set the DPI-Aware flag to tell Windows this fact, for them, by default, “DPI virtualization” will be used, making their GUI fuzzy. You may not like this, so you might want to force the Windows XP scaling style for such applications.
An example of such an application and a resolution of 150% (144 DPI)
Applications that can adjust their GUI to different DPI values, having a DPI-Aware flag - This is the latest type of application that is completely hassle-free, regardless of the DPI settings. The DPI-Aware flag is set automatically for Windows Presentation Foundation (WPF) and GDI + applications, as these APIs provide built-in scaling tools. Developers using the old GDI API and (surprisingly) Windows Forms need to manually flag their DPI-Aware applications.
Applications not adapted for DPI change, but having DPI-Aware flag - This is even worse than completely ignoring the DPI value. In the examples, you will find GUI applications that scale well up to 120 DPI, but not higher, or JavaFX applications. Here we can’t do anything, because we have no way to force Windows to use DPI virtualization for such programs. Once the DPI-Aware flag is set, the application must scale itself. We can only “saw” the developers to fix their product - or use something else.
Choose a scaling method for your applications
Once you decide that you want to use a high DPI, your choice of scaling method depends on the applications in which you work. Keep in mind that disabling “DPI virtualization” means checking the box (check box) with the incorrect name “Use Windows XP-style scales” and vice versa. - If you are so incredibly lucky to use only those applications that are both DPI-Aware and set the desired flag, then it does not matter which scaling method you choose. All applications will use Windows XP-style scaling, and DPI virtualization will never be used.
- If you use only well-written DPI-Aware applications, but some of them do not set the necessary flag, you can turn off “DPI virtualization”. Thus, all applications will display correctly without any blurring due to scaling. If your monitor has a very high pixel density such that scaled bitmaps no longer look blurry, you might want to enable DPI virtualization anyway.
- If you have one or several applications that are not adapted for changing DPI and do not have DPI-Aware flag, you need to enable DPI virtualization if you are not ready to put up with skewed GUI applications. Unfortunately, another problem arises here, because Microsoft has implemented this option inconveniently. You can enable DPI virtualization only for the entire system, not for a single application, and then selectively disable it for individual applications.
We remind you that in Windows 8.1 there is no longer any choice in this matter. If you work at a resolution of 120 dpi (125%), each program will be forced to use Windows XP-style scaling, and if you work at a higher resolution, each program that is not DPI-Aware will use the default " DPI virtualization. "
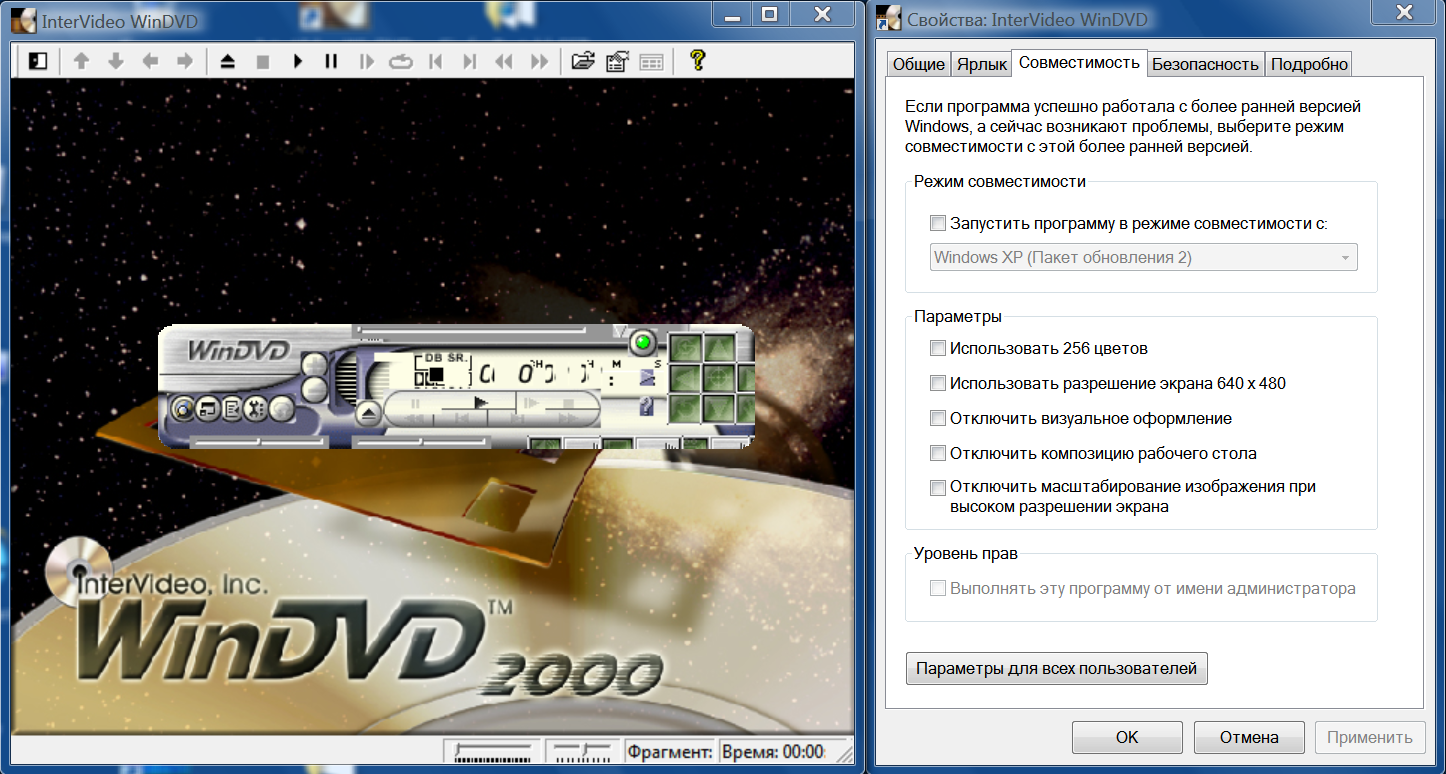
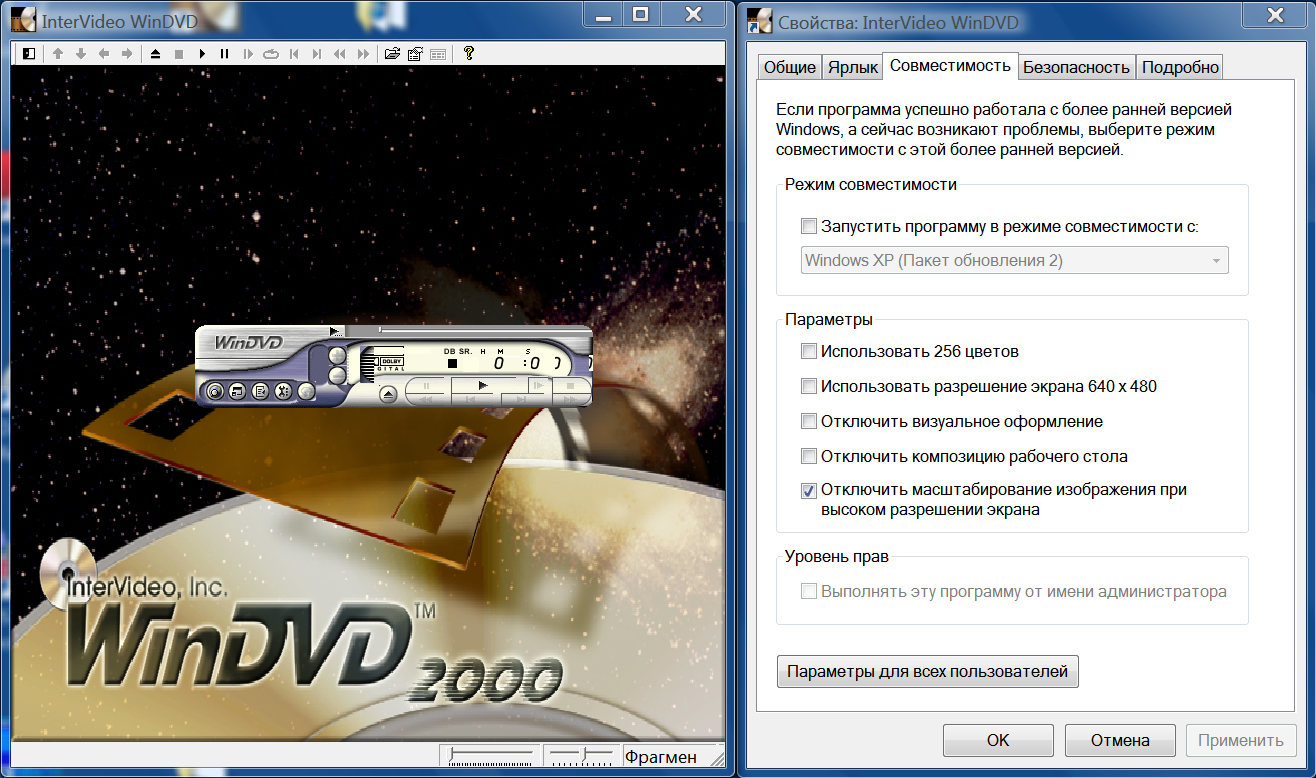
Opt-out DPI virtualization for individual applications
After you decide to enable DPI virtualization or you are running Windows 8.1 with a resolution of more than 120 dpi, you can check the system for DPI-Aware applications that do not have a corresponding flag. And give them back the ability to use Windows XP-style scaling for which they are intended. There are two ways to do this, the first works only for 32-bit applications, the second is universal and also suitable for 64-bit applications. 32-bit applications - It's simple: right-click on the executable in Windows Explorer, select the "Properties" dialog box, go to the "Compatibility" tab and select the "Disable image scaling when high resolution screen. " That's all, in Windows 8.1 it also works for 64-bit applications.
64-bit applications - For no apparent reason, it is possible to annoy users of 64-bit applications, in Windows 8 and earlier, the flag mentioned above is disabled for 64-bit applications, although the option itself is quite functional if you make changes directly to the registry! So, start the registry editor and go to this key:
HKEY_CURRENT_USER \\ Software \\ Microsoft \\ Windows NT \\ CurrentVersion \\ AppCompatFlags \\ Layers
Now add the string value (REG_SZ), whose name is the full path to the application executable and whose value is HIGHDPIAWARE. I recommend that you first modify several 32-bit applications, as described above, so that you can see some example values \u200b\u200bin this registry key.
We looked at how DPI settings can be used on Windows Vista and later. And if you ever wondered what the compatibility option is for - "Disable image scaling at high screen resolution." And why it doesn’t do anything on your system, now you know: it is effective only if you have the system-wide option “DPI virtualization” enabled and only for applications that don’t set the DPI-Aware flag properly, but use the scaling correctly in Windows XP style.
Further reading
For more information about both scaling methods from a developer perspective, see the MSDN article Writing High-DPI Win32 Applications. This content has moved to Writing DPI-Aware Desktop and Win32 Applications. This lengthy article also contains a sample manifest to declare an application as DPI-aware, as well as sample screenshots for the various scaling methods and tips on display scaling in native code. Add tags Instruction manual
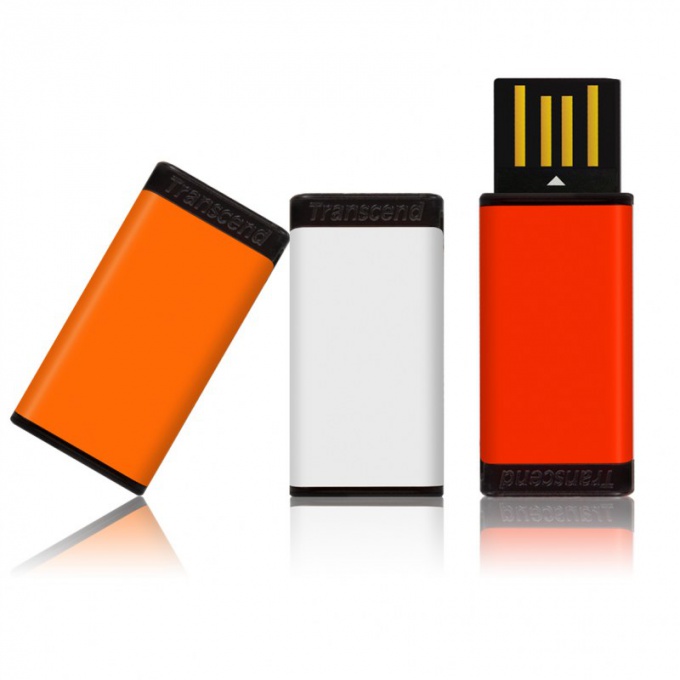
Reduce Removable Drive Size with Split flash drives into two sections, one of which must be the volume supported by the device. The second section will be hidden, you can copy any information into it - you can open it only on the computer. Also, some programs do not encrypt a partition when performing a partition; in this case, the connection of two devices is recognized.
There are many suitable software utilities to perform this action; use, for example, Acronis or Partition Magic. Please note that many of them are not free, so you will also need to purchase a license to perform actions with a removable drive.
Go to the program menu and format your removable drive, after making a copy of the files on it on hDD computer, if necessary.
Create two partitions and encrypt one by setting a password. Format the second section in the file system supported by the device (for more details, see the user manual).
Copy the files you need to work with the drive to its insecure partition. After that check the operation flash drives. If it is still not recognized by the system, try formatting it in another file system.
Also, first make sure that the disk is fixed, it does not have bad sectors, the USB-connector of the device is working properly and so on. Also specify the size when staking up to bytes. Be sure to not mix up partitions.
Also check your removable drive for viruses and check if other flash cards are readable in the device. In the future, just purchase a small drive instead of manipulating ordinary flash drives.
Flash drives are increasingly being introduced into our lives. Small and comfortable, in the form of trinkets or imitations of other objects (in the form of bulbs and lips, folding knives and funny figures), they have become an integral attribute of our lives. In order not to lose data, you need to make copies of flash drives.
You will need
- - a computer;
- - flash drive.
Instruction manual
Surely each user had a situation in his life when he tried to drop a large file (HD movie, for example) from his computer, but he couldn’t even transfer a 5 GB file to an 8 GB USB flash drive. Imagine the bewilderment of a person who does not fit 7 liters in a 10 liter bucket.
The same situation turns out for a person who bought a first flash drive and is unfamiliar with file system FAT 32, which is simply not able to save a file larger than 4 GB on a flash drive. It is also worth noting that this system must be formatted in NTFS.
In any case, you must periodically make a backup a copy the entire contents of your flash drive. In Windows 7, in the "My Computer" menu, right-click on the "Removable Disk" icon corresponding to your USB flash drive. In the context menu that opens, left-click “Copy”, then right-click the folder or logical drive where you want to save data with flash drives. Next, click "Paste" with the left mouse button.
A bar should appear showing the progress of copying files. If the strip did not appear, it means you did something wrong or the size of the copied files was small, and it simply did not have time to appear. To check, go to the folder where you copied the contents flash drives and check if there is information there. And remember that backups need to do constantly. Only then can you protect yourself from at least some of the chagrin associated with the loss of information.
Many devices, such as DVD players, do not support removable media with a large amount of memory. For this, the purchase of a new flash drive is best, but there is the possibility of reducing its volume.
You will need
- - A program for breaking media into sections, for example, JetFlash.
Instruction manual
Copy all the information you need from the media to the hard drive. Go to "My Computer", right-click on the USB flash drive and select the "Format" action. Best of all, do not check the box next to clear the header.
Install the downloaded program on the computer, following the instructions of the installer menu. Run it, if necessary, reinsert the removable media into the slot on the computer. When the media appears in the list of devices, select the type of action that you want to perform on the disk, in this case, the breakdown into volumes or partitions.
Find out how much should be one of the parts on your flash drive. After that, create a partition with the appropriate memory size. Be careful: some programs, when breaking removable drives into volumes, leave open access to only one of its parts, it is best if the device is intended for use not on a computer.
Set a password for the part that will not be involved in the process. Be careful when specifying the password, since in the future it will be needed not only for accessing files, but also for operations with the partition.
Format the created partitions individually. The one that you will not need in the future, fill in with any information, it is best that it be data of the same content. Next, when you connect the removable media to a personal computer, you will see two different devices. The autostart function will also appear again for the second disk.
note
Be careful when specifying the volume of the section.
Helpful advice
Do not use technical methods to reduce memory, for example, by removing chips.
Sources:
- how to reduce the size of a flash drive
Despite the fact that operations with the transfer of information are not difficult actions, a large number of users often have problems. As practice shows, a particular difficulty is the extraction of information from portable media.

You will need
- - a computer;
- - USB drive;
- - information on a flash drive.
Instruction manual
First of all, prepare the media, namely the USB flash drive you want to remove information. On the computer this operation can be produced in several ways. Insert the USB into a dedicated socket on the computer. After a few seconds, the device will be automatically read, and a menu will appear in which you will need to choose how to use the media.
Click on “Open File Explorer”. This is the best option, since you need to see all the files that are stored on USB device. You can also open My Computer. Next, select the USB flash drive by right-clicking and click on "Open via Explorer."
Browse all the files you need to extract. Try to place everything in folders so that in the future there are no problems with the search for this or that information. Next, open on the computer’s hard drive the folder where you will need to extract all the files from flash drives. Then roll it up, or just reduce the size.
From a flash drive, drag and drop files. Take the file from the USB drive and transfer it to a folder on the PC hard drive. If you need to transfer all the files to your computer completely, you can press CTRL + A to select all the folders and files. Next, press CTRL + C to copy. Open the folder on your computer, and press CTRL + V. You can also right-click and select "Paste."
In the same right field, compression options will appear. The most optimal of them is for documents. If you select it, your photo will be compressed and fit in the size of 1024x768 pixels. You will also see a warning below that the image is not suitable for printing photo quality. But quite suitable for viewing with friends on
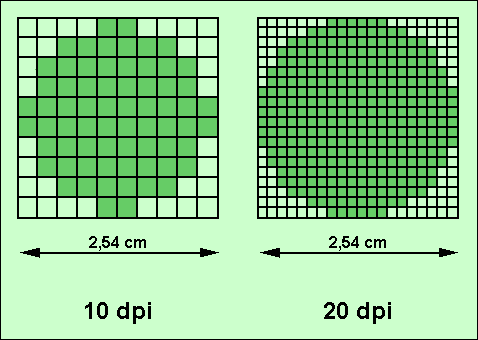
In this article I will tell you what DPI is and how to adjust it on the mouse. DPI (Dots per inch) or, if right, CPI (Counts per inch) is a term that describes the number of pixels that the cursor moves when you move the mouse (fixed by the displacement sensor) by 1 inch. The second definition is more true because it means “shifts by”, and DPI means “dots per inch”, which is typical for describing the sharpness of an image. But since the first abbreviation is much more popular, it will be used in the text.
DPI of a mouse - what is it and how does it work?
One of the characteristics that is written on the packaging of the mouse is DPI. As its value, depending on the model of the device, it can be indicated - 600, 800, 1600 and higher.
The higher the DPI value, the more accurate is the optical mouse sensor, which is responsible for detecting movement. Accordingly, when moving the mouse over the surface, the cursor on the screen will more accurately and smoothly repeat this movement.
If the DPI value of the optical mouse sensor corresponds to, for example, 1600, then this means that when you move 1 inch, the cursor can move 1600 pixels. Therefore, the higher this value, the cursor on the screen is able to move faster.
Which DPI mouse is better to choose?
The choice of mouse is determined by the conditions in which and how the person will use it. First of all, you need to take into account the screen resolution on which the mouse will control the cursor. If the display has an HD matrix, then enough devices with a sensor at 600-800 DPI. If the screen has FullHD (or close to it, for example 1600 by 900) resolution, then a mouse with a DPI of 1000 is suitable. The cursor on QuadHD (2560 by 1500) is most conveniently controlled using a device with an optical sensor at 1600 DPI.
Now we will understand the scope. Users who need high accuracy and smoothness (for example, gamers and designers) need a mouse with a higher DPI. Everyone else can take a mouse based on screen resolution (the criteria are indicated above).
Gamers and designers, of course, should also buy devices based on the clarity of the display, but with some amendments. For example, for FullHD it is recommended to take a mouse with a sensor resolution of 1600 DPI. I hope you understand that this is DPI in a computer mouse, now let's talk how to change its value.
How to change the DPI value for an optical mouse?
On some more expensive devices, there is a switch directly on the case that allows you to quickly change the resolution of the sensor. However, if one is missing, DPI can still be changed.
To change the DPI value in order to speed up or slow down the cursor, you need to go to the operating system settings.
- In Windows, to do this, open the "Control Panel", go to the "Hardware and Sound" category and select "Mouse."
- In the window that opens, go to the "Index Settings" tab.
- There, find the “Move” item and, in the “Set the pointer movement speed” sub-item, move the slider to a specific place: the right is faster, the left is slower.
- Click on "apply", after which you can check the speed of the pointer.
- If it does not suit you, you will have to repeat the procedure described again.
You need to understand that if this DPI value, set by software, is higher than the hardware capabilities of the sensor, the cursor will begin to move jerkily. This, as a rule, is not critical for ordinary users, but it can cause problems for gamers and designers. If the information in the article turned out to be small, I advise you to watch the video below, which describes in detail what this DPI indicator is.
DPI video review
In contact with